Introduction
Here you will find everything you need to set up and use your Start9 server. For additional help, contact support.
📘 User Manual
- Initial Setup
- Trusting Your Root CA
- Connecting Locally
- Connecting Remotely
- Installing Services
- Gateways
- DNS
- Private Domains
- Creating Backups
- Restoring Backups
- Updating StartOS
- Sending Emails
- SSH
💾 Flashing Guides
💻 Device Guides
📱 Service Guides
📚 Misc Guides
- Setting up Dynamic DNS
- Using StartTunnel
- Getting SMTP Credentials
- Resetting Your Password
- Upgrading from a Raspberry Pi
- Migrating LND to StartOS
- Firefox Guides
- Thunderbird Guides
📦 Packaging Guide
❓ Help
📘 User Manual
- Initial Setup
- Trusting Your Root CA
- Connecting Locally
- Connecting Remotely
- Gateways
- DNS
- Private Domains
- Creating Backups
- Restoring Backups
- Updating StartOS
- Sending Emails
- SSH
Initial Setup
-
Connect your server to power and Ethernet. If you do not have access to Ethernet, click here. You do not need to connect a monitor or keyboard to your server.
-
From a client computer connected to the same Local Area Network (LAN) as your server, open a browser and visit http://start.local. This client computer can be a laptop, desktop or mobile device.
-
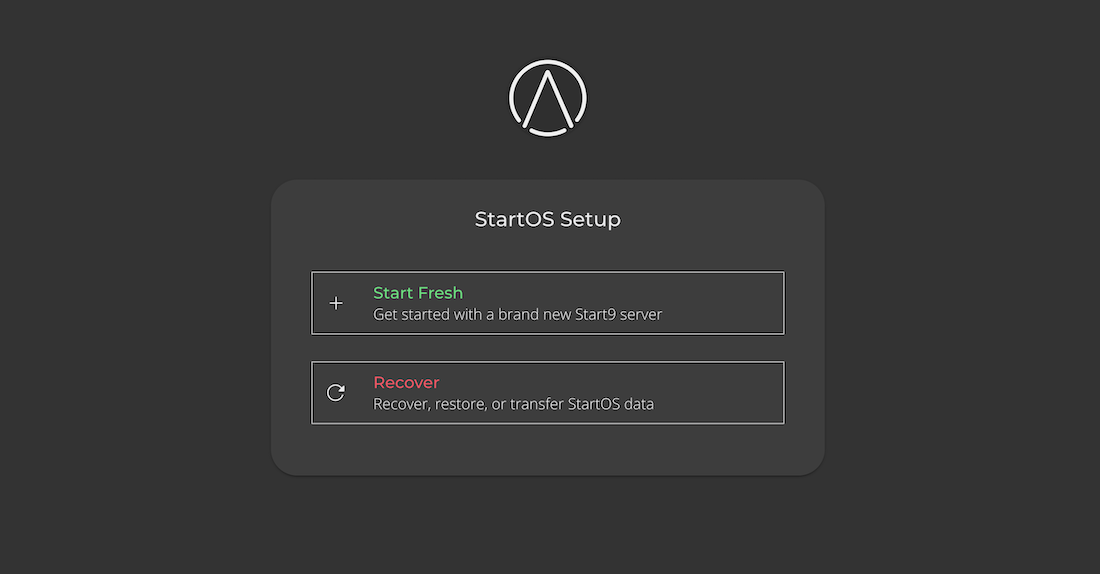
Select “Start Fresh” and follow the on-screen instructions. If you need to recover existing data, see below.
Recover Options
There are three options for setting up StartOS while also keeping existing data.
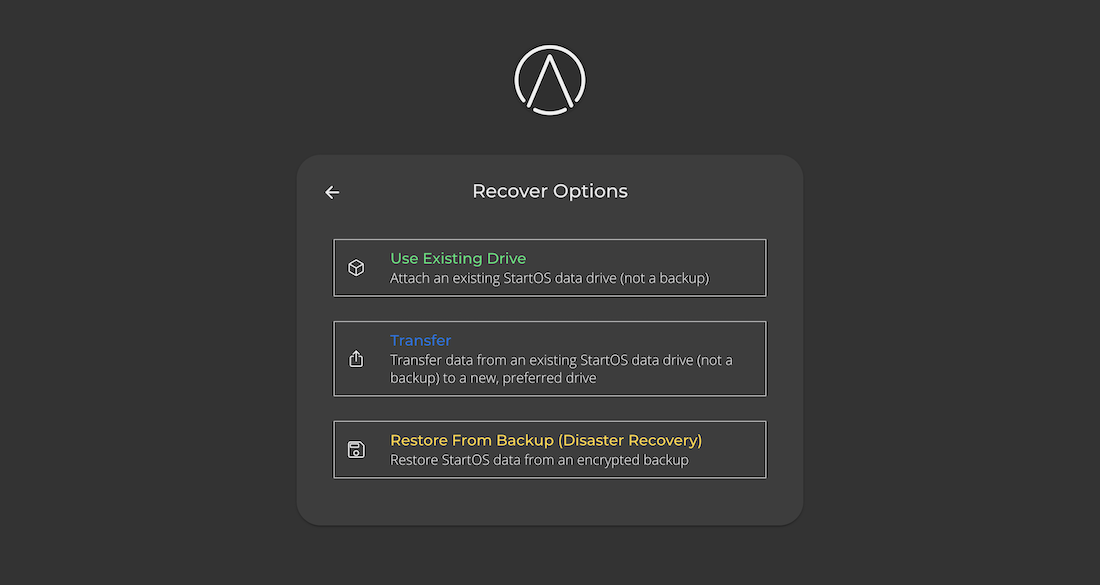
Use Existing Drive
Select this option if:
-
You have re-flashed StartOS and want to resumt normal operation on the same drive and server.
-
You are physically transplanting your data drive to a new server.
Transfer
Select this option if you are transferring your data from one drive to another.
Restore from Backup (Disaster Recovery)
Select this option only if your StartOS data drive has been lost or corrupted. This is for disaster recovery only.
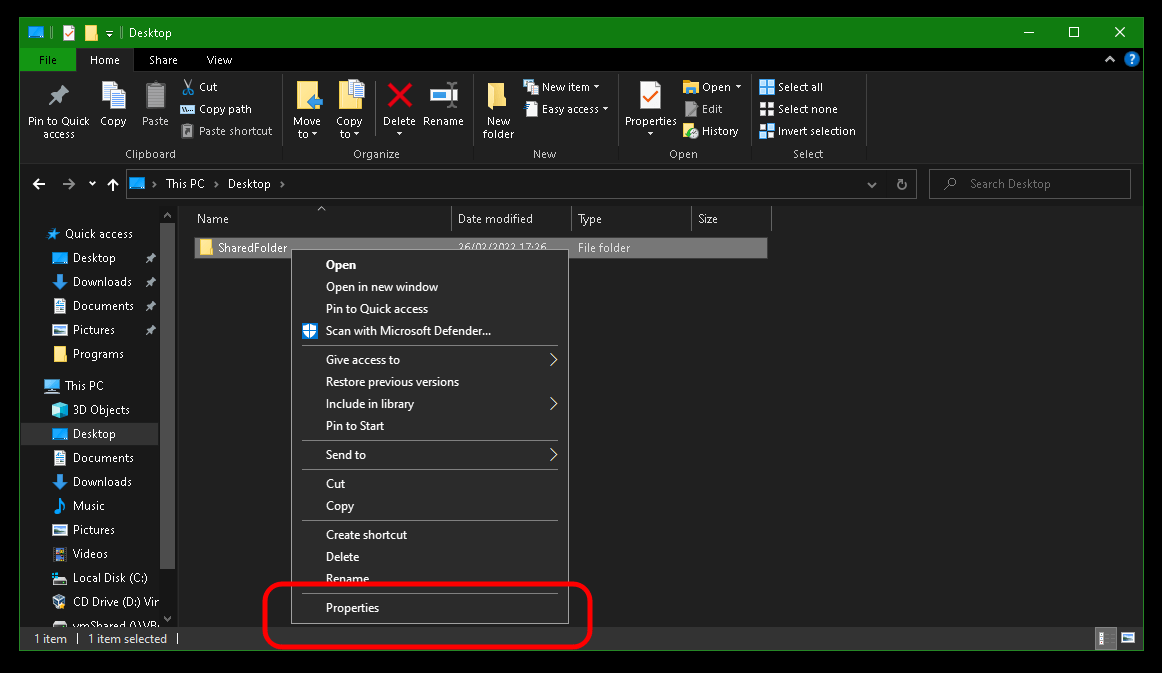
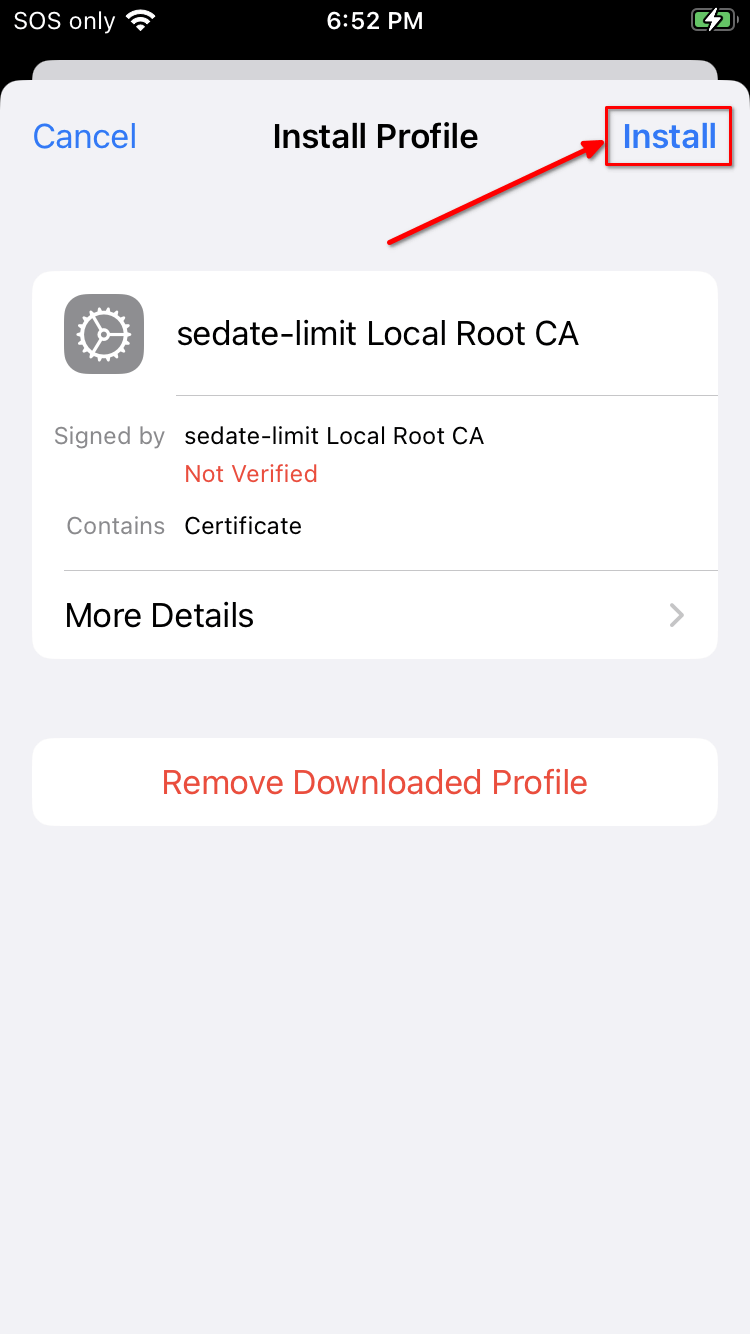
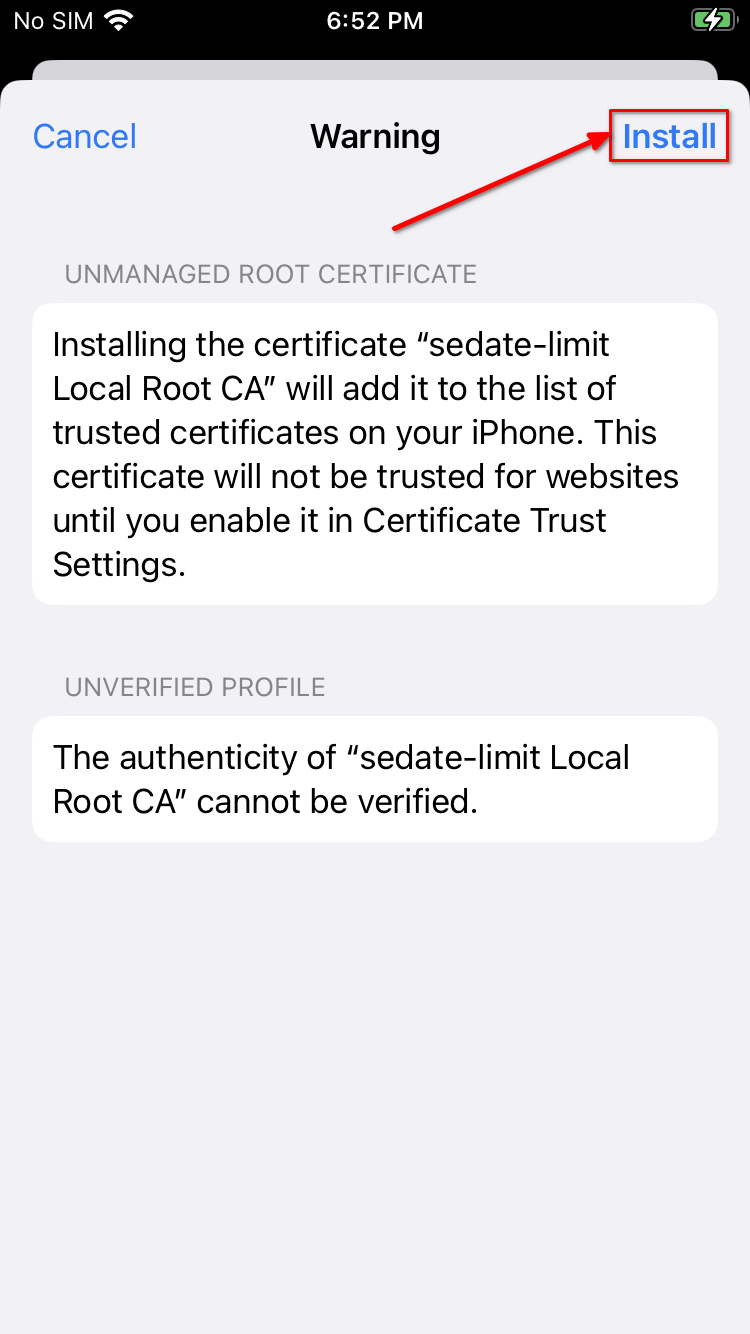
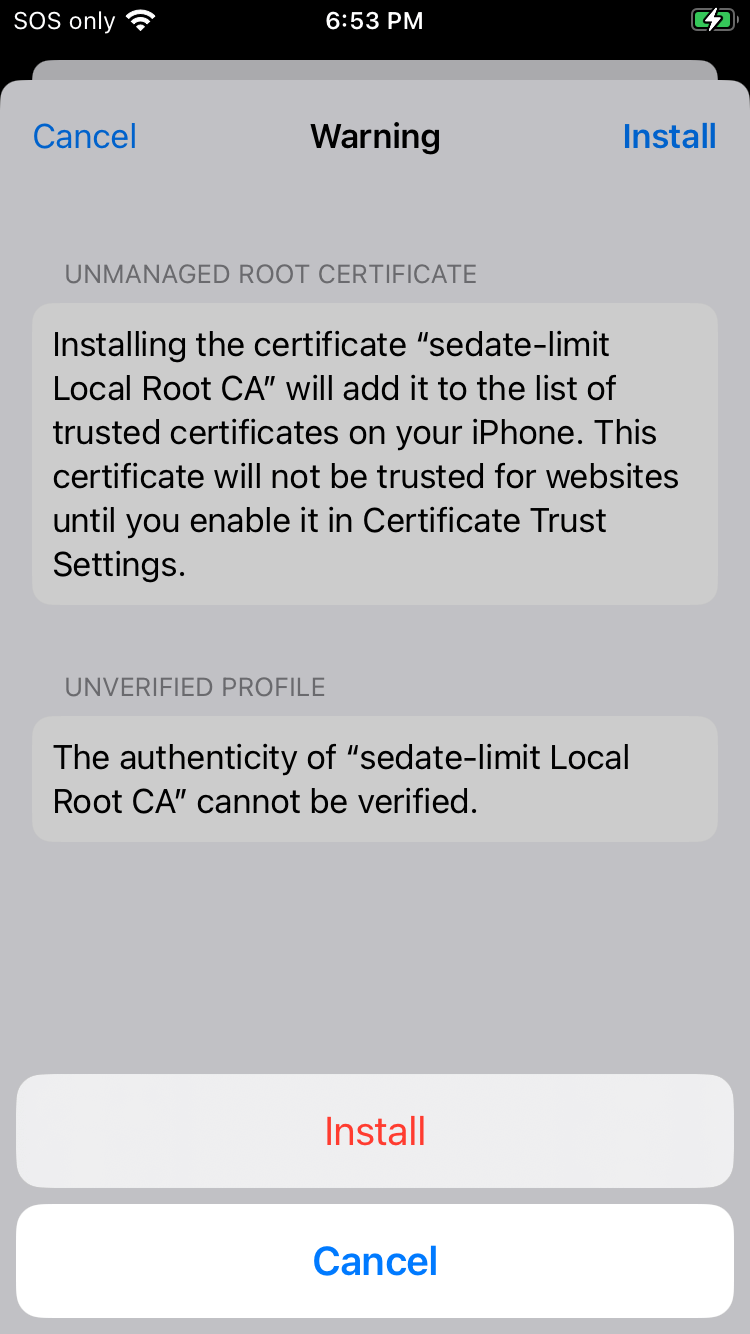
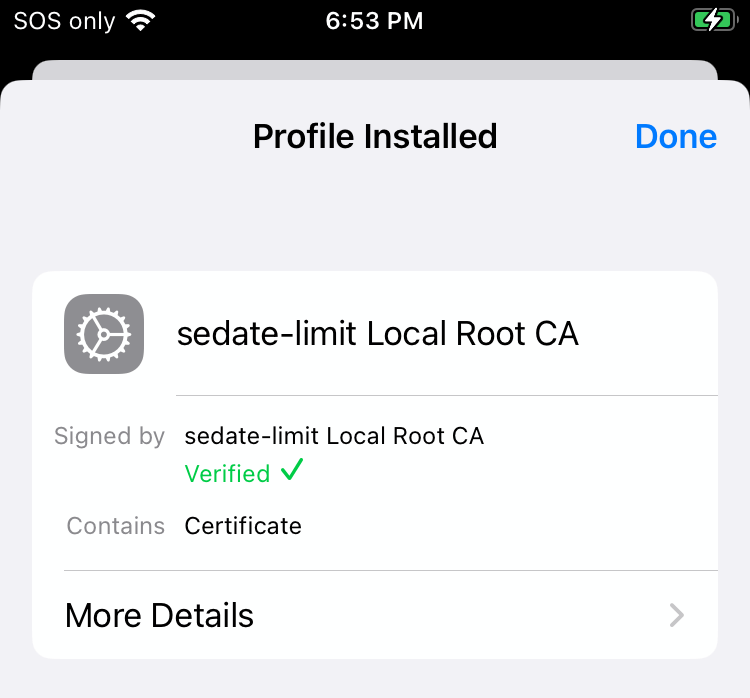
Trusting Your Root CA
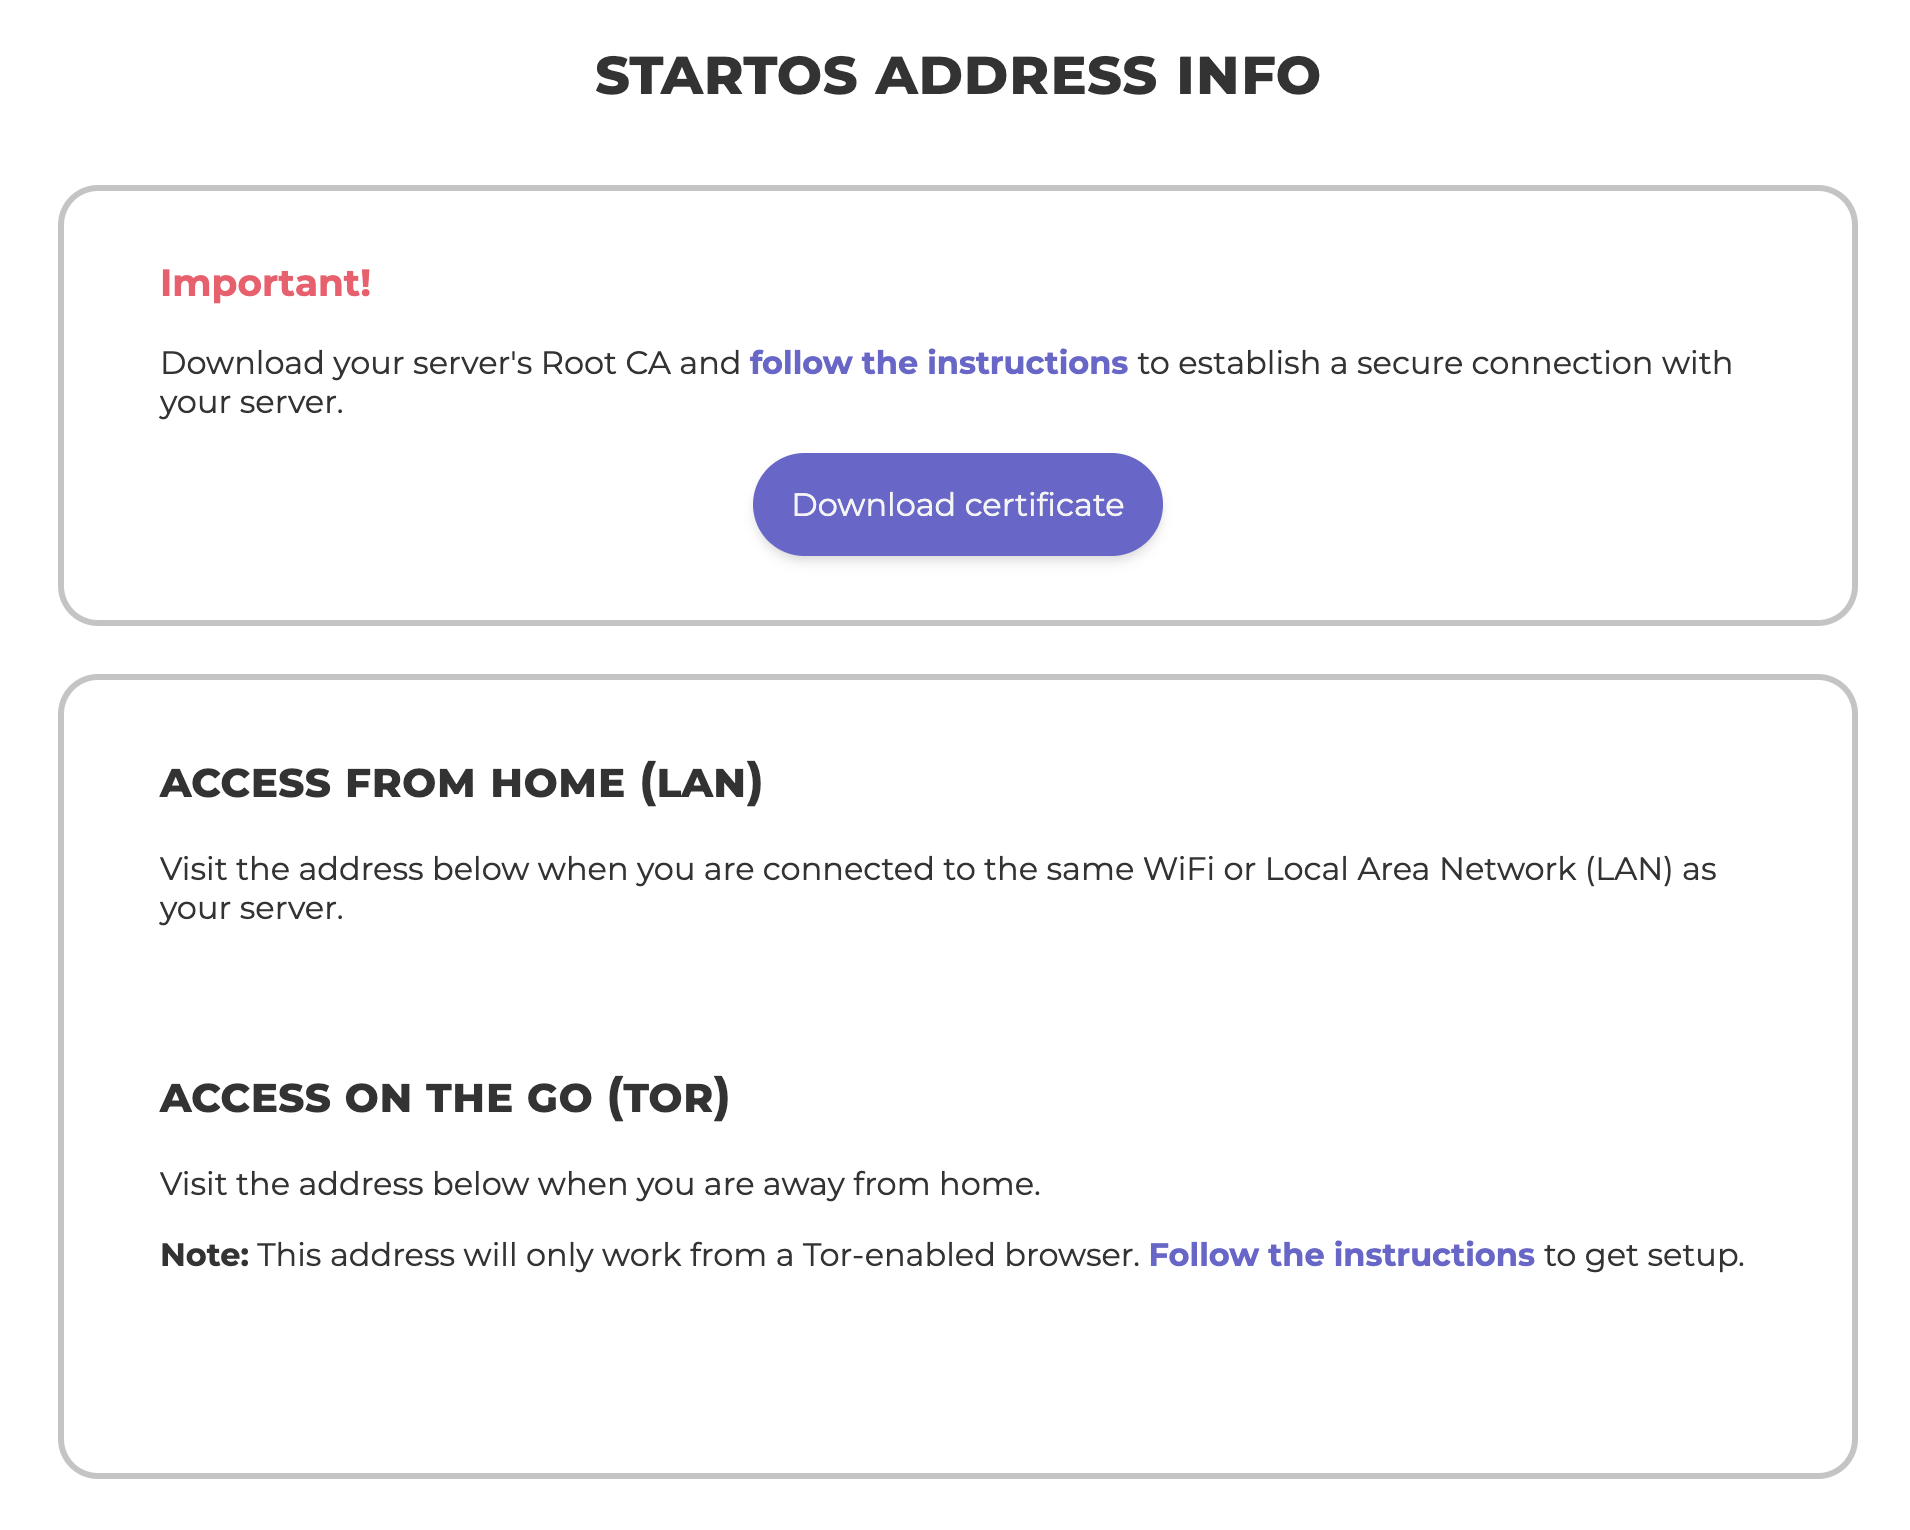
In order to establish a secure (HTTPS) connection with your server on the local network, it is necessary to download and trust your server’s Root Certificate Authority (Root CA).
Note
You must repeat this guide for ever device that will connect to your server locally or using a VPN. This guide is not necessary for devices that will connect using Tor or clearnet.
Obtaining your Server’s Root CA
There are multiple ways to obtain your server’s Root CA.
-
Option 1: Download from your HTTP (not HTTPS) landing page
Visit your server’s
http://<adjective-noun>.localURL and click “Download”.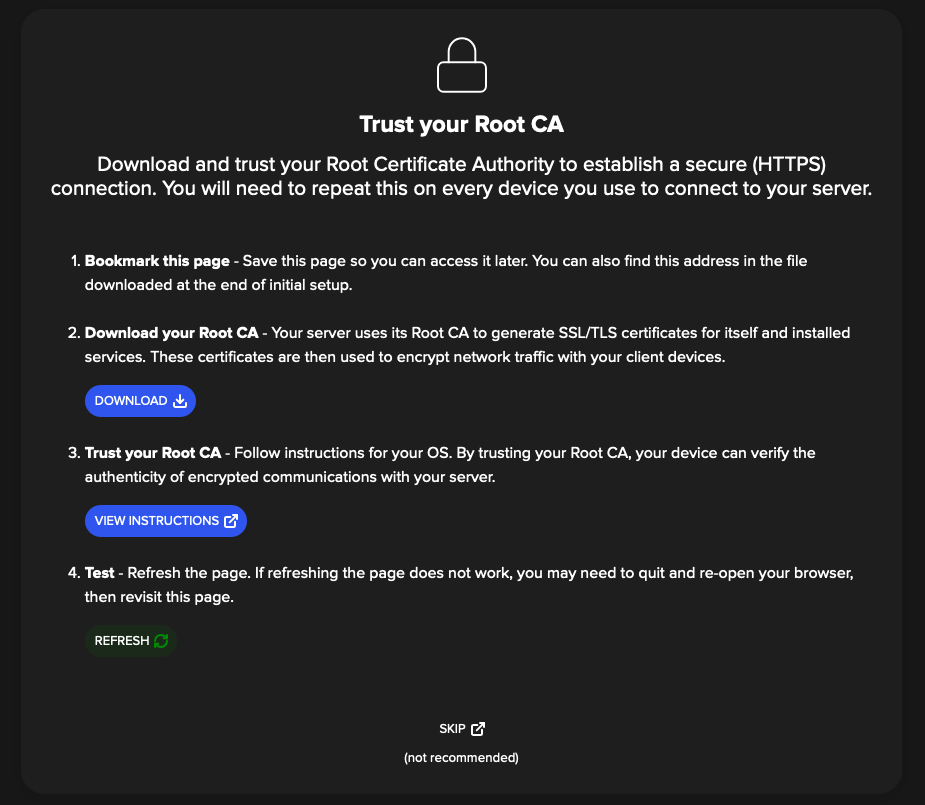
-
Option 2: Download it from your StartOS-info.html file
Following initial setup, you were required to download a StartOS-info.html file. Your Root CA can be downloaded from this file.
-
Option 3: Download over Tor
You can securely access your server over HTTP using its
http://....onionURL from any Tor-enabled browser. Log in and navigate toSystem -> General -> Root Certificate Authority(Root CA) and click “Download”.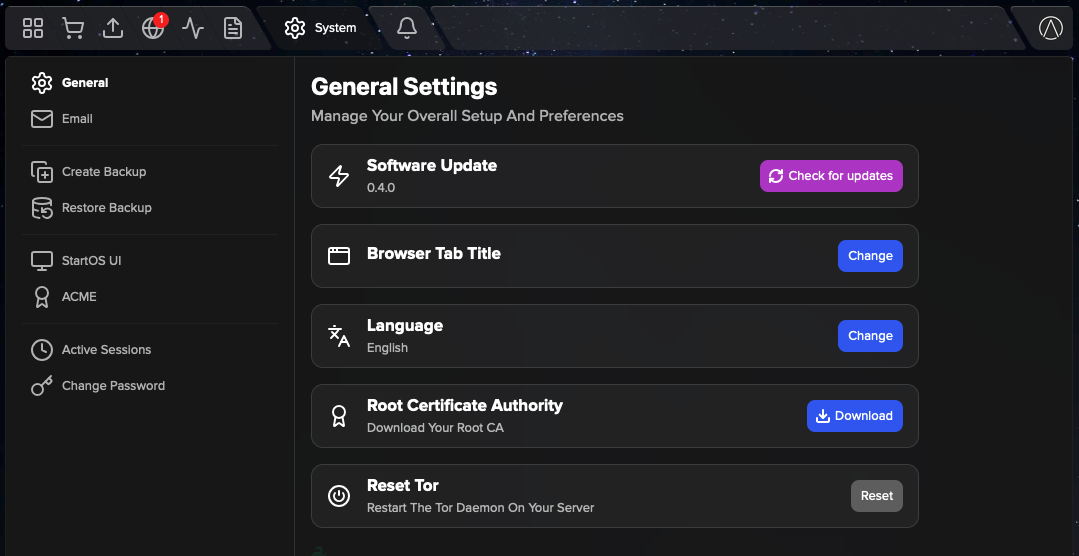
-
Option 4: Send it to yourself
Once you have downloaded your Root CA on any device, you can send it to yourself using email, messaging app, or other file sharing app.
2. Trust your Server’s Root CA
Select your client device OS and follow instructions
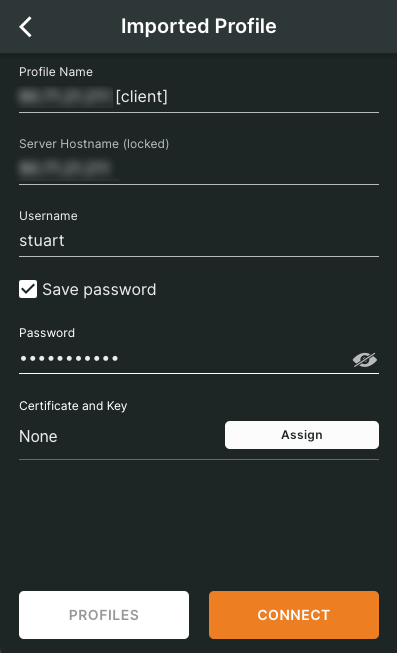
Connecting Locally
Use Case
Local connections are the fastest possible, as they do not reach out to the Internet. You must be connected to the same Local Area Network (LAN) as your server.
Local domain
During initial setup, your server receives a random local ([adjective-noun].local) domain. This domain uses Multicast DNS (mDNS) to serve as an alias for your server’s LAN IP address.
Tip
The local domain is useful because, by default, your router will sometimes change your server’s IP address on the LAN. If your server’s LAN IP address changes, the local domain will continue to work, even if you move or get a new router!
IP Address
Your router automatically assigns your server an IP address on the LAN. The address can be found (1) in your StartOS dashboard at System -> StartOS UI, (2) in your router dashboard, or (3) by pinging your server Local domain from the command line of a computer on the same network.
By default, your router will sometimes change your server’s IP address on the LAN. To avoid this, we highly recommend assigning a static IP address. This is necessary if you intend to access your server via VPN or clearnet. It also makes the local domain unnecessary. All routers support setting a static IP address for a device on the LAN. Refer to your router’s user manual for detailed instructions.
Instructions
- Ensure you are connected to the same LAN as your server.
- If you haven’t already, Trust your Server’s Root CA on the connecting device.
- Visit your server’s local domain or IP address from any browser.
Connecting Remotely
There are three ways to connect to your server and its installed services remotely, each with different use cases and tradeoffs.
-
VPN. Fast, private, personal access from anywhere in the world using a VPN server running on your router or a VPS.
-
Clearnet. Permits hosting services on the public Internet using IP/port or standard (
.com,.net, etc) domains. -
Tor. Permits hosting services on the private Internet (aka the “Darknet”) as anonymous (
.onion) domains.
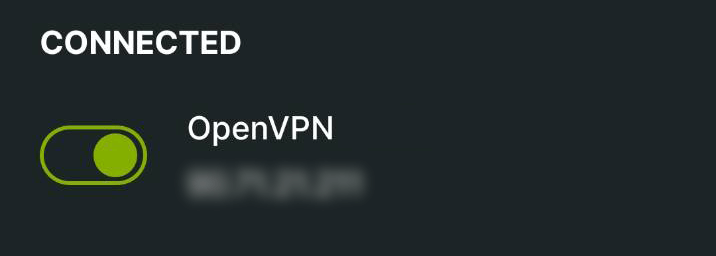
Connecting Remotely - VPN
Contents
Use Case
This connection method is ideal for fast, private, personal access from anywhere in the world using a VPN server running on your router or VPS. Only authorized devices have access to your server and installed services.
Option 1: Router
Most modern routers include a VPN server feature. If so, it is usually the preferred method for private, remote access to your server.
-
If you haven’t already, assign a static IP address to your server on the LAN. Refer to your router’s user manual for detailed instructions.
-
Since home IP addresses can change without warning, we highly recommend Setting up Dynamic DNS.
-
Enable your router’s VPN server. Refer to your router’s user manual for detailed instructions.
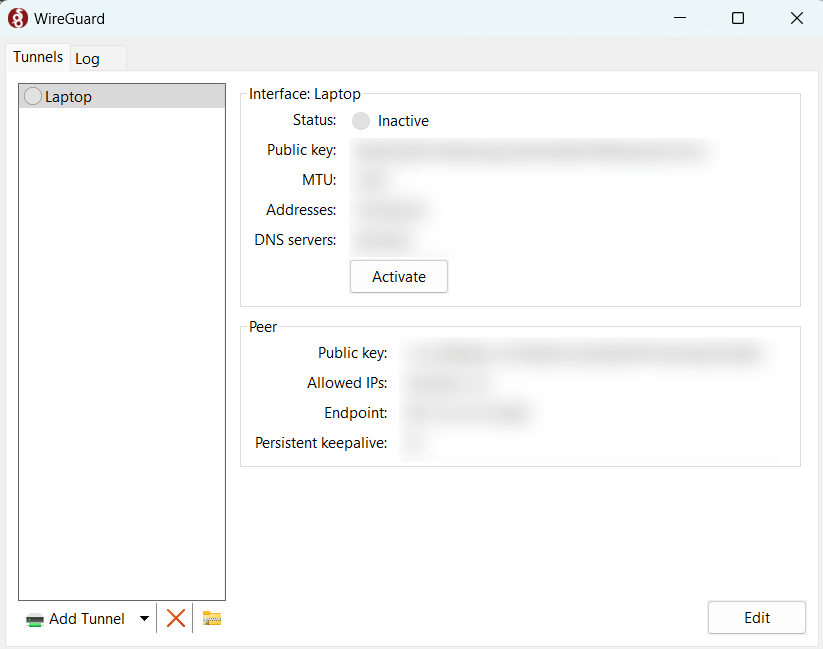
Option 2: StartTunnel
By default, StartTunnel exports wireguard config files that are configured for split tunneling, allowing you to use your StartTunnel VPN to access your StartOS server and installed services while also preventing it from being automatically used for all Internet traffic.
There are three reasons to select this option:
- Your router does not offer a VPN server.
- Your router’s VPN server is not automatically configured for split tunneling.
- You are already using StartTunnel for clearnet hosting, so most of the work is already done.
To use StartTunnel for private, remote VPN access, see Using StartTunnel.
Connecting Clients
Once you have successfully enabled a VPN server on your router or added a StartTunnel gateway, follow instructions below to privately connect your client devices to your server using a VPN.
Connecting Remotely - Clearnet
Contents
Use Case
This connection method permits hosting a service interface on the public Internet.
Adding a Public Domain
With few exceptions, you should add a domain to your service interface so that you and others can access it seamlessly, just like any other website or API.
-
On the service interface page in the “Public Domains” section, click “Add”.
-
Enter the fully qualified domain name. For example, if you control
domain.com, you could enterdomain.comorpublic.domain.comornextcloud.public.domain.com, etc. -
Select a gateway to use for this domain. For help selecting a gateway, see Gateways
[!WARNING] Starlink and CGNAT CGNAT gateways, such as Starlink, cannot be used for clearnet hosting. You must create a new gateway with StartTunnel. Refer to Using StartTunnel.
-
Select a Certificate Authority to use for this domain.
- Local Root Ca: Good for personal access. Only devices that have downloaded and trusted your server’s Root CA will be able to access the domain without issue.
- Let’s Encrypt: Good for public access. All devices trust Let’s Encrypt certificates by default.
-
Click “Save”.
-
If StartOS does not detect a satisfactory DNS record, you will be asked to create one. Continue to the section below.
-
A new
https://<your-public-domain>address will appear in the “Addresses” table.
Configuring DNS
-
Access your domain’s DNS settings, usually in the registrar where you originally leased the domain.
-
In StartOS, find your domain, click “View DNS” from the menu, and create one of the displayed records. Depending on the number of subdomains in your domain, you may see multiple options. For example, if your domain is
nextcloud.public.domain.com, you will see options fornextcloud.public.domain.com,*.public.domain.com, and*.domain.com. In most cases, we recommend choosing the record with the least number of segments. In this case,*.domain.com. Then, next time you use any subdomain ofdomain.com, you will not need to create another DNS record. -
Click “Test” to ensure the record was successfully detected by StartOS.
Warning
It might take a few minutes for your domain changes to take effect. You can test it using https://dnschecker.org.
Port Forwarding
Note
Port forwarding is only necessary for private gateways, such as your router or StartTunnel. If you are running StartOS on a VPS, no port forwarding is needed.
To expose your PUBLIC_IP:port or domain address to the Internet, you must create a port forwarding rule in its corresponding gateway. The rule that needs to be created is conveniently displayed in the tooltip for each address.
[!WARNING] Caution
- ACME providers will not sign certificates for IP addresses. Therefore, the
PUBLIC_IP:portaddress is signed by your server’s Root CA. This means only devices that have downloaded and trusted your server’s Root CA will be able to access the IP address without issue.- Because of the need to trust your Root CA, and also because it is accepted practice to host websites and APIs on domains (
.com,.net, etc) and not IP addresses, most people will NOT use thisPUBLIC_IP:portaddress and therefore DO NOT need to create a port forwarding rule for it.
Tip
Most websites and APIs on the Internet are hosted on port
443. Port443is so common, in fact, that apps and browsers infer its presence. The absence of a port means the port is443. With rare exceptions, domains on StartOS also use port443, and that is why your domains usually do not display a port. The port forwarding rule needed for these standard domains is always the same, which means you only have to do it once!
How you create a port forwarding rule depends on the type of gateway.
-
Routers: port forwarding is supported by all routers and easy to do. Refer to your router’s manual for instructions.
-
StartTunnel: refer to the StartTunnel instructions for port forwarding
Connecting Remotely - Tor
Contents
Use Case
This connection method permits hosting services on the private Internet (aka the “Darknet”) as anonymous (.onion) domains.
There are three reasons you might want this:
-
Unless you share/leak a Tor address, it is totally private and anonymous. Nobody knows it exists, and nobody knows it belongs to you. It is your secure, secret tunnel to the underlying website/API.
-
If you share/leak a Tor address without associating it to your identity (not easy to do), it is anonymous but not private. People know it exists, but nobody knows it belongs to you. By this method, you can anonymously host a censorship-resistant website/API on the private web.
-
If you share/leak a Tor address and also associate it with your identity, it is neither private nor anonymous. People know it exists, and they know it belongs to you. This is useful for hosting an identified yet still censorship-resistant website/API on the private web, or for sharing access to the websites/API with select friends and family.
Warning
It is normal for Tor connections to be slow or unreliable at times.
Important Background
By default, each service interface on StartOS receives a unique and randomly-generated Tor domain. Each domain produces two addresses: HTTP and HTTPS. Because Tor is a secure protocol, it is perfectly safe to use the HTTP address. It is also preferable to use the HTTP address, because it does not require you or anyone else to trust you server’s Root CA to access it.
Warning
Some applications that are unfamiliar with or unfriendly towards Tor may require
HTTPS. ACME providers will not sign certificates for Tor addresses. Therefore, yourHTTPSTor address is signed by your server’s Root CA. This means only devices that have downloaded and trusted your server’s Root CA will be able to access the HTTPS address without issue.
Adding and Removing Domains
To add a Tor domain to a service interface, find the “Tor Domains” section and click “Add”.
[!TIP] Vanity Addresses When adding a Tor address to a service interface, can upload a private key to create a vanity address. For instructions generating a vanity address, see here.
To delete a Tor domain, simply click the trashcan beside the Domain. If you delete all your Tor domains, the service interface will not be accessible over Tor.
Connecting over Tor
Using a Tor Browser
You can connect to your server and installed services from anywhere in the world, privately and anonymously, by visiting their unique http://....onion URLs from any Tor-enabled browser.
[!INFO] Recommended Browsers
- Mac, Linux, Windows, Android/Graphene: Tor Browser
- iOS: Onion Browser
Running Tor in the Background on your Phone/Laptop
By running Tor in the background on your phone or laptop, certain apps can connect over Tor, even if the apps themselves do not natively support Tor.
For instructions specific to your device’s operating system, use a search engine or AI. This capability is well documented.
Installing Services
Contents
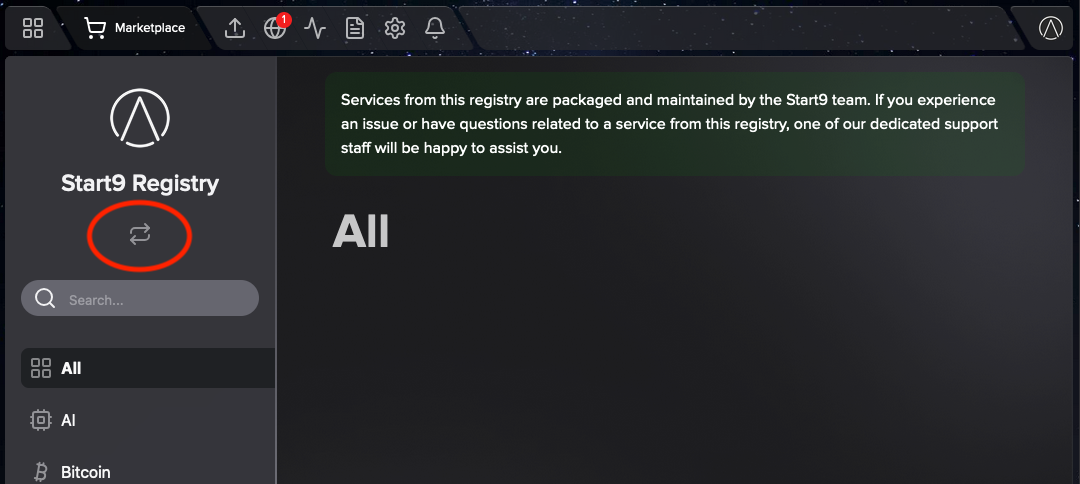
Installing from the Marketplace
The Marketplace is made up of multiple “registries”. A registry is a curated list of services that can be downloaded and installed onto StartOS. You can think of a registry as just one “store” or “booth” inside a broader marketplace.
StartOS comes preloaded with two default registries: (1) The Start9 Registry and (2) the Community Registry.
Services in the Start9 Registry are vouched for, recommended, supported, and maintained by Start9. Services in the Community Registry are not. For a more detailed explanation of the Registry framework, check out this short blog post.
To install a service from the marketplace, simply visit the Marketplace, select a service, and click “Install”.
Switching Registries
To switch between registries or add a custom registry, simply click arrows underneath the current Registry title.
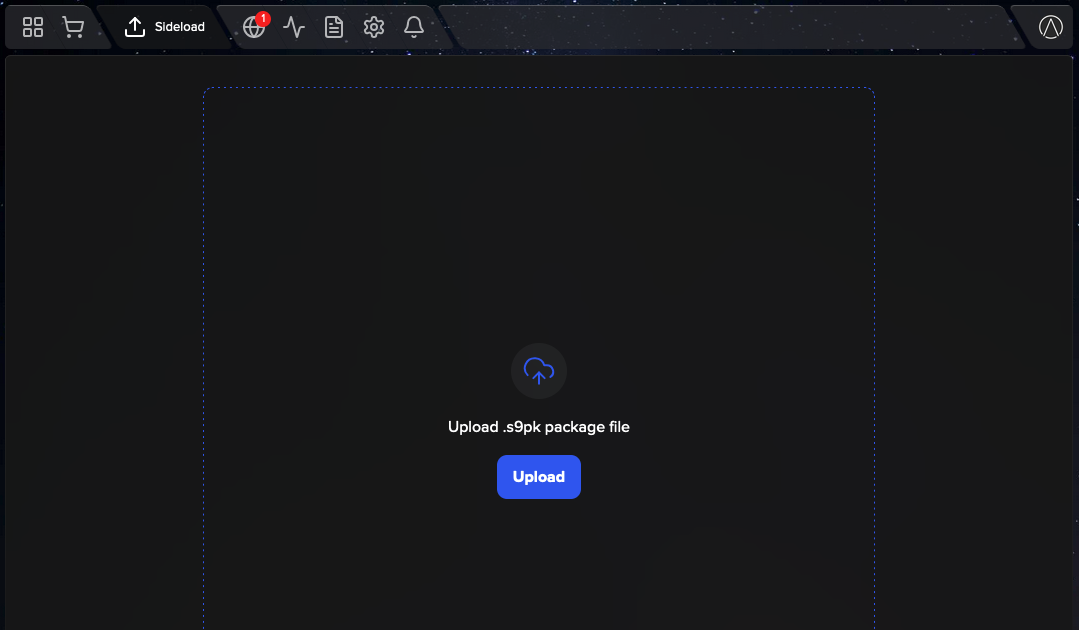
Sideloading
Sideloading is useful if you are testing a service that does not yet exist on a registry, or if you prefer to eliminate the Marketplace as a point of trust. An s9pk can be obtained from anywhere or even built from source code.
To sideload a service, go to Sideload and upload the appropriate .s9pk file.
Gateways
A gateway is what connects your server to the Internet. Your router is a gateway. StartTunnel is also a gateway. Both your router and StartTunnel create secure local networks that, by default, cannot be accessed by devices outside the network.
Note
If you are running StartOS on a VPS with a public IP address, there is no local network. Your gateway is inherently public and open to the Internet.
Think of a gateway as a defense perimeter with hundreds of locked doors, each door leading to a unique service interface. For example, one door might say “Vaultwarden UI”, another might say “Bitcoin RPC”, and yet another might say “Bitcoin P2P”.
If you want to let a specific person through a particular door, you give them a key. This is the equivalent of giving someone private VPN access to a specific service interface. If you want to let everyone through a particular door, you remove the lock altogether. The is the equivalent of forwarding a port in your gateway, thereby exposing a particular service interface or domain to the public Internet. In either case, anyone who comes through any door will know the address of the gateway, which is its IP address. Knowing a gateway’s IP address reveals it approximate geographic location. How approximate? See below table:
| Geographic Location | Detection Accuracy |
|---|---|
| Country | 99% |
| State / Region | 95-99% |
| City (large metro) | 60–80% |
| Zip Code / Neighborhood | 30–50% |
| Exact Street Address | Requires ISP subpoena |
Considerations for Clearnet
If you want to give someone private VPN access to a service interface (i.e. “give someone a key”), or to expose a service interface to the public Internet (i.e. “remove a lock from a door”), you must reveal the approximate location of gateway used. If your gateway is your home router, you are necessarily revealing the approximate location of your home. If your gateway is a VPS running StartTunnel, you are revealing the approximate location of the VPS, not your home.
So, when it comes to selecting a gateway for VPN and clearnet access. Which you select will depend on your threat model and budget:
-
Option 1: if you have no issue revealing your city, state, country, and possibly neighborhood to people accessing your server, you should use your router as your clearnet gateway, since this option is free. NOTE: since home IP addresses can change without warning, we highly recommend Setting up Dynamic DNS.
[!WARNING] CGNAT If your Internet Service Provider (ISP) uses Carrier-grade NAT (CGNAT), such as Starlink, it means you share an IP address with other customers. Therefore, it is not possible to use your router as a clearnet gateway. You must use Option 2 below.
-
Option 2: if you want to obfuscate your home IP address from people accessing your server, or your ISP uses CGNAT, you can create a StartTunnel private gateway and use that instead of your router. Refer to the Using StartTunnel guide.
DNS
Use Case
Here you can view and make changes to the DNS servers used by StartOS.
Using DHCP
Similar to other computers, StartOS uses the DNS servers provided by its gateway via DHCP.
Navigate to System -> DNS to see the IP addresses of the default DNS servers.
Setting Static DNS Servers
To override the default DNS servers and set static ones, go to System -> DNS, select “Static”, and provide up to three DNS servers, listed in order of preference.
Private Domains
Contents
Use Case
A private domain is similar to your server’s local domain, except it also works for VPN connectivity, and it can be anything. It can be a real domain you control, a made up domain, or even a domain controlled by someone else.
Similar to your local domain, private domains can only be accessed when connected to the same LAN as your server, either physically or via VPN, and they require trusting your server’s Root CA.
Adding a Private Domain
-
If you haven’t already, assign a static IP address to your server on the LAN. Refer to your router’s user manual for detailed instructions.
-
On the service interface page in the “Private Domains” section, click “Add”.
-
Enter a fully qualified domain name. It can be anything. For example:
domain.com,private.domain.internal,nextcloud.private,nextcloud.fake-tld, orfacebook.com. -
Click “Save”.
-
A new
https://<your-private-domain>address will appear in the “Addresses” table.
Setting up DNS
Real Domains you Control
If your private domain is a real domain that you control, you have two options for setting up DNS:
-
Option 1: Access your domain’s DNS settings, usually in the registrar where you originally leased the domain, and create a record that resolves the domain to your server’s LAN IP address. Remember, this domain is only accessible to devices connected to your LAN, either physically or via VPN.
-
Option 2: Follow instructions for Fake Domains or Domains you do not Control
Fake Domains or Domains you do not Control
When you add a private domain to StartOS, a corresponding DNS record is automatically added to StartOS’s internal DNS server. To complete the picture, configure your private gateway to use StartOS for DNS.
-
Router: Set StartOS as your router’s primary DNS server. All routers support this feature. Refer to your router’s user manual for detailed instructions.
Warning
It is possible that StartOS is already using your router for DNS. Therefore you cannot instruct your router to use StartOS for DNS. This is circular. If StartOS detects a potential circular DNS situation, it will warn you. To resolve this issue, override the DNS servers used by StartOS to no longer use your router.
-
StartTunnel: SSH into your StartTunnel VPS and run the following command
start-tunnel dns defer
Creating Backups
[!TIP] Important Creating backups is an essential responsibility of self-hosting. If you do not make backups, you will eventually lose your data.
Contents
What You Need to Know
-
You can create backups to a physical drive plugged directly into your server, or over-the-air to another device on the same LAN (a network folder).
-
Backups are encrypted using your master password. If you change your password prior backups retain the original password.
-
Services may choose to exclude certain files or folders from the backup. For example, Bitcoin excludes the blockchain, since it can be recovered by re-syncing.
-
Backups can take minutes or hours to complete, depending on your hardware and quantity of data.
-
A service cannot be used while it is backing up. You may, however, continue to use your server and other services.
-
Upon completion, StartOS issues a backup report, indicating which services were backed up, as well as any errors.
-
Backups taken from a specific system architecture (x86, ARM, RISC-V) are backed up for just that architecture. If restored to another architecture, they will likely need to be reinstalled to run efficiently.
Physical Drive
EXT4 is the recommended format of your backup drive. fat32 and exFAT are not recommended and may not work.
[!DANGER] Backing up to USB thumb drive or SD card media is highly discouraged, as low-quality flash memory is easily corruptible.
If you are using a Raspberry Pi, backup drive must be self-powered, or be connected via a powered USB hub, to prevent possible data corruption.
Network Folder
Choose your target device below for instructions creating a network folder.
Best Practices
Even with proper backups the risk of data corruption is always non-zero. Therefore it is recommended to take additional care when backing up highly valuable or irreplaceable data like a lightning node:
- High quality SSDs should be favored over HDDs as a backup target.
- Backup to multiple targets.
- If backing up to multiple targets make sure all backups are up to date.
Restoring Backups
Contents
Restoring Individual Services
This option should only be necessary if you accidentally uninstall a service.
- Go to
System -> Restore from Backup - Select your backup drive.
- Decrypt the backup drive by entering the password that was used to create it.
- Select the service(s) you want to restore and click “Restore Selected”.
[!TIP] Important If you’re restoring a backup taken from a different system architecture (x86, ARM, RISC-V) to the one you’re restoring to, you may need to reinstall services (not uninstall, since you will lose your data) from the marketplace after the restore completes to avoid running them more slowly in emulation.
Restoring an Entire Server
If your StartOS data drive is lost or corrupted and you need to restore your entire server, follow instructions here.
Updating StartOS
[!INFO] StartOS does not have automatic updates and will never update without your approval. That said, we highly recommended keeping StartOS up to date for the latest security and performance patches, as well as to take advantage of new features.
Contents
Update through the UI
-
When a new version of StartOS is available, a rocket badge will appear on the “System” tab.
-
Go to
System -> General -> Software Update. -
Read the release notes and click “Begin Update”.
[!DANGER] Ensure you have a stable Internet connection before beginning an OS update, and do not unplug your server while StartOS is downloading.
-
While the new version of StartOS is downloading, you may continue to use your device as usual.
-
Once the download is complete, you will be prompted to restart your server to complete the update.
[!DANGER] Updates can take up to an hour to complete. During this time, there is no indication of progress and your StartOS UI will be unreachable. DO NOT UNPLUG YOUR SERVER DURING THIS TIME!
Update by Re-flashing
If you are updating to an unreleased version of StartOS, or something went wrong with a UI update (very rare), it may be necessary to update StartOS by re-flashing. Follow the guide for Flashing StartOS.
Sending Emails
Warning
This guide is not for using StartOS as an email server. It is for granting StartOS the simple ability to send emails through a 3rd party email server.
Use Case
Adding SMTP credentials to StartOS makes it possible for certain services to send email notifications. Many services, such as NextCloud, Vaultwarden, Gitea, and others expect to send emails and require SMTP credentials to send them.
By default, no services have access to your SMTP credentials. You must grant access to each service explicitly.
Instructions
-
Obtain SMTP credentials from a 3rd party provider
-
In
System > Emailenter your SMTP credentials and hit “Save”. -
On the same page, send yourself a test email. Remember to check your spam folder. If the email goes to spam, mark it as not spam.
-
For each service you want to use the credentials to send emails, go to the dashboard of that service, click “Actions”, and locate the relevant action.
SSH
Like other Linux distributions, StartOS allows you to go “under-the-hood” via Secure Shell Protocol (SSH).
Warning
Accessing your server via SSH is considered advanced. Please use caution, you can cause permanent damage to your server, potentially resulting in loss of data.
Contents
Important Notes
-
The first time you connect, you will see something like this:
The authenticity of host 'adjective-noun.local (192.168.1.175)' can't be established.
ED25519 key fingerprint is SHA256:BgYhzyIDbshm3annI1cfySd8C4/lh6Gfk2Oi3FdIVAa.
This key is not known by any other names.
Are you sure you want to continue connecting (yes/no/[fingerprint])?
Type
yesand hit Enter to start trusting the server’s SSH public key. -
If you get a scary looking warning that says something like
WARNING: REMOTE HOST IDENTIFICATION HAS CHANGED!Fear not! This is most likely happening because you have recently re-flashed your server, which causes a change in the key for your device’s hostname. The solution is to delete the existing entry from your
known_hostsfile, which is typically located at~/.ssh/known_hosts. This will be specified in the warning, along with a helpful line number (in case your file is lengthy).
Using your StartOS Master Password
-
Open a terminal on your client device and enter:
ssh start9@SERVER-HOSTNAMEReplace
SERVER-HOSTNAMEwith your server’sadjective-noun.localaddress URL. -
Enter your StartOS master password.
Using SSH Keys
-
In the StartOS UI, go to
System > SSH -
Click
Add Key, paste in your key and clickSave -
Open a terminal on your client device and enter:
ssh start9@SERVER-HOSTNAMEReplace
SERVER-HOSTNAMEwith your server’sadjective-noun.localaddress URL. -
Enter your key’s passphrase (if any)
Connecting via PuTTY on Windows
For Windows, following the command above will work. But if you prefer a GUI tool, BrewsBitcoin has created a guide for connecting via SSH using PuTTY on Windows
💾 Flashing Guides
Flashing Firmware
Flashing Firmware - Server Pure
This page is for the Server Pure only. It will not work on other devices.
Generally, you do not need to manually flash your device using this guide, as the firmware is now automatically updated on supported devices. Please only use this method if directed by a Start9 Support Technician. If you were told to “flash your device”, you are looking for the StartOS flashing guides instead.
You Will Need
- A monitor and keyboard.
- A USB stick, formatted FAT32.
Instructions
-
Power down your server if not already.
-
Connect a monitor and keyboard to your server using two of the USB3 (blue) ports.
-
Download the right firmware:
- Models without WiFi - Download Standard
- Models with WiFi - Download Standard | Download Jailed WiFi
Note
The Jailed WiFi variation deactivates WiFi at the firmware level so it can never be turned on
-
Copy or move the zip file to the USB stick.
-
Eject the USB stick and insert it into your server using a USB3 (blue) slot.
-
Turn on the server while pressing the
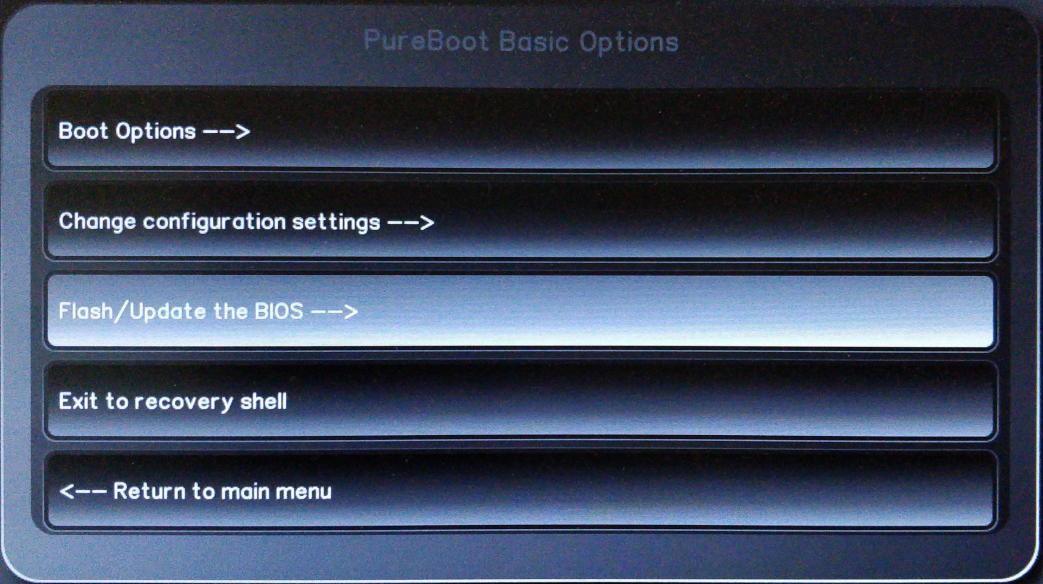
ESCkey on the keyboard repeatedly until you see the PureBoot Basic Boot Menu screen. Select “Options –>”.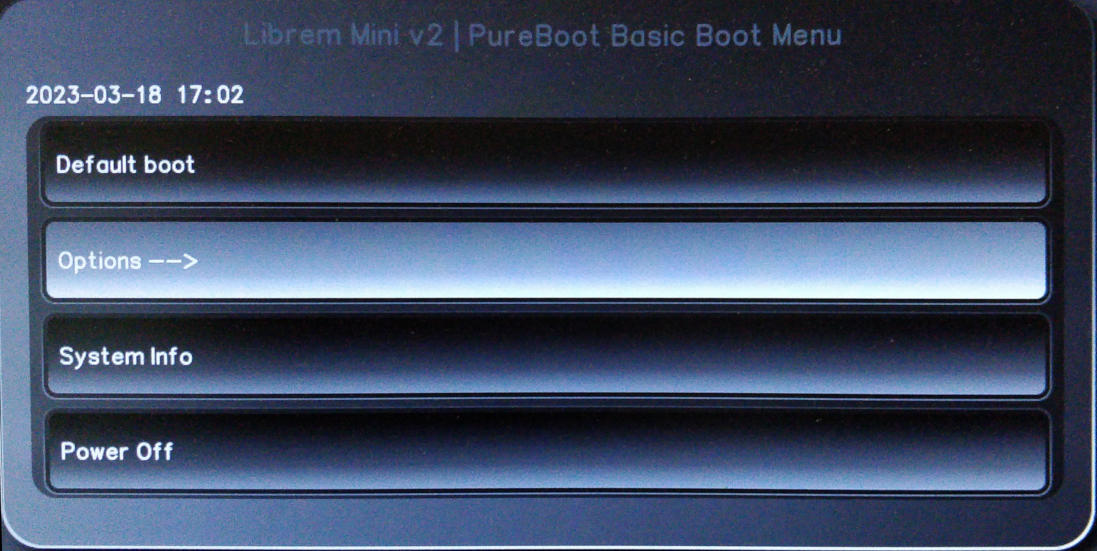
-
Select “Flash/Update the BIOS”.
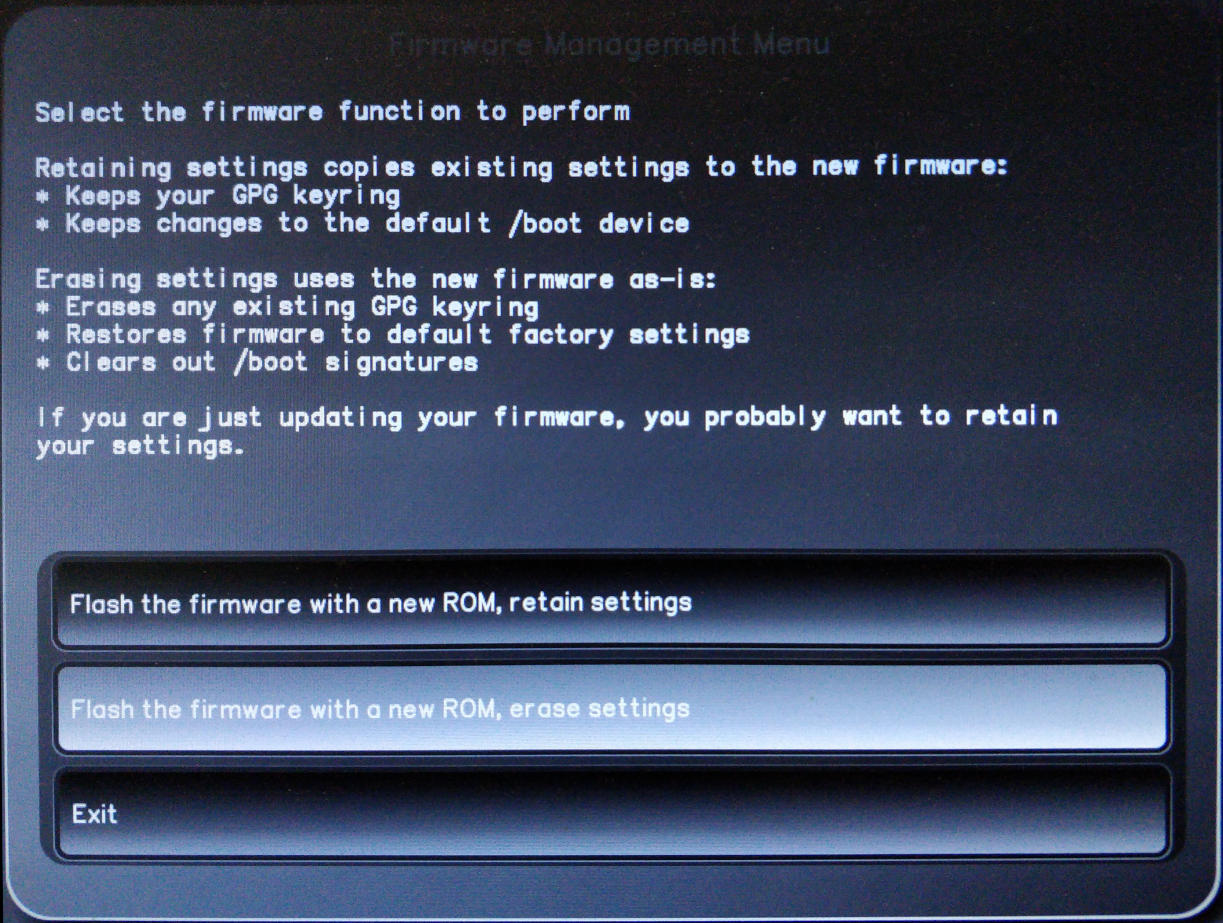
-
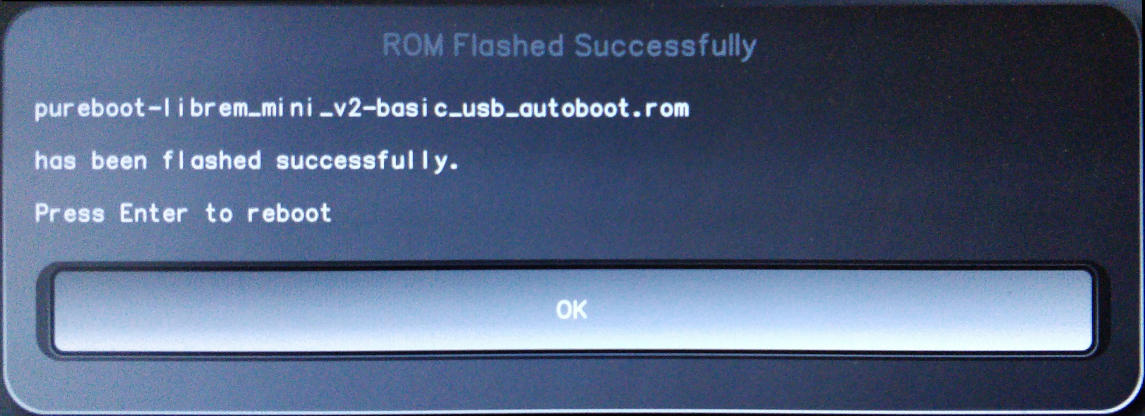
Select “Flash the firmware with a new ROM, erase settings”.
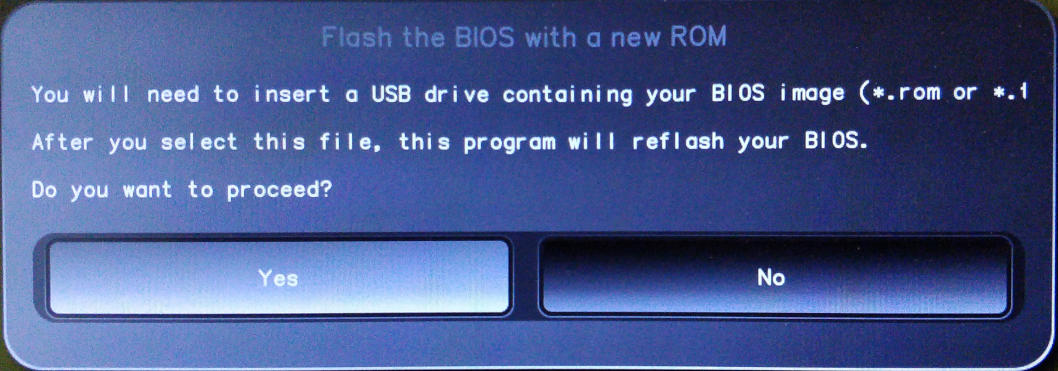
-
The system will ask if you want to proceed flashing the BIOS with a new ROM, select “Yes”.
-
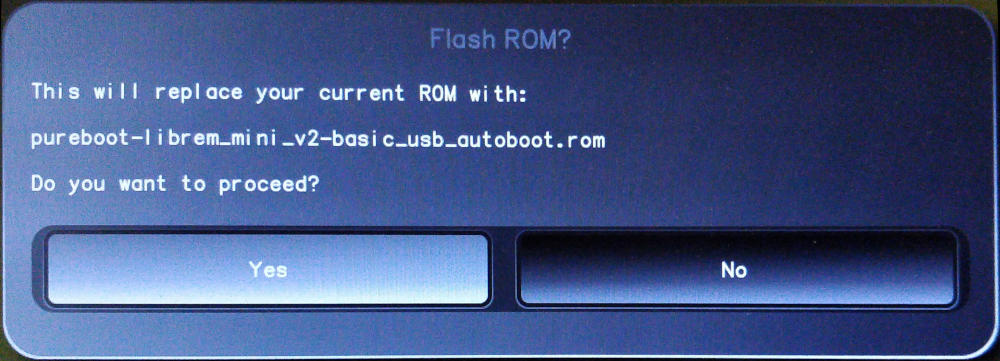
Choose the file that we downloaded and copied to the USB stick.

-
Confirm you want to proceed with the flash by selecting “Yes”.
-
The BIOS will be re-flashed with the new firmware. This may take a few minutes. When complete, remove the firmware USB, then select “OK” to complete the process.
Flashing Firmware - Server One (2023)
Start9’s 2023 Server One was the Intel NUC11ATKC4, whose BIOS was refered to as “ATJSLCPX” by Intel, and whose latest release was AT0043.cap before they officially discontinued support for the product line.
You Will Need
- A monitor and keyboard.
- A USB stick, formatted FAT32.
Instructions
-
Download Intel_ATJSLCPX-AT0043.cap to the USB stick
Tip
If you wish to confirm the integrity of your download before you flash it, here is the sha256sum:
e72c356cdefa90486c031b7bd3d616cfd4e34e76dffb9f3ba72928355db3185b Intel_ATJSLCPX-AT0043.cap -
Insert the power cable, video cable, keyboard, mouse, and USB stick with the ATJSLCPX BIOS into the Server One.
-
Power the unit on and continually press
F7on your keyboard to launch the BIOS update screen. -
Press enter 3 times to update the BIOS by selecting and confirming your intention to flash
Intel_ATJSLCPX-AT0043.capfrom the USB stick. -
Power the unit off when it reboots, and remove the BIOS USB stick.
-
Power the unit on and continually press
F2to enter the bios settings. -
Arrow up, then right to the
Powermenu (near the top right). -
Arrow to
Secondary Power Settingsat the bottom. -
Arrow down to
After Power Failureand set the value to “Power On”. -
Arrow to
Wake on LAN from S4/S5and set the value to “Stay Off”. -
Arrow up, then over to the
Bootmenu (top right). -
Arrow down to
Boot Priority. -
Set all 4
UEFI PXE & HTTP Networkboot options to “Disabled”. -
Arrow down to
Boot USB Devices Firstand enable (check) it. -
Hit
F10to save changes and exit, followed by “Yes”.
Flashing StartOS
Flashing StartOS - X86_64 / ARM
This guide is for flashing StartOS to a USB drive, then installing it onto an x86_64 device, which includes most desktops, laptops, and mini PCs. For an up-to-date list of known-good hardware, please check out this forum post.
Tip
To install StartOS on an ARM device, simply replace all x86_64 references in this guide.
Contents
Download
-
Visit the Github release page to find the latest version of StartOS.
-
At the bottom of the page, under “Assets”, download the
x86_64.isofile or thex86_64-nonfree.isofile. We recommend installing thex86_64.isoimage first. Then, if it is not compatible with your hardware, install thex86_64-nonfree.isoimage.-
x86_64.iso: This image is 100% open source, containing no proprietary firmware or drivers. It will only work on certain hardware devices, such as the Start9 Server Pure.
-
x86_64-nonfree.iso: this image contains non-free (closed source) firmware and drivers, primarily for display and wireless capabilities.
-
-
Verify the SHA256 checksum against the one listed on GitHub (optional but recommended).
-
Mac. Open a terminal window and run the following, replacing
startos-0..._x86_64with the path/name of the file:openssl dgst -sha256 startos-0..._x86_64 -
Linux Open a terminal window and run the following, replacing
startos-0..._x86_64with the path/name of the file:sha256sum startos-0..._x86_64 -
Windows Open a PowerShell and run the following, replacing
Downloadswith the directory where you downloaded the file, andstartos-0..._x86_64with the name of the file:cd Downloads Get-FileHash startos-0..._x86_64
-
Flash
-
Download and install balenaEtcher onto your Linux, Mac, or Windows computer.
-
Insert your USB drive into your computer.
-
Open balenaEtcher.
-
Click “Select Image” and select the
.isoimage you just downloaded. -
Click “Select Target” and select your microSD card.
Warning
BE ABSOLUTELY CERTAIN you have selected the correct target USB flash drive. Whatever target you select will be COMPLETELY ERASED!!
-
Click “Flash!”. You may be asked to approve the unusually large disk target and/or enter your password. Both are normal.
Install
-
Remove the newly-flashed USB drive from your computer and plug it into your server. Choose the fastest available USB 3.0+ port - typically this is blue or labeled “SS” (SuperSpeed).
-
Power on your server, booting from USB.
Tip
Occasionally, you may need to make some changes in your BIOS, such as turning off Secure Boot, or allowing USB boot for install. See the Community Hub for guides or to get help.
-
The StartOS install wizard will now be available at
http://start.local. You can also use a monitor, keyboard, and mouse. This is known as “Kiosk Mode”. -
Choose “Re-Install” to preserve existing StartOS data, or “Factory Reset” to start fresh. After install is complete, you will be prompted to remove the USB drive and refresh the page.
Flashing StartOS - Raspberry Pi
This guide is for flashing StartOS to a microSD card for use on a Raspberry Pi.
Contents
Download
-
Visit the Github release page to find the latest version of StartOS.
-
At the bottom of the page, under “Assets”, download the
startos-..._raspberrypi.img.gzfile. -
Verify the SHA256 checksum against the one listed on GitHub (optional but recommended).
-
Mac. Open a terminal window and run the following, replacing
startos-0..._raspberrypi.img.gzwith the path/name of the file:openssl dgst -sha256 startos-0..._raspberrypi.img.gz -
Linux Open a terminal window and run the following, replacing
startos-0..._raspberrypi.img.gzwith the path/name of the file:sha256sum startos-0..._raspberrypi.img.gz -
Windows Open a PowerShell and run the following, replacing
Downloadswith the directory where you downloaded the file, andstartos-0..._raspberrypi.img.gzwith the name of the file:cd Downloads Get-FileHash startos-0..._raspberrypi.img.gz
-
Flash
-
Download and install balenaEtcher onto your Linux, Mac, or Windows computer.
-
Insert your microSD card into your computer, either directly or using an adapter.
-
Open balenaEtcher.
-
Click “Select Image” and select the
.img.gzimage you just downloaded. -
Click “Select Target” and select your microSD card.
Warning
BE ABSOLUTELY CERTAIN you have selected the correct target microSD card. Whatever drive you select will be COMPLETELY ERASED!
-
Click “Flash!”. You may be asked to approve the unusually large disk target and/or enter your password. Both are normal.
Install
- For the Raspberry Pi, flashing and installing are essentially the same thing. Simply remove the newly-flashed microSD card and insert it into your Raspberry Pi.
💻 Device Guides
Linux Guides
Trusting Your Root CA (Linux)
Contents
Debian Systems
This should work for most Debian-based systems, such as Debian, Ubuntu, Mint, PopOS etc.
-
Ensure you have downloaded your Root CA.
-
Open a terminal and run::
sudo apt update sudo apt install -y ca-certificates p11-kit -
Move into the directory where you downloaded your Root CA (usually
~/Downloads), for example:cd ~/Downloads -
Add your Root CA to your OS trust store. Be certain to replace
adjective-nounwith your server’s unique hostname in the 3rd and 4th commands:sudo mkdir -p /usr/share/ca-certificates/start9 sudo cp "adjective-noun.crt" /usr/share/ca-certificates/start9/ sudo bash -c "echo 'start9/adjective-noun.crt' >> /etc/ca-certificates.conf" sudo update-ca-certificatesIf successful, you will receive
1 added. -
If using Firefox or Tor Browser, complete this final step.
-
If using a Chromium browser, such as Chrome or Brave, complete this final step.
Arch / Garuda
-
Ensure you have downloaded your Root CA.
-
Move into the directory where you downloaded your Root CA (usually
~/Downloads), for example:cd ~/Downloads -
Add your Root CA to your OS trust store. Be certain to replace
adjective-nounwith your server’s unique hostname in the 3rd and 4th commands:sudo pacman -S ca-certificates sudo cp "adjective-noun.crt" /etc/ca-certificates/trust-source/anchors/ sudo update-ca-trustDespite no output from the last command, you can test your app right away.
CentOS / Fedora
-
Ensure you have downloaded your Root CA.
-
In
/etc/systemd/resolved.conf, ensure you haveMulticastDNS=Yes. -
Restart systemd-resolved
sudo systemctl restart systemd-resolved -
Move into the directory where you downloaded your Root CA (usually
~/Downloads), for example:cd ~/Downloads -
Add your Root CA to your OS trust store. Be certain to replace
adjective-nounwith your server’s unique hostname in the 3rd and 4th commands:sudo yum install ca-certificates sudo cp "adjective-noun.crt" /etc/pki/ca-trust/source/anchors/ sudo update-ca-trust
Additional Steps for Chromium Browsers
On Linux, Chromium browsers require extra configuration to trust your Root CA. These instructions should work for Chrome, Brave, Vivaldi and other Chrome-based browsers.
-
In the URL bar, enter
chrome://settings/certificates. -
Click
Authorities > Import. -
Select your adjective-noun.crt file.
-
Check “Trust this certificate for identifying websites”.
-
Click OK.
Connecting via VPN (Linux)
Follow this guide to privately access your server from your Linux device using a VPN.
Prerequisites
Contents
WireGuard
-
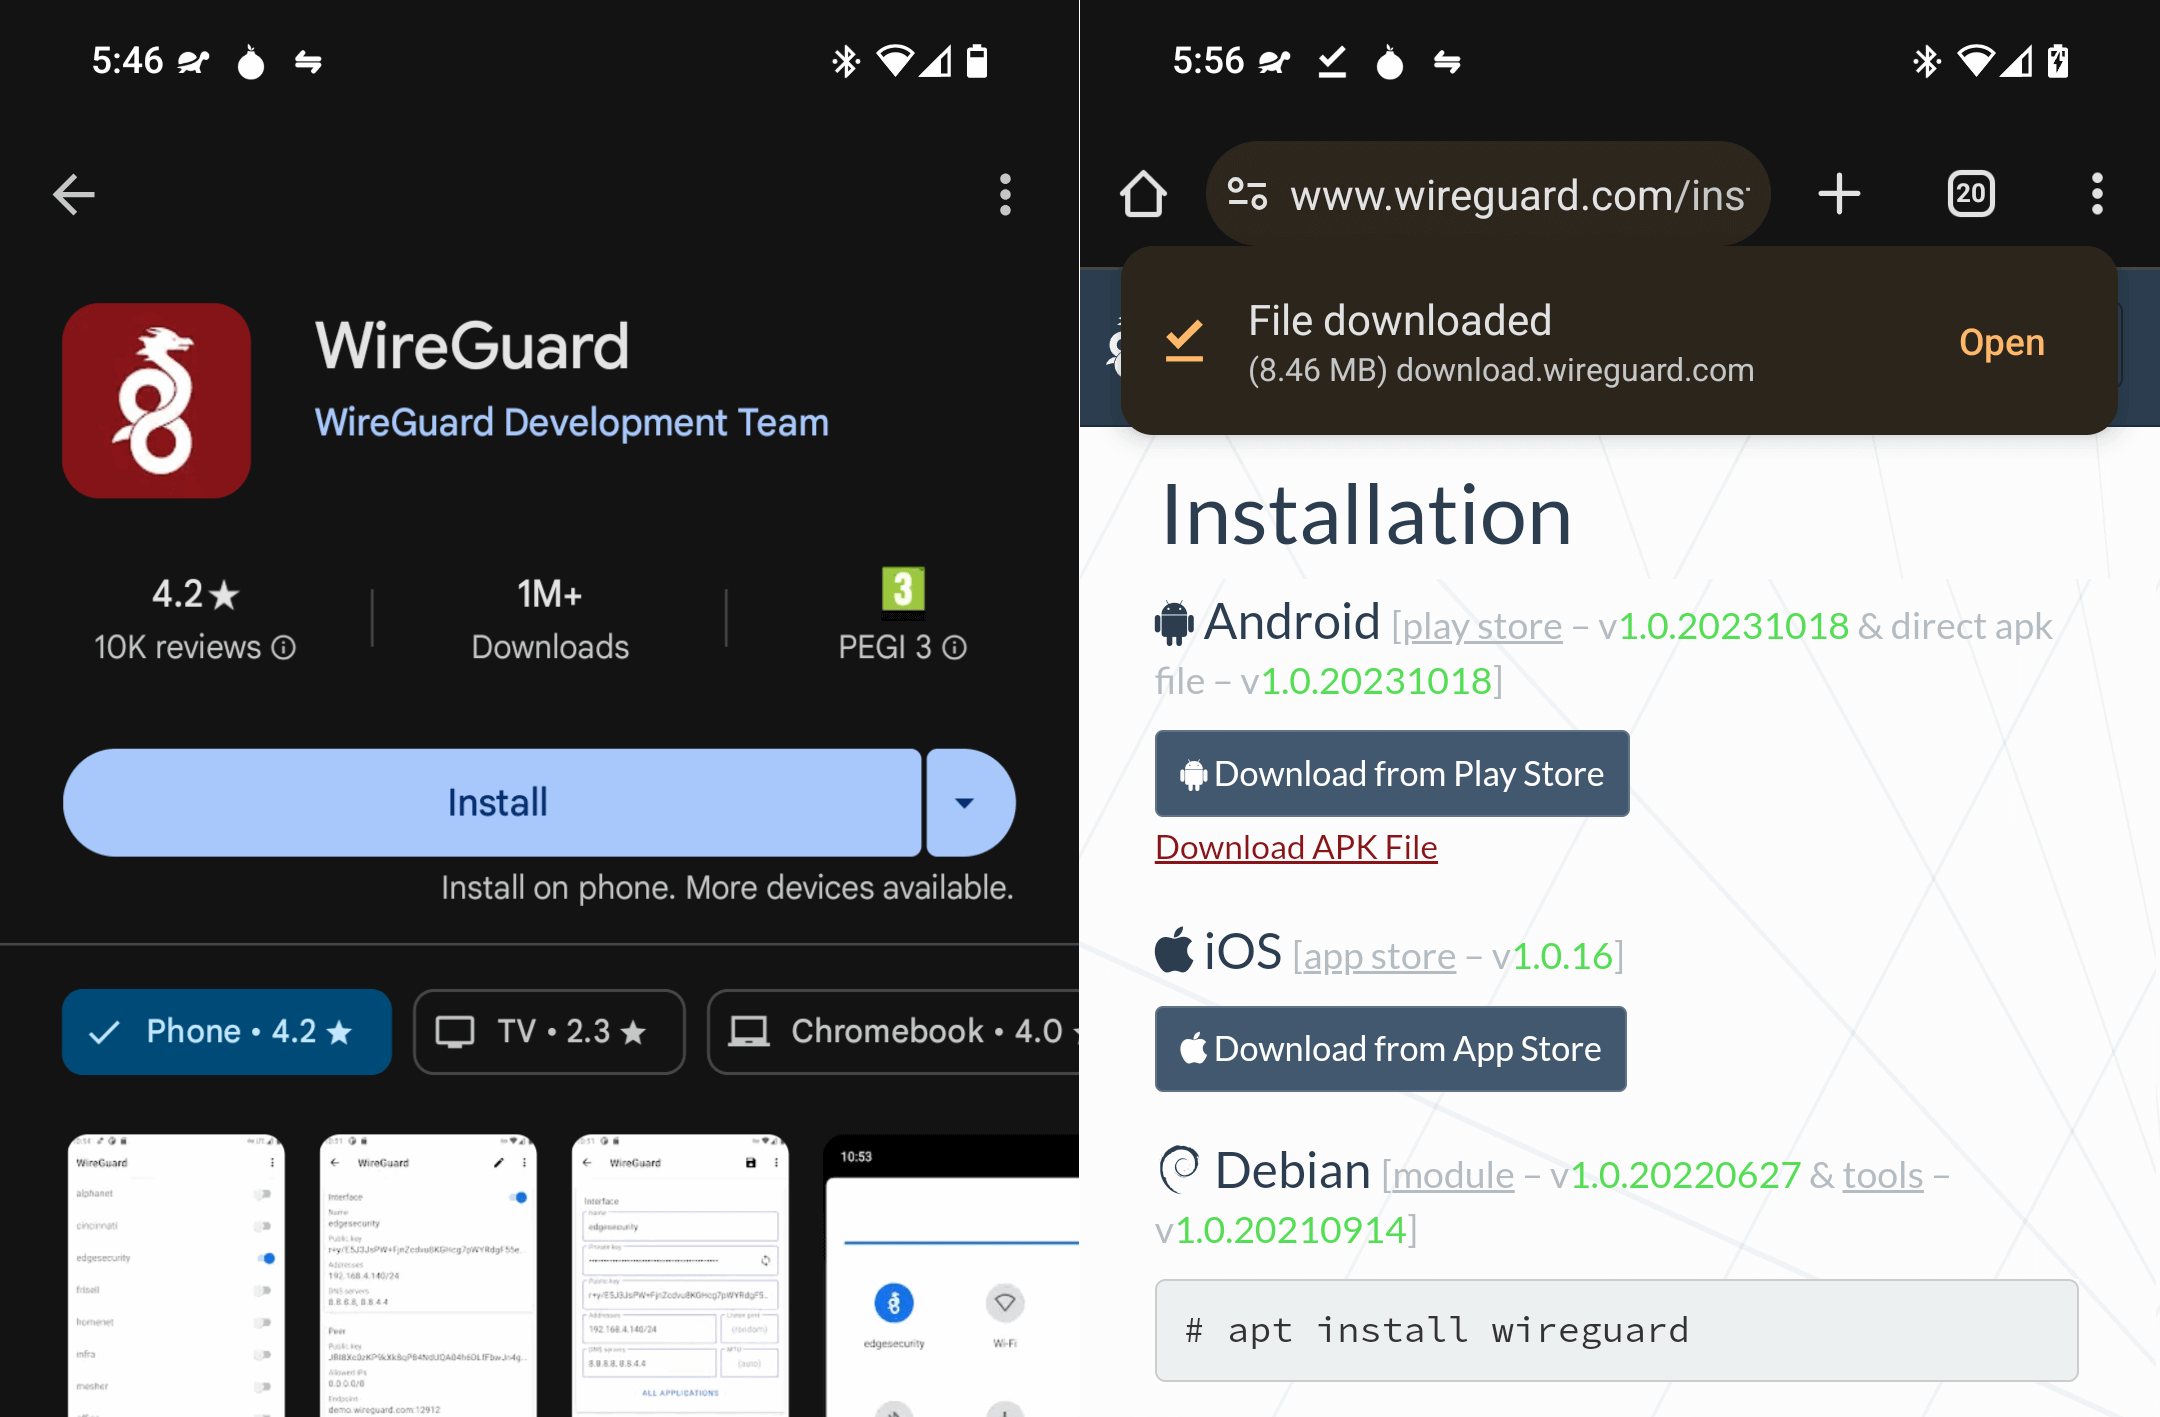
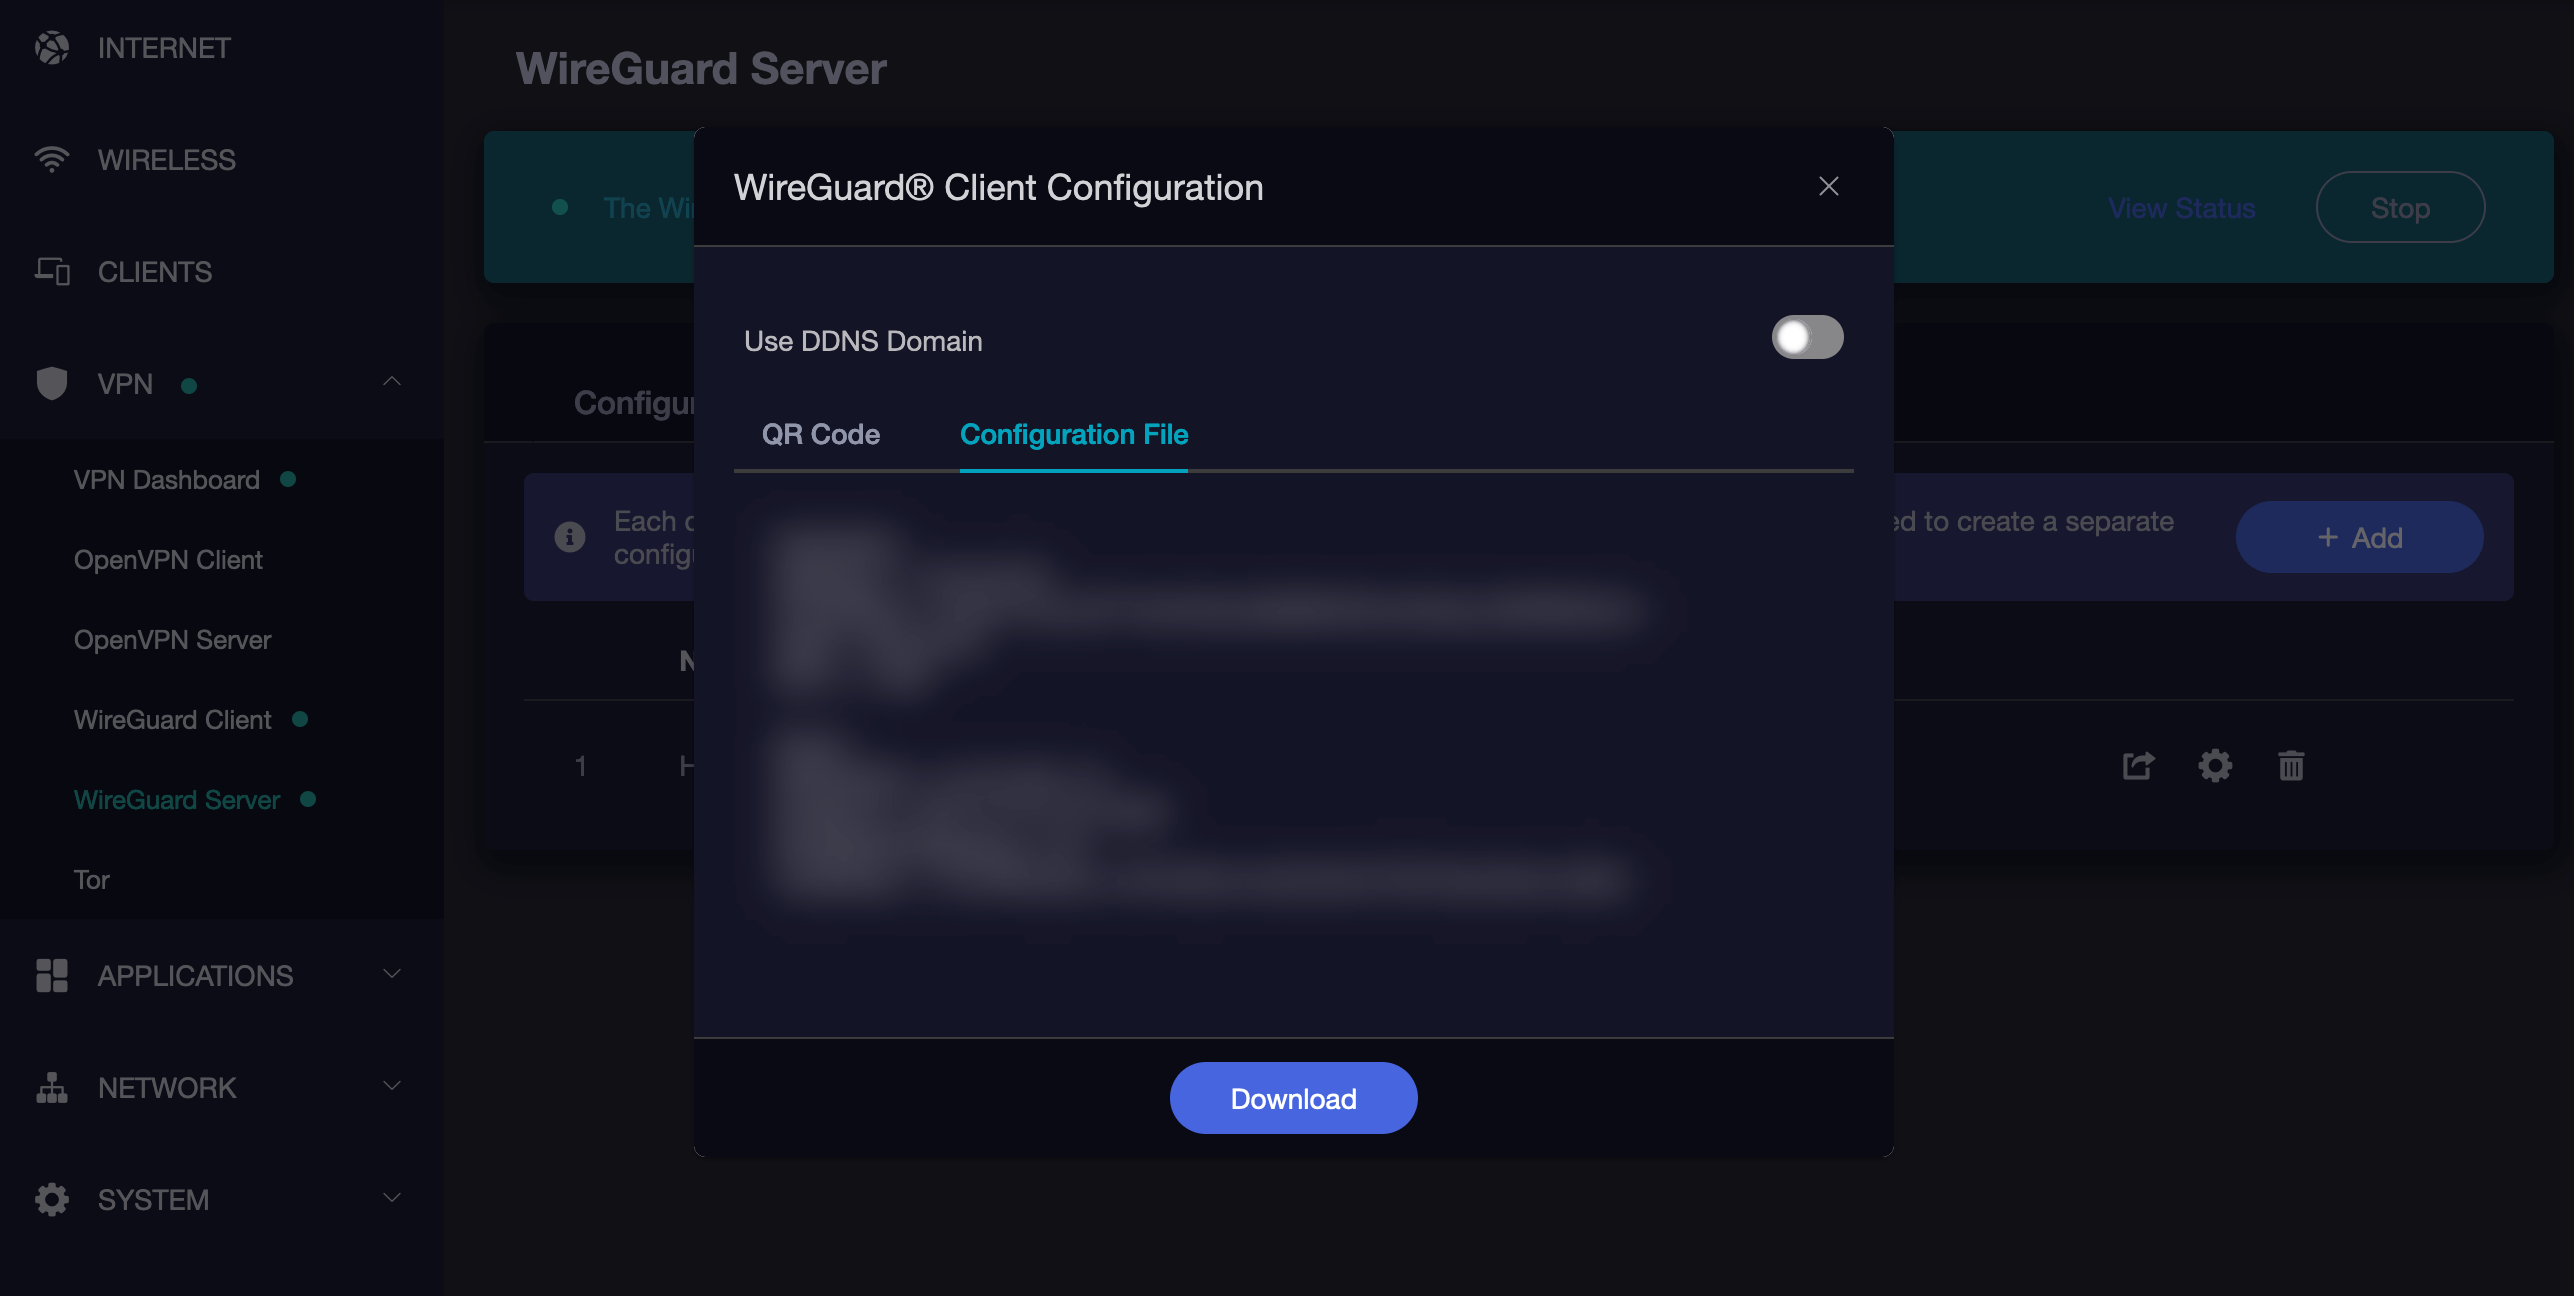
Obtain a WireGuard config file for your device.
- StartTunnel: Follow instructions here
- Router: Follow your router’s instructions.
-
Install
wireguardandwireguard-tools.-
Debian / Ubuntu
sudo apt update && sudo apt install wireguard -
Fedora / RHEL
sudo dnf update && sudo dnf install wireguard-tools -
Arch / Manjaro
sudo pacman -Syu && sudo pacman -S wireguard-tools && sudo pacman -S wireguard
-
-
Move into the directory where you downloaded your Root CA (usually
~/Downloads), for example:cd ~/Downloads -
Copy the contents of your WireGuard configuration file into
/etc/wireguard/wg0.conf(or enter them from your notes)sudo mv myconf.conf /etc/wireguard/wg0.confBe certain to replace
myconf.confwith the name of the file you downloaded. -
Set the permissions on the configuration file correctly:
sudo chmod 600 /etc/wireguard/wg0.conf -
Bring the interface up using
wp-quick, which will create the interface and necessary routing rules for you the first time you use it.sudo wg-quick up wg0 -
Verifiy that a this worked by examining the output of:
sudo wg -
Enable WireGuard on Boot (optional) - this would connect you each time you boot
sudo systemctl enable wg-quick@wg0
Tip
Each time you want to close the VPN connection:
sudo wg-quick down wg0
OpenVPN
-
Install
openvpn.-
Debian / Ubuntu
sudo apt update && sudo apt install openvpn -
Fedora / RHEL
sudo dnf update && sudo dnf install openvpn -
Arch / Manjaro
sudo pacman -Syu && sudo pacman -S openvpn
-
-
Move into the directory where you downloaded your Root CA (usually
~/Downloads), for example:cd ~/Downloads -
Copy the contents of your OpenVPN configuration file into
/etc/openvpn/client.conf(or enter them from your notes)sudo mv myconf.ovpn /etc/openvpn/client.confBe certain to replace
myconf.ovpnwith the name of the file you downloaded. -
Set the permissions on the configuration file correctly:
sudo chmod 600 /etc/openvpn/client.conf -
Start OpenVPN and load the config file, entering your username and password when requested.
sudo systemctl start openvpn@client -
Verifiy that a this worked by examining the output of:
sudo systemctl status openvpn@client -
Enable OpenVPN on Boot (optional) - this would connect you each time you boot
sudo systemctl enable openvpn@client
Tip
Each time you want to close the VPN connection:
sudo systemctl stop openvpn@client
Creating Backups (Linux)
Contents
Create a Shared Folder
Ubuntu
-
Install Samba if not already:
sudo apt install samba && sudo systemctl enable smbd -
Add your user to samba, replacing
$USERwith your Linux username.sudo smbpasswd -a $USERYou will be prompted for your linux password. Then, you must create a new SMB password for the user with permission to write to your new backup share. Keep the password somewhere safe, such as Vaultwarden.
-
Identify or create a folder to store your server backups.
Tip
This folder can be located on an external drive connected to your Linux machine.
-
Right click the folder and click “Properties”.
-
Click “Local Network Share”.
-
Select “Share this folder” and give the folder a Share name. Remember the name, you will need it later. Then click “Create Share”.
-
If your installation of Ubuntu is running a firewall by default or due to your own custom configuration, enter this command to allow connections to Samba. If it generates an error, you can safely ignore it:
sudo ufw allow Samba
Mint
-
Install Samba if not already:
sudo apt install samba && sudo systemctl enable smbd -
Add your user to samba, replacing
$USERwith your Linux username.sudo usermod -a -G sambashare $USER sudo smbpasswd -a $USERYou will be prompted for your linux password. Then, you must create a new SMB password for the user with permission to write to your new backup share. Keep the password somewhere safe, such as Vaultwarden.
-
Identify or create a folder to store your server backups.
Tip
This folder can be located on an external drive connected to your Linux machine.
-
Right click the folder and click “Sharing Options”.
-
Select “Share this folder” and give the folder a Share name (maximum 12 characters). Remember the name, you will need it later. Click “Create Share”.
-
If your installation of Mint is running a firewall by default or due to your own custom configuration, enter this command to allow connections to Samba. If it generates an error, you can safely ignore it:
sudo ufw allow Samba
Other Linux
-
Install Samba if it is not already installed.
-
Arch:
sudo pacman -S samba -
Debian and Debian-based:
sudo apt install samba -
CentOS/Redhat
sudo yum install samba -
Fedora
sudo dnf install samba
-
-
Identify or create a folder to store your server backups. Make a note of the directory path. For example:
mkdir -p /home/$USER/start9-backupreplacing
$USERwith your Linux username and “start9-backup” with whatever you want the folder to be named.Tip
This folder can be located on an external drive connected to your Linux machine.
Warning
If you are on Fedora 38+, you need to do an extra step to allow the Samba share in SELinux:
sudo semanage fcontext --add --type "samba_share_t" "/home/$USER/start9-backup(/.*)?" sudo restorecon -R /home/$USER/start9-backup -
Configure Samba by adding the following to the end of your
/etc/samba/smb.conffile:[backup-share] path = "/home/$USER/start9-backup" create mask = 0600 directory mask = 0700 read only = no guest ok = noWhere:
[backup-share]can be replaced with whatever you want (must remain inside brackets). This is yourShare Name. Remember the name, you will need it later.pathis the directory path to the share folder from above.
-
Open a terminal and enter the following command, replacing
$USERwith your Linux username:sudo smbpasswd -a $USERThis creates a password for the Local Network Share. Keep it somewhere safe, such as Vaultwarden.
-
If your Linux system has a firewall enabled by default or due to custom configuration, you may need to allow connections to Samba. The command varies depending on the firewall in use:
-
For systems using UFW (commonly found on Debian-based distros):
sudo ufw allow Samba -
For systems using firewalld (common on RHEL-based distros):
sudo firewall-cmd --permanent --add-service=samba
sudo firewall-cmd --reload
-
Create a Backup
-
In StartOS, go to
System > Create Backup. -
Click “Open New”.
-
Complete the form:
-
Hostname: The name of your Linux machine on the LAN.
-
Path - The “Share Name” (name of the share in your samba config), not the full directory path. (e.g. “backup-share” in the example).
-
Username - Your Linux username on the remote machine that you used to create the shared directory.
-
Password - The password you set above using smbpasswd
-
-
Click “Connect”.
Warning
If you receive
Filesystem I/O Error mount error(13): Permission denied, ensure you have entered all the correct values in the form. The hostname can be particularly tricky.
Mac Guides
Trusting Your Root CA (Mac)
-
Ensure you have downloaded your Root CA.
-
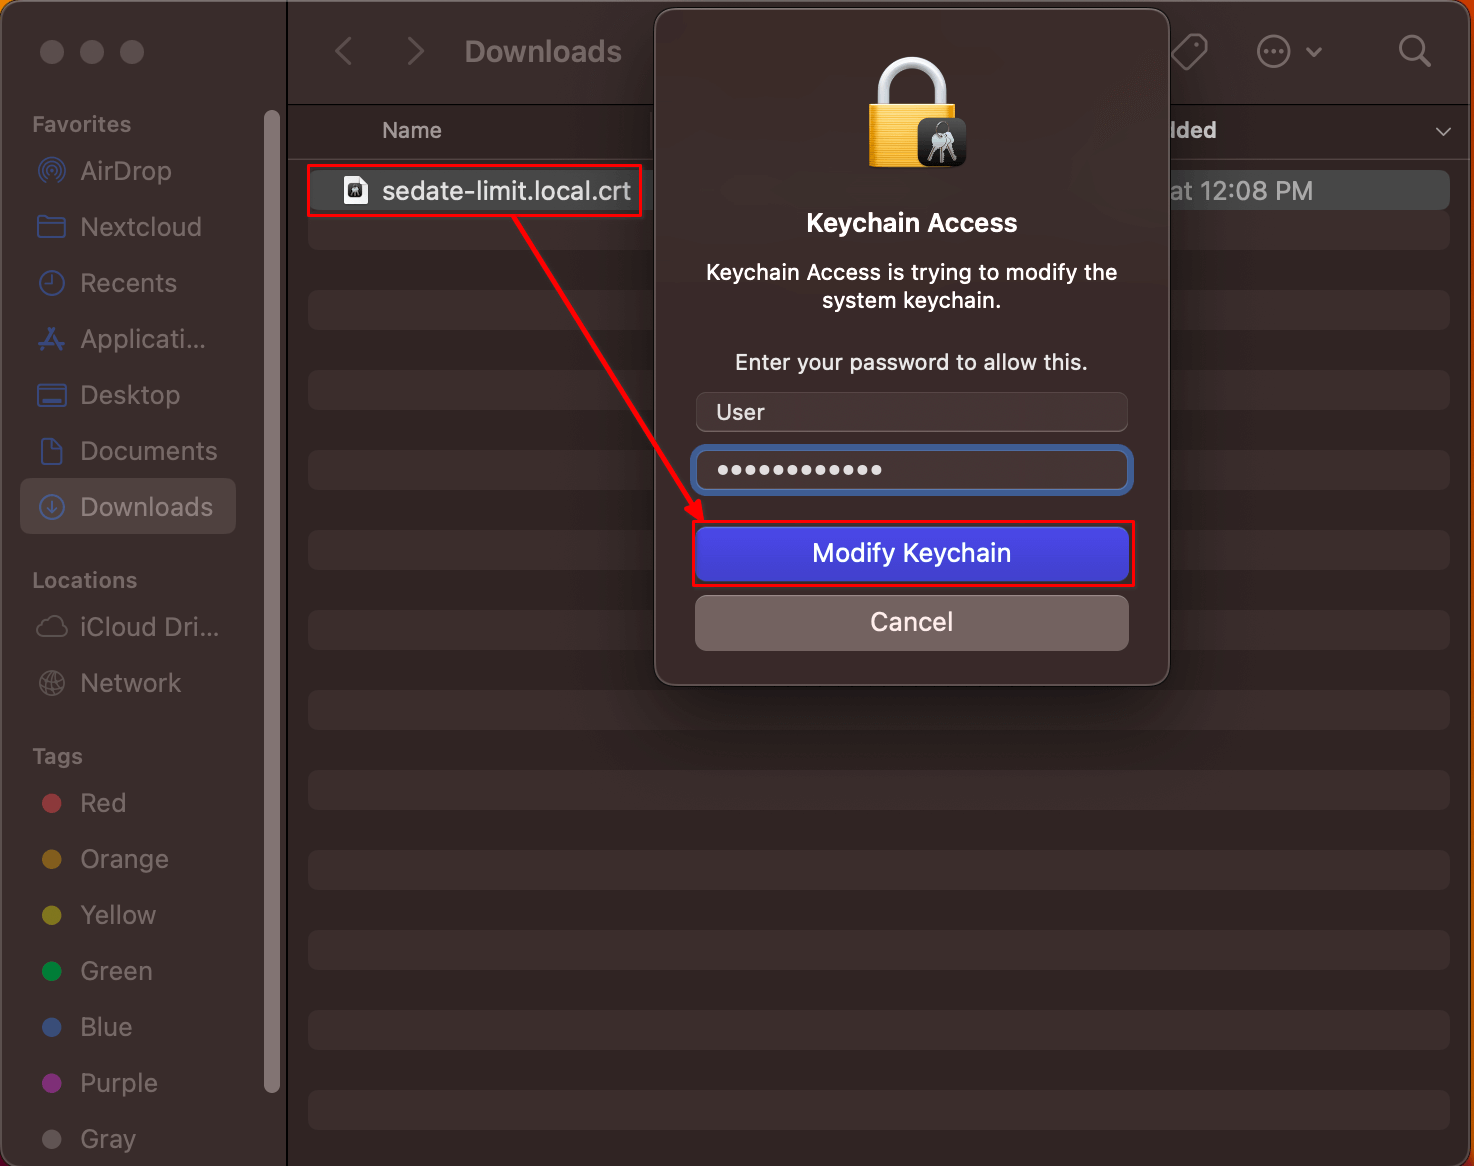
Locate your Root CA and double click it. Keychain Access will launch. You will be prompted for your Mac credentials. Select “Modify Keychain”.
-
Press Command + Spacebar to launch a program, type in Keychain Access and select the resulting Keychain Access program to open it.
-
Your server’s CA certificate will be displayed among the imported certificates in Keychain Access. Right-click on the imported CA cert and select Get Info:
-
The details of your CA certificate will be displayed in a new dialog window. Click the “Trust” heading, then select “Always Trust” on Secure Sockets Layer (SSL) and X.509 Basic Policy.
Click the red (x) button at the top left of the Local Root CA dialog window.
-
You will then be prompted again for your Mac credentials. Click Update Settings:
-
You will see your server’s CA certificate as trusted now, signified by a blue (+) sign and the CA cert information will now say “This certificate is marked as trusted for all users” in Keychain Access:
-
If using Firefox or Tor Browser, complete this final step
Connecting via VPN (Mac)
Follow this guide to privately access your server from your Mac device using a VPN.
Prerequisites
Contents
WireGuard
-
Obtain a WireGuard config file for your device.
- StartTunnel: Follow instructions here
- Router: Follow your router’s instructions.
-
Install WireGuard from the App Store.
-
Open the WireGuard app, click “Import tunnel(s) from file”, and select the file you downloaded above.
-
MacOS will inform you that WireGuard wants to set up a VPN connection. Click ‘Allow’.
-
Your VPN tunnel will have been created and visible in both you Mac’s system settings and conveniently in the WireGuard app where you can click to activate it.
Tip
You may need to edit your newly created tunnel and enable ‘On-demand’ for either ethernet, wifi or both.
OpenVPN
-
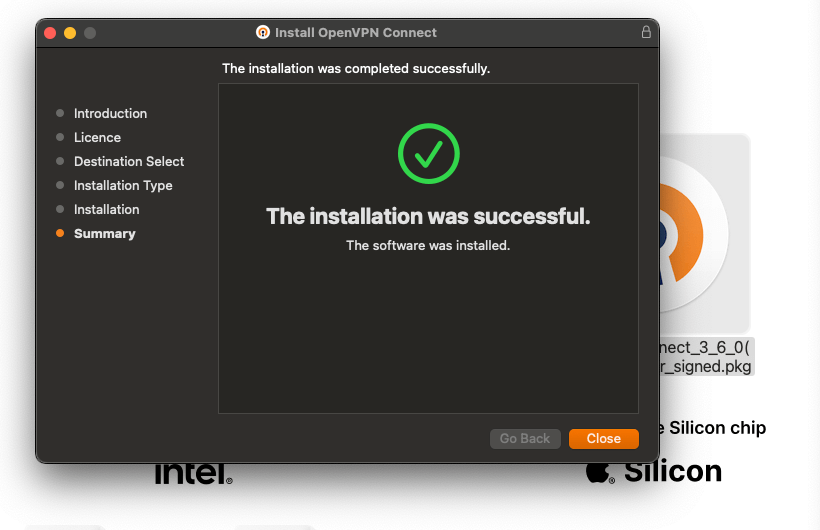
Download and install the OpenVPN Connect client from the official website.
-
If asked to do so, allow the OpenVPN client to run in the background.
-
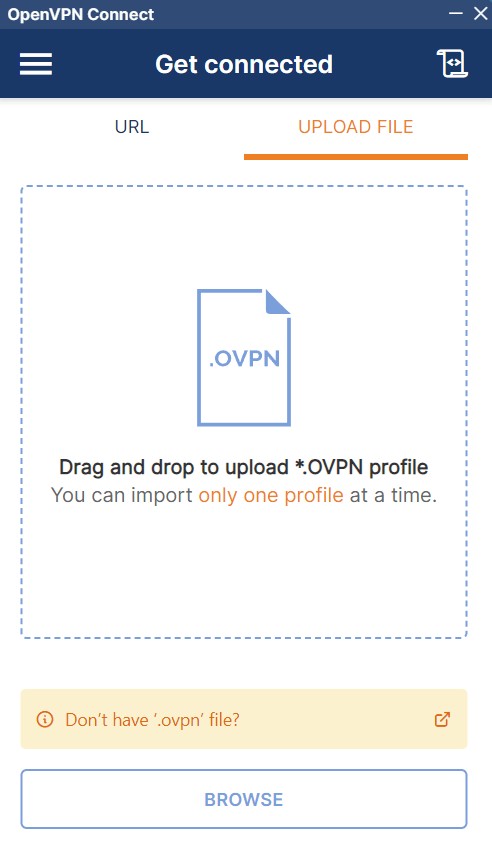
Download the configuration file from your router’s OpenVPN server.

-
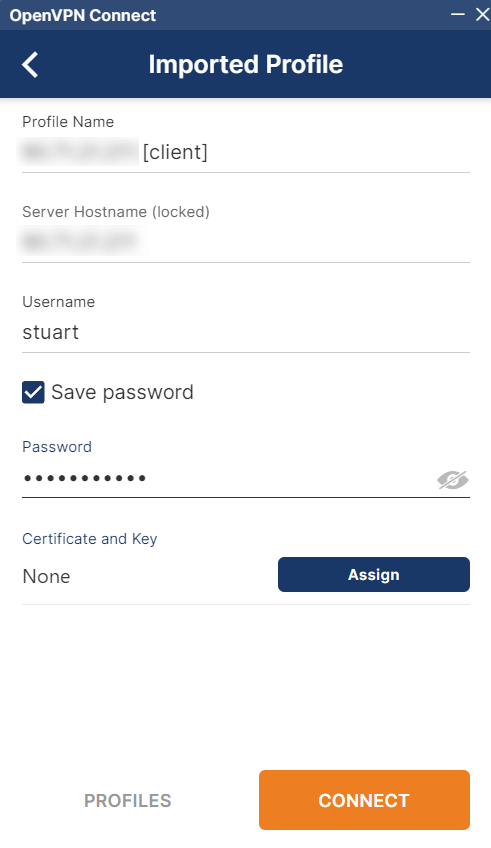
Import the configuration file and enter the necessary authentication settings you chose or were default on your OpenVPN Server on your router

-
Depending on how you’ve configured your OpenVPN server, you may need to add a username and password before you hit Connect.
-
Once set up, click on the name of the profile allows you to connect and disconnect. You can edit the profile from the icon to its right.
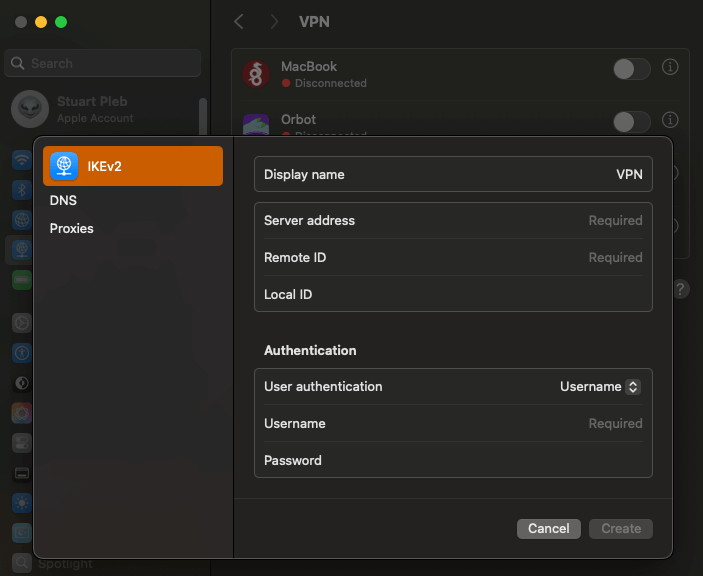
Note
You can avoid using the OpenVPN Connect client and create the OpenVPN connection directly in MacOS in the VPN section of System Settings. You would select IKEv2 and add your configuration manually.
Creating Backups to Mac
Contents
Create a Shared Folder
-
Identify or create a folder to store your server backups.
Tip
This folder can be located on an external drive connected to your Mac.
-
Go to
System Settings > General > Sharingand click the “info” icon: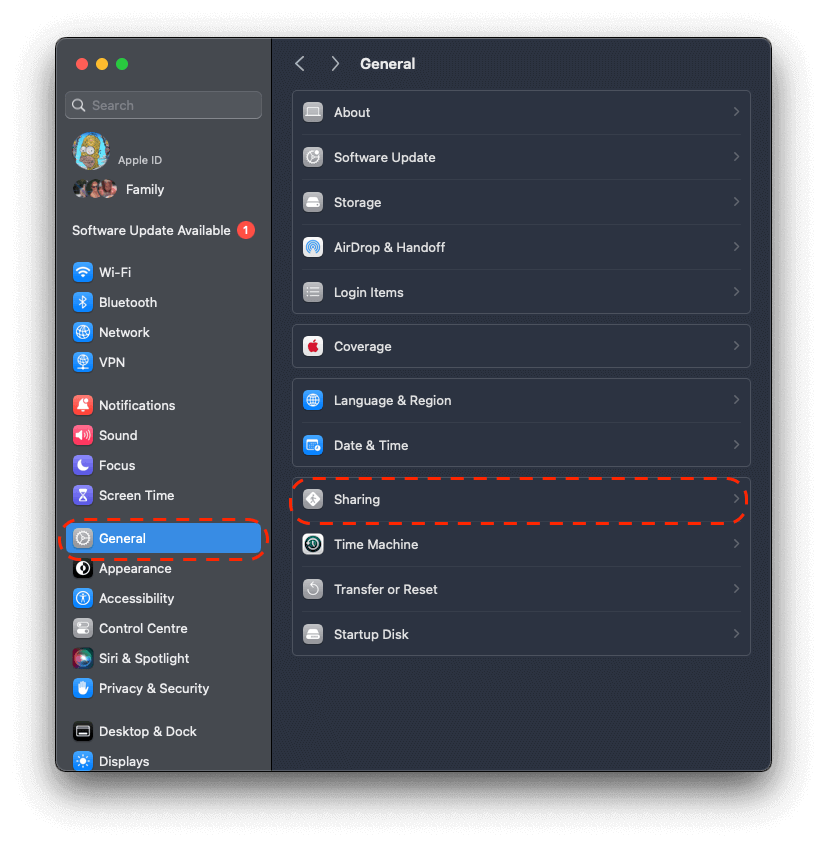
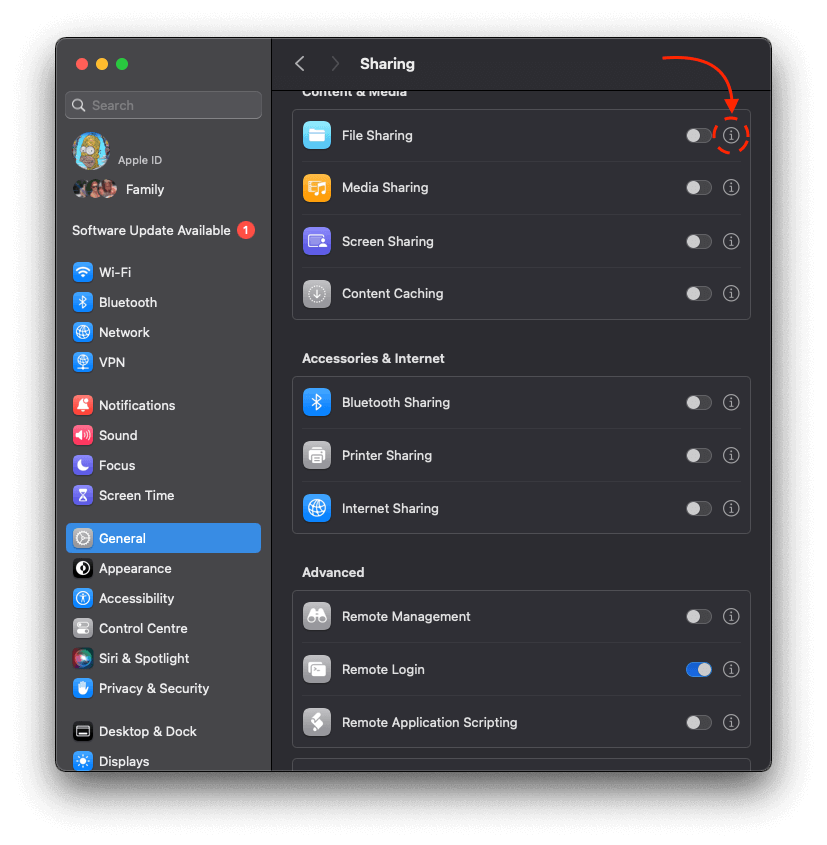
-
Click the toggle to enable file sharing, then click the “plus” icon and select your backups folder.
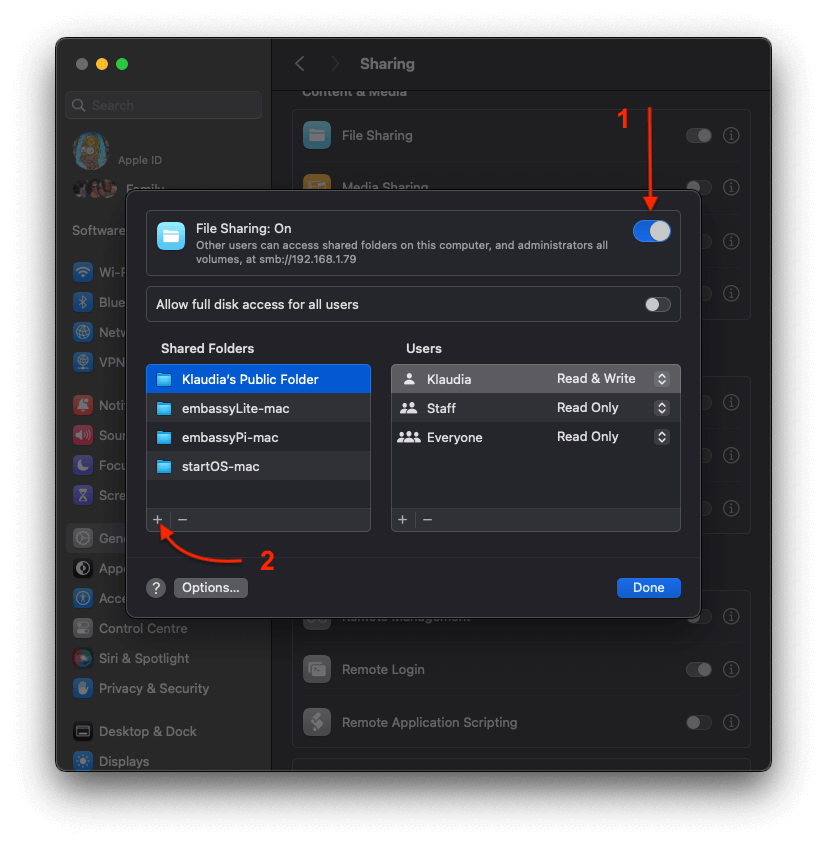
-
Click “Options”.
-
Select the user who owns the folder.
-
You can now move in to Create a Backup
Tip
You can find the hostname at the top of sharing window. The hostname will be an address beginning with smb://. To use as hostname disregard the smb:// and simply enter the ip address that follows it. You will need this in the next step. Alternatively you can use the computer hostname. (See directions below) Either method will work.
Create a Backup
-
In StartOS, go to
System > Create Backup. -
Click “Open New”.
-
Complete the form:
-
Hostname: The name of your Mac. Check the tip in Step 5 of the section above to find it. On some versions of Mac, you may need to open up Terminal and type
hostname. -
Path - The name of your shared folder, not the full directory path.
-
Username - Your Mac user who owns the shared folder.
-
Password - Your password for the above user.
-
-
Click “Connect”.
Warning
- If you receive
Filesystem I/O Error mount error(13): Permission denied, ensure you have entered all the correct values in the form. The hostname can be particularly tricky.- MacOS Catalina (version 10.15.7) If the backup fails, please see this Apple support thread. If the provided solution does not work, you will either need to update your Mac or use a physical drive for backups.
- MacOS Ventura (version 13.2) If you recently updated to Ventura, and you cannot get the folder to connect, do the following: in
System Settings > General > Sharing, turn off file sharing, restart your mac, then turn file sharing back on.
- If you receive
Windows Guides
Trusting Your Root CA (Windows)
-
Ensure you have downloaded your Root CA.
-
Click the “Start” menu, type
mmc, and select “Run as administrator” to access the Windows Management Console. When prompted with the “User Account Control” window, select “Yes” to allow this program to run.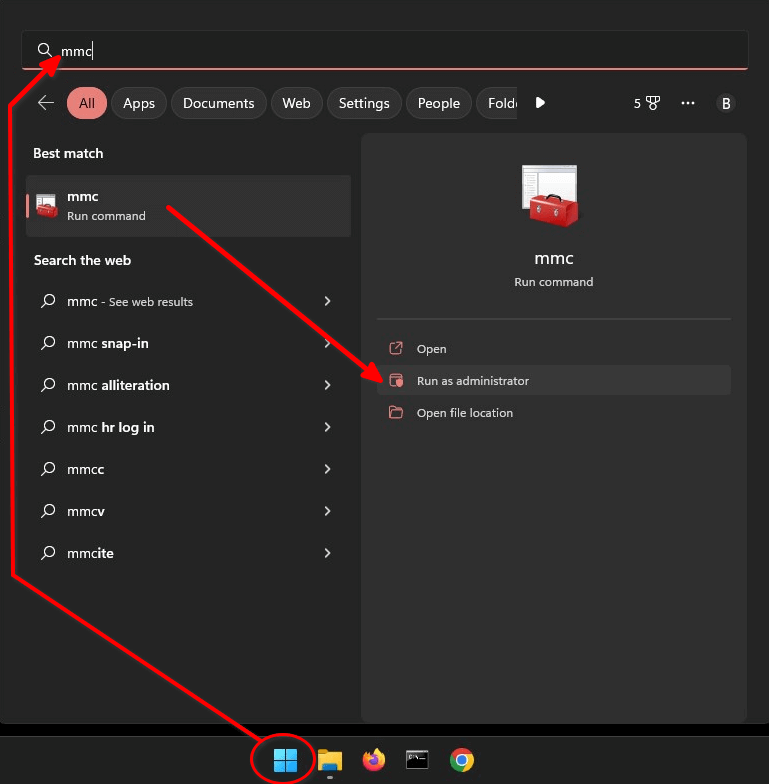
-
When the Management Console opens, navigate to
File > Add/Remove Snap-in.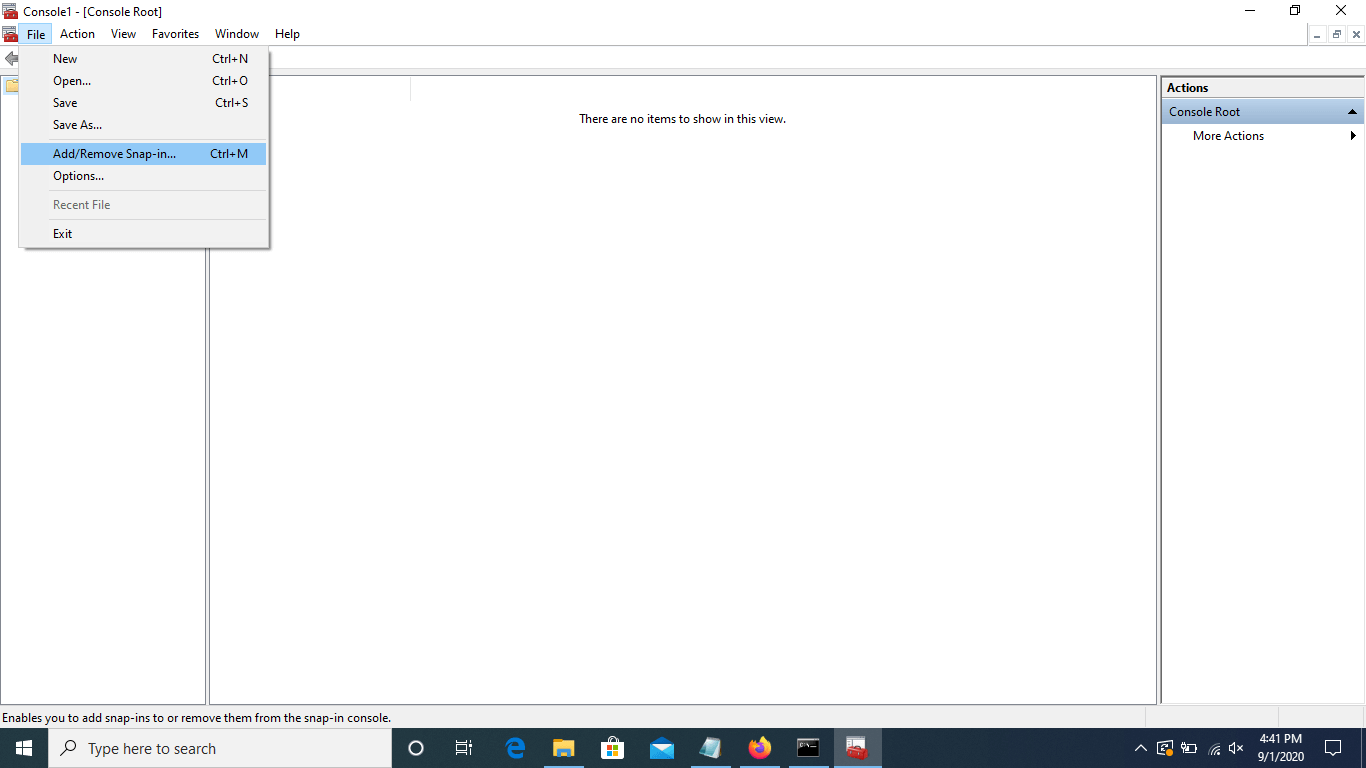
-
Select “Certificates” in the left side menu, then “Add”. This will open another window.
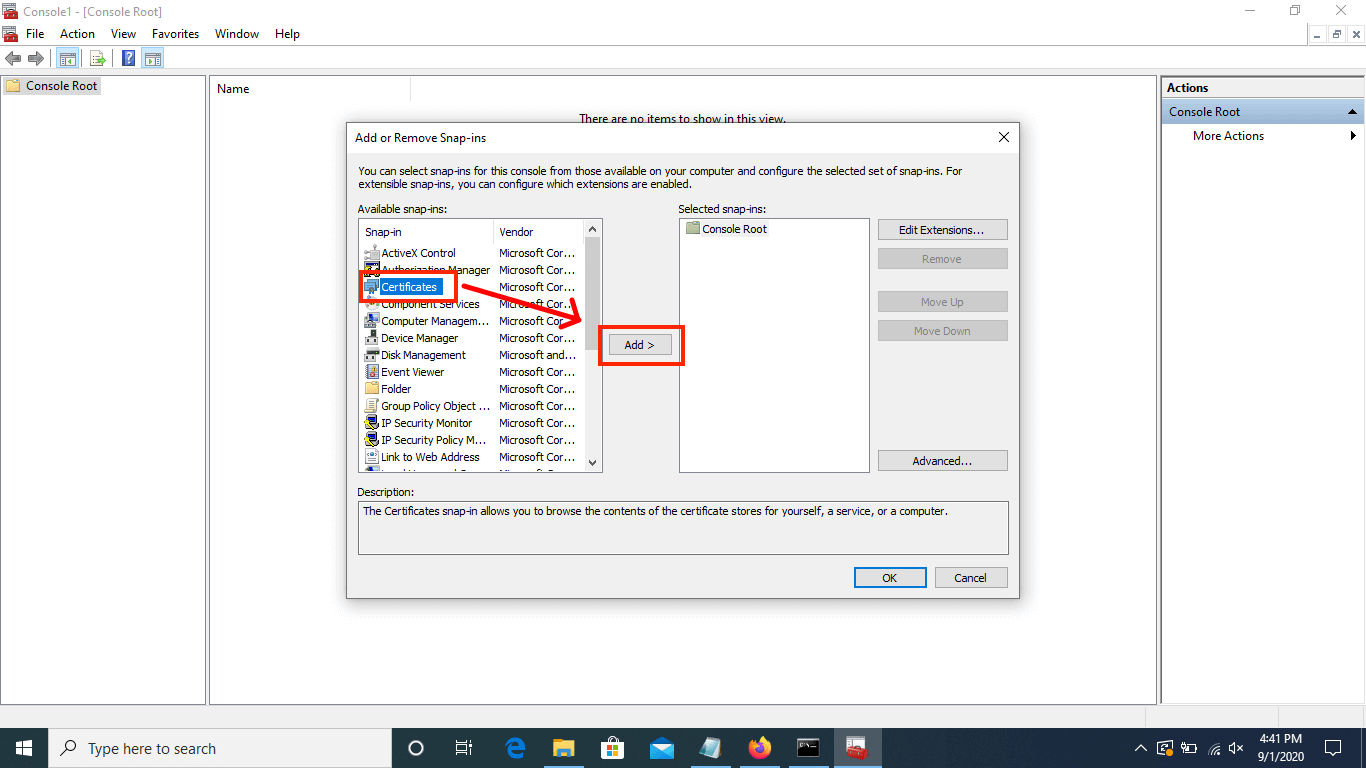
-
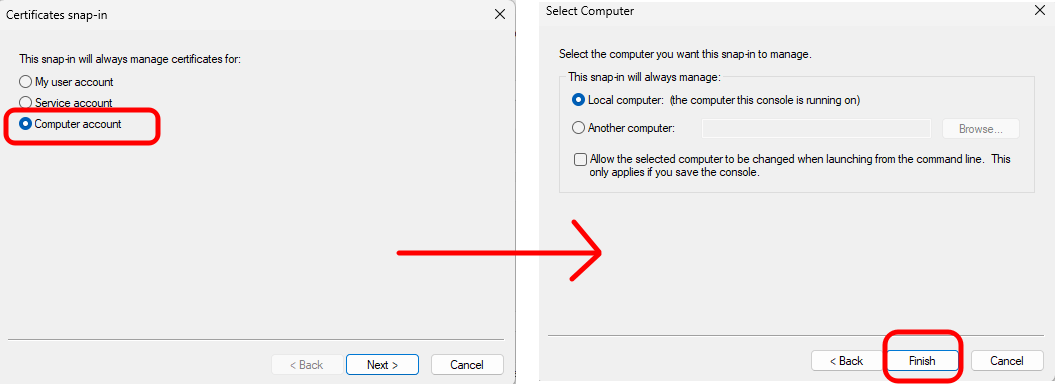
Select “Computer account” and click “Next”. Leave defaulted options on the next screen and click “Finish”.
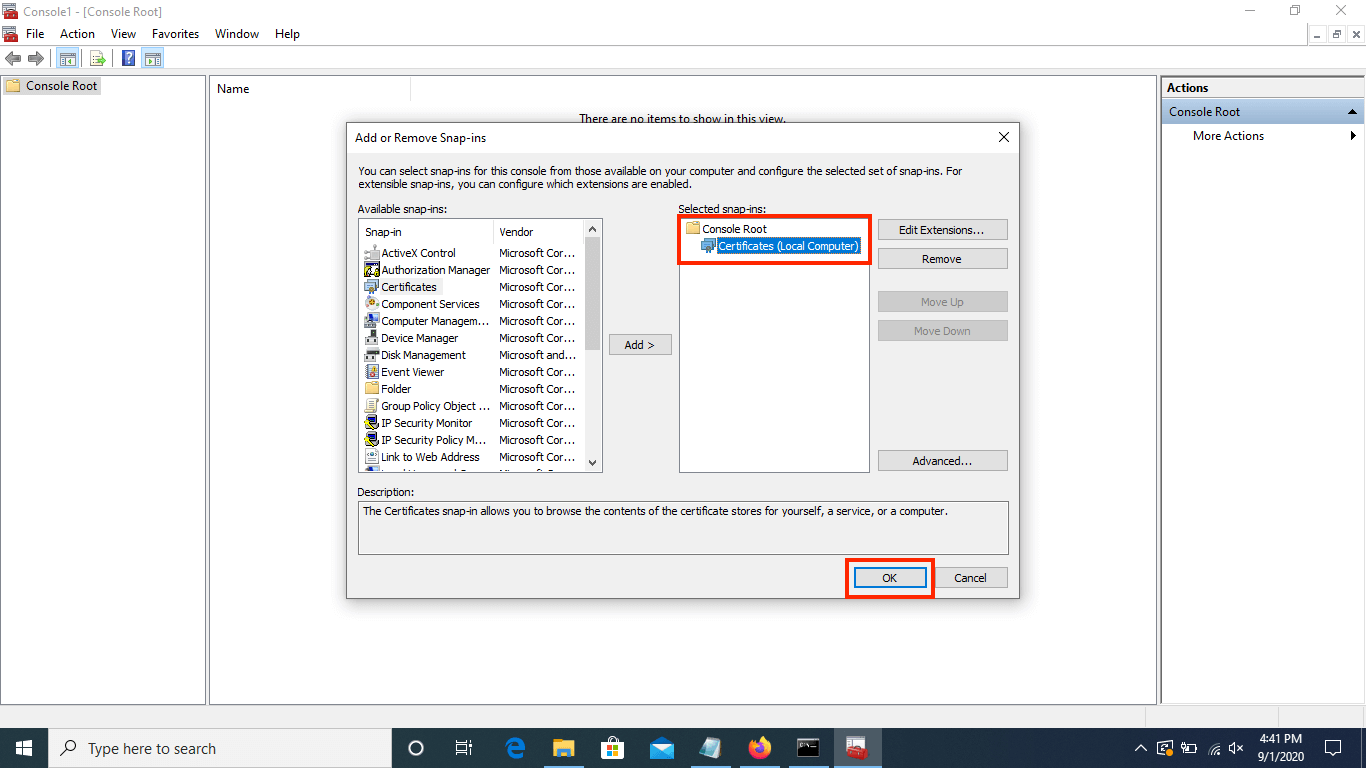
-
When you return to the “Add or Remove Snap-ins” page, ensure “Certificates (Local Computer)” exists under “Console Root” in the “Selected snap-ins” section, then click “OK”.
-
In the left hand menu of the Management Console, navigate to
Certificates (Local Computer) > Trusted Root Certification Authorities > Certificates.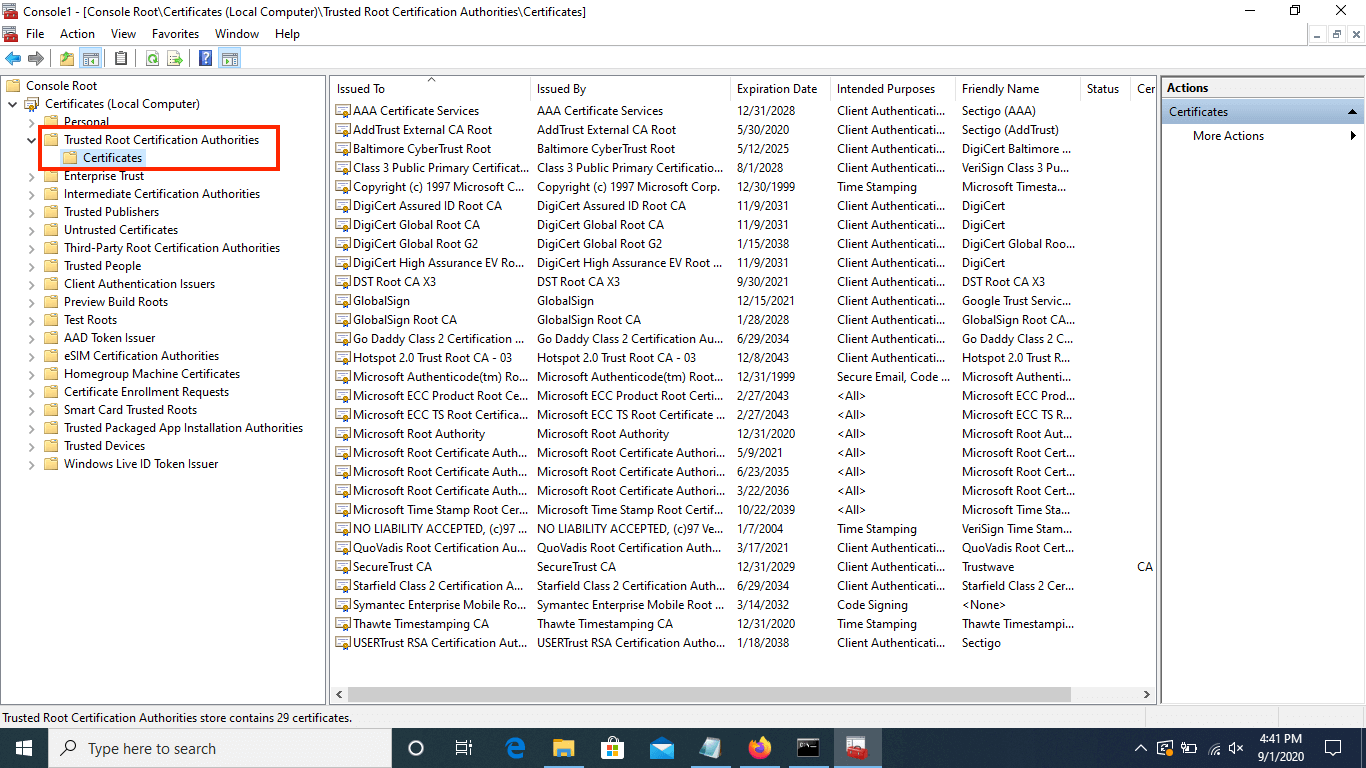
-
Right click on the “Certificates” directory, then navigate to
All Tasks > Import.
-
Click “Next” on the first page of the Certificate Import Wizard, then browse to the location where you saved the downloaded certificate and open it. Then click “Next”.

-
On the “Certificate Store” window, ensure that it says “Trusted Root Certificate Authorities” and click “Next”. Then click “Finish” on the final screen.
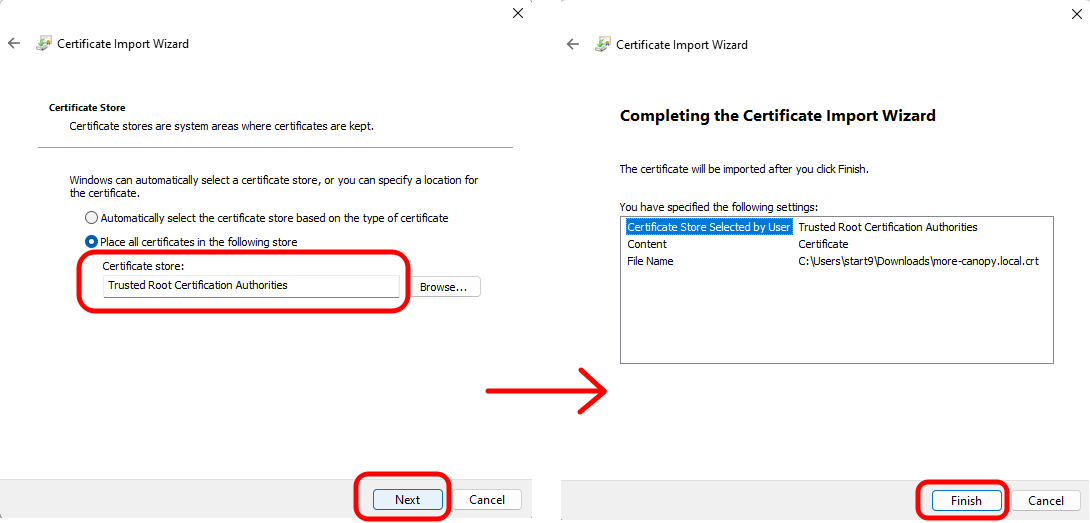
-
Select “OK” when the import is successful.
-
Verify your server’s unique
<adjective-noun> Local Root CAcertificate is in the “Certificates” folder: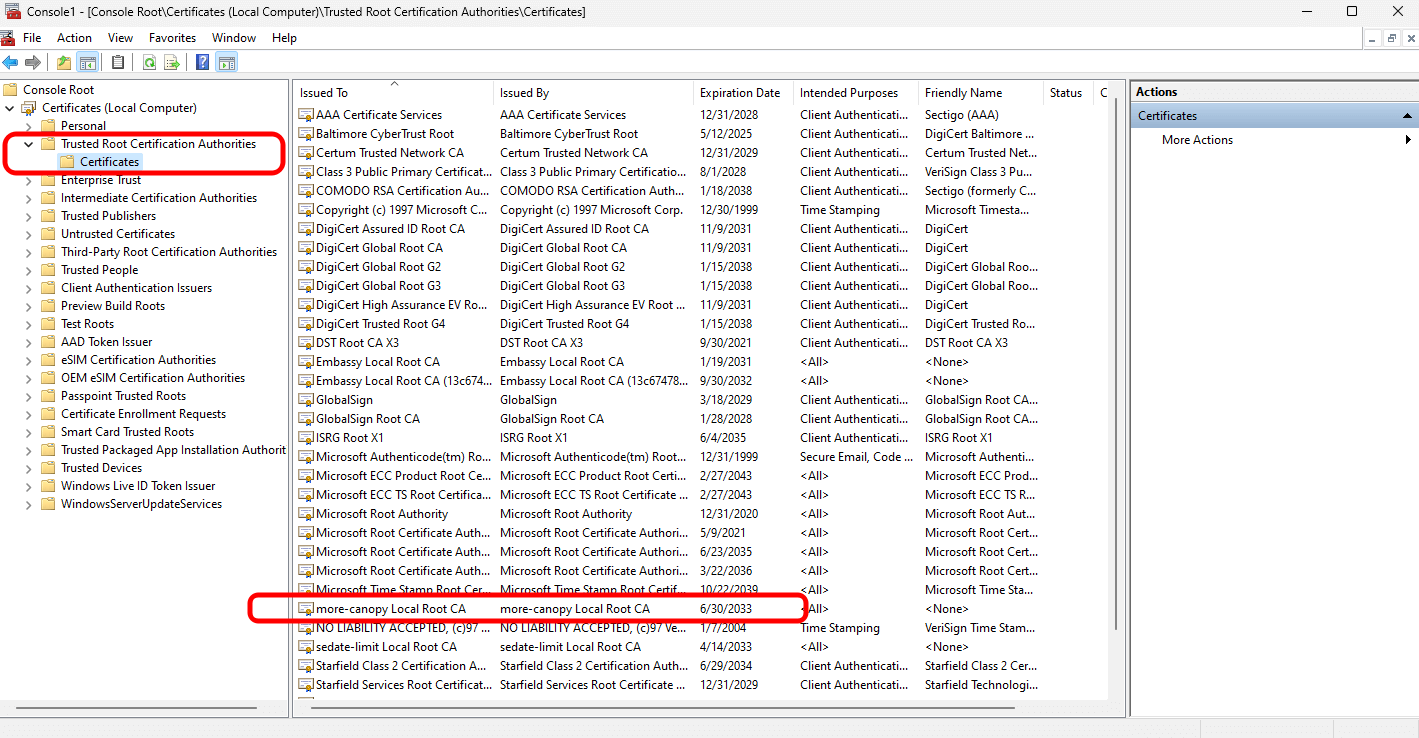
-
You can save the console settings (where we added a snap-in), if desired. Your Root CA will remain imported to the CA certificate store either way, and you will likely use this guide if you need to import a new certificate.
-
If using Firefox or Tor Browser, complete this final step
Connecting via VPN (Windows)
Follow this guide to privately access your server from your Windows device using a VPN.
Prerequisites
Contents
WireGuard
-
Obtain a WireGuard config file for your device.
- StartTunnel: Follow instructions here
- Router: Follow your router’s instructions.
-
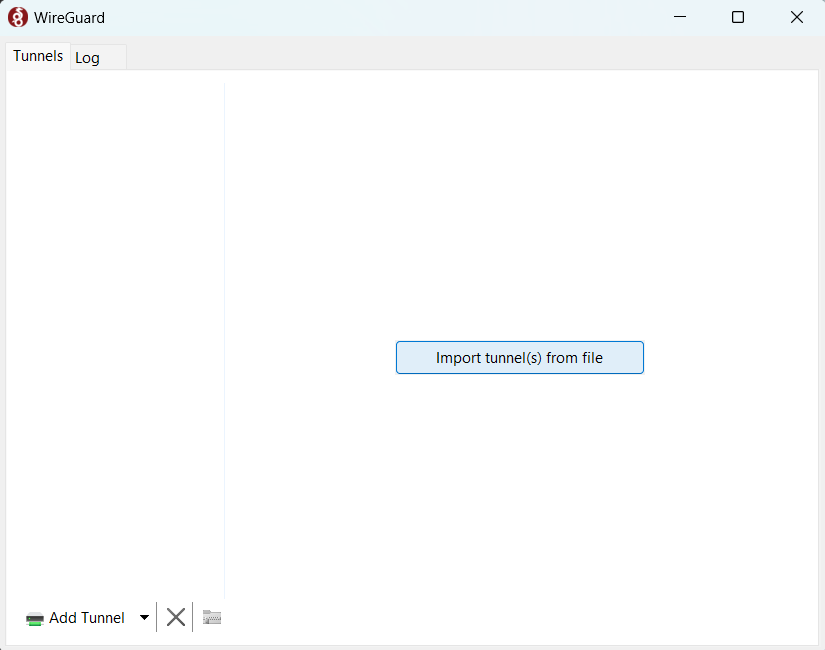
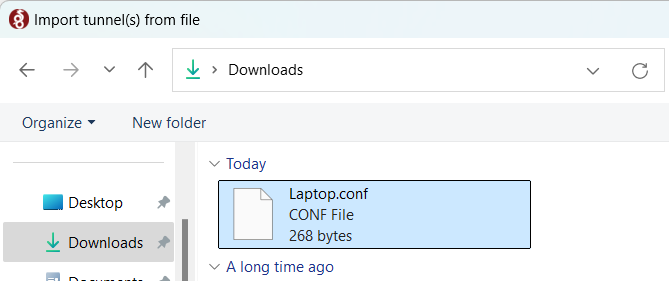
Install WireGuard from the official website.
-
Click “Import tunnel(s) from file” and select the file you downloaded above.
-
Your VPN tunnel will have been created and visible conveniently in the WireGuard app where you can click to activate it via the ‘Activate’ button.
OpenVPN
-
OpenVPN Connect from the official website.
-
Download the configuration file from your router’s OpenVPN server.

-
Import the configuration file and enter the necessary authentication settings you chose or were default on your OpenVPN Server on your router
-
Depending on how you’ve configured your OpenVPN server, you may need to add a username and password before you hit Connect.
-
Once set up, click on the name of the profile allows you to connect and disconnect. You can edit the profile from the icon to its right.

Creating Backups (Windows)
Contents
Create a Shared Folder
-
Identify or create a folder to store your server backups.
Tip
This folder can be located on an external drive connected to your Windows machine.
-
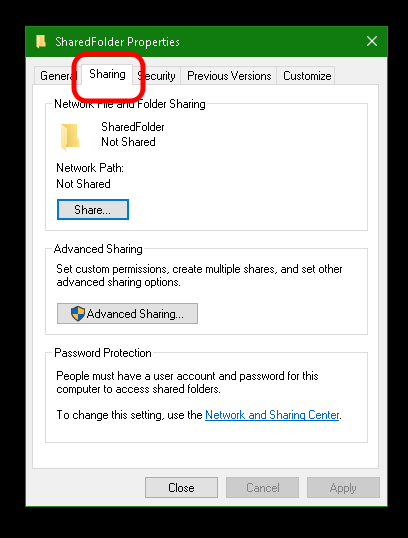
Right click the folder and click “Properties”.
-
Click “Sharing”.
-
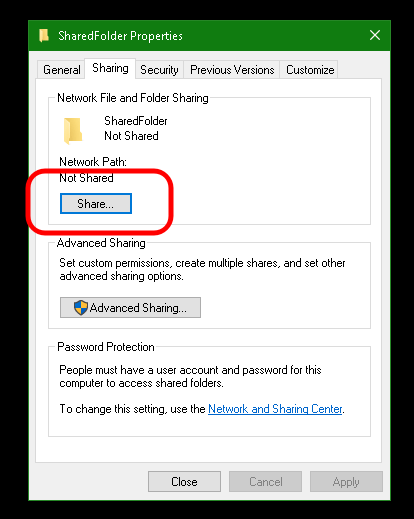
Click “Share”.
-
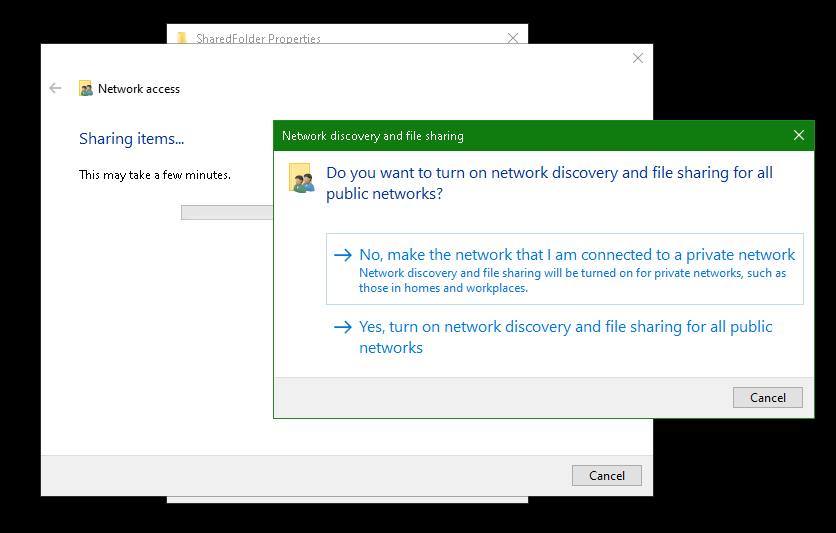
Select a user you want to use for login and click “Share”.
Warning
If you get the following dialog box, you have designated your network “Public”. You may wish to change to “Private” if this is your home network. Otherwise you may turn on network sharing for public networks.
-
Note the Windows directory path in grey text, highlighted in blue, beginning at the first single slash (
\). We will use that path later.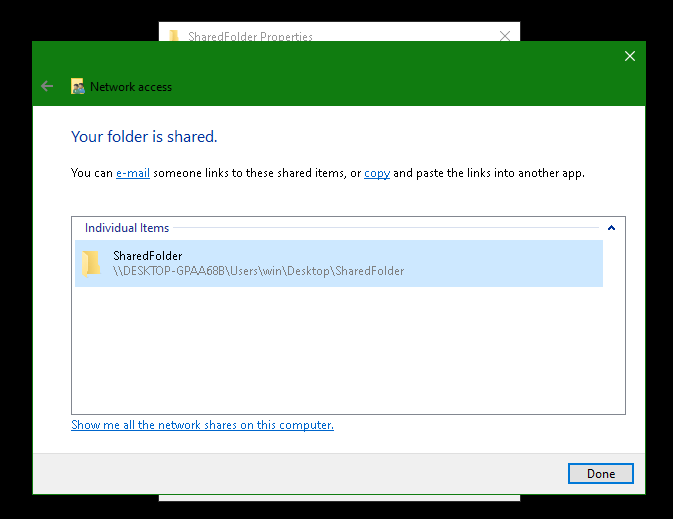
Create a Backup
-
In StartOS, go to
System > Create Backup. -
Click “Open New”.
-
Complete the form:
-
Hostname: Enter your Windows computer name (this is shown after a
\\). -
Path - Enter the folder path followed by the share name displayed in the Windows sharing dialog shown copied from above. In our example this would be
/Users/win/Desktop/SharedFolder. When entering the path, make sure replace the back slashes\shown in Windows with forward slashes/. -
Username - Your Windows user who owns the shared folder.
-
Password - Your password for the above user.
-
-
Click “Connect”.
Warning
- If you receive
Filesystem I/O Error mount error(13): Permission denied:- Ensure you are entering the correct username and password. You cannot use a pin.
- Ensure your windows password meets any length and complexity requirements set by your local Windows policy.
- Office365 accounts also may not work at all, try a regular user in this case.
- If you receive
Filesystem I/O Error mount error(115): Operation now in progress,- Navigate to
Start > Settings > Network & Internet > Ethernet (or WiFi)and select the “Private” profile to treat your LAN as a trusted network that allows file sharing.
- Navigate to
- If you receive
Android/Graphene Guides
Trusting Your Root CA (Android/Graphene)
This guide applies to Android 13+, GrapheneOS, CalyxOS, and LineageOS
-
Ensure you have downloaded your Root CA.
-
Go to
Settings > Security > More security settings > Encryption & credentials > Install a certificate > CA Certificate > Install Anyway, then select your custom-namedadjective-noun.crtcertificate.
-
If using Firefox, you must use Firefox Beta, then complete this final step.
Connecting via VPN (Android/Graphene)
Follow this guide to privately access your server from your Android/Graphene device using a VPN.
Prerequisites
Contents
WireGuard
-
Obtain a WireGuard config file for your device.
- StartTunnel: Follow instructions here
- Router: Follow your router’s instructions.
-
Install WireGuard from the Play Store WireGuard website
-
Click the
+button to add a new profile/connection.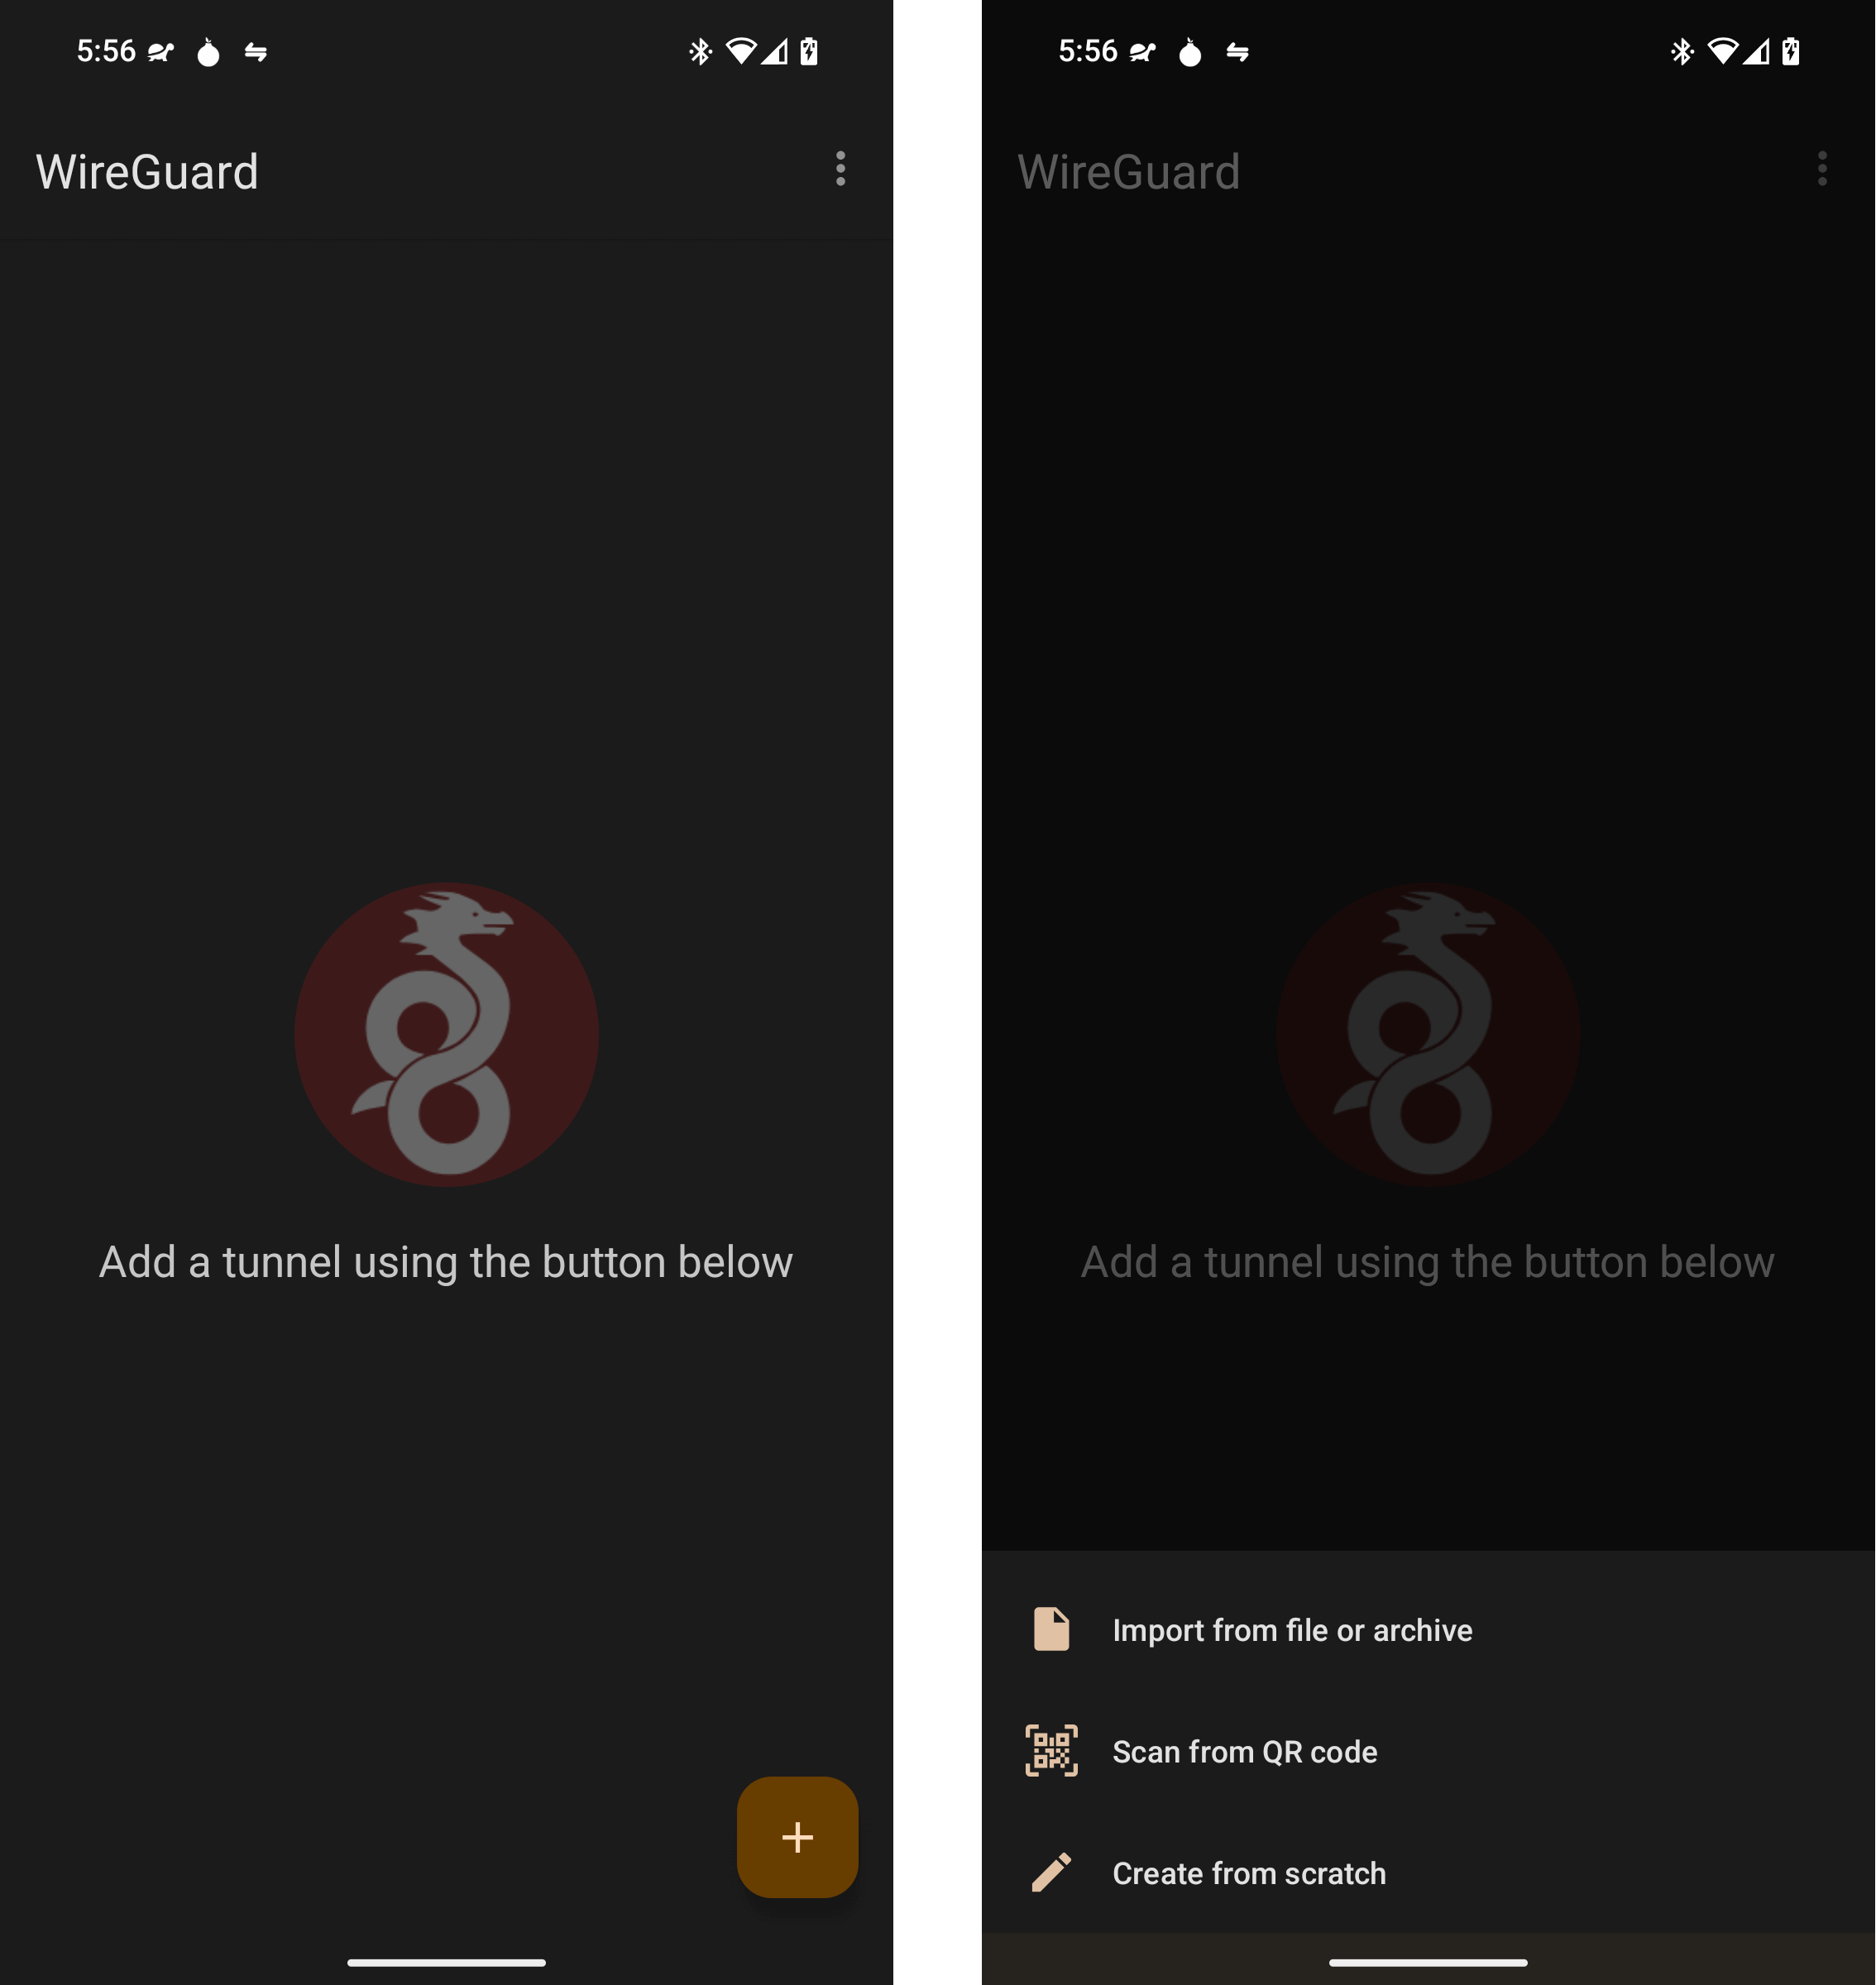
-
Import the configuration file created above to your Android/Graphene device. If the configuration file can be displayed as a QR code, that is usually easiest. If not, you can download the file and transfer it to your Android/Graphene device. A last resort option would be to manually enter the necessary values.
-
Android will inform you that WireGuard wants to set up a VPN connection. Click “OK”.
OpenVPN
-
Install OpenVPN for Android from Google Play, F-Droid or the APK from Arne Schwabe’s Github. As an alternative you can also use OpenVPN Connect from OpenVPN, Inc..
-
Download the configuration file from your router’s OpenVPN server to your Android/Graphene device. If accessing your router UI via a laptop/desktop, you will need to download the file to that device, then send it to yourself via email, message, or other file sharing tool.
-
Click the
+button to add a new profile/connection.
-
Import from the file you downloaded above. Consider giving the profile a better name.
-
Android will inform you that OpenVPN wants to set up a VPN connection. Click “OK”.
-
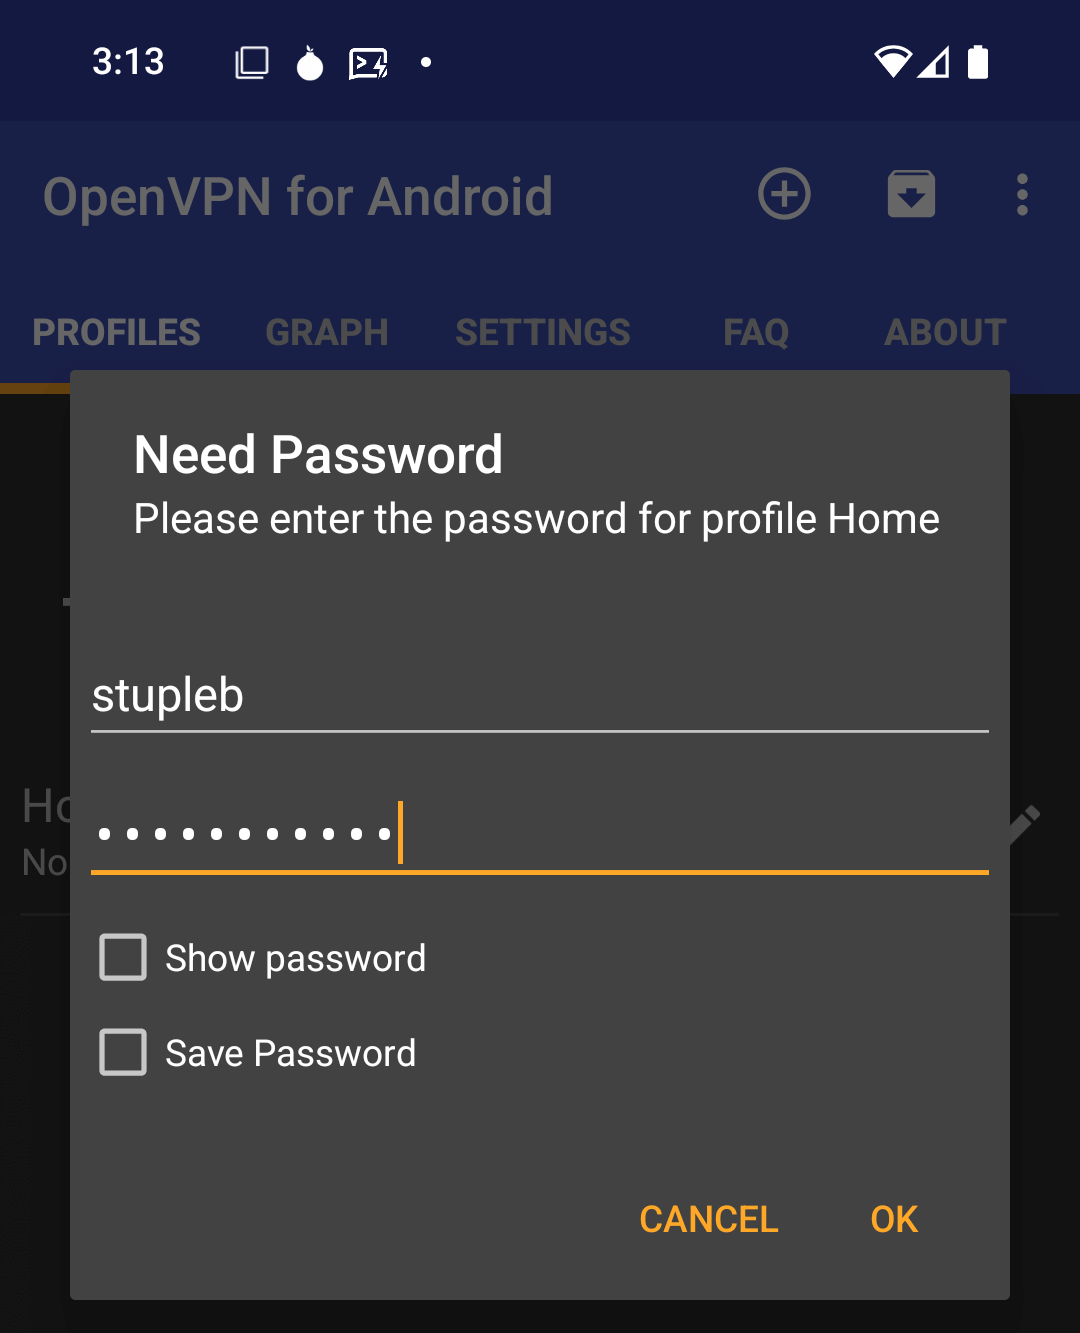
If you set up your OpenVPN server with username and password authentication, enter those and select to Save Password.
Note
In this guide we are using Password-only, but passwords can be accompanied by certificates for added security.
-
Once set up, click on the name of the profile allows you to connect and disconnect. You can edit the profile from the icon to its right.
-
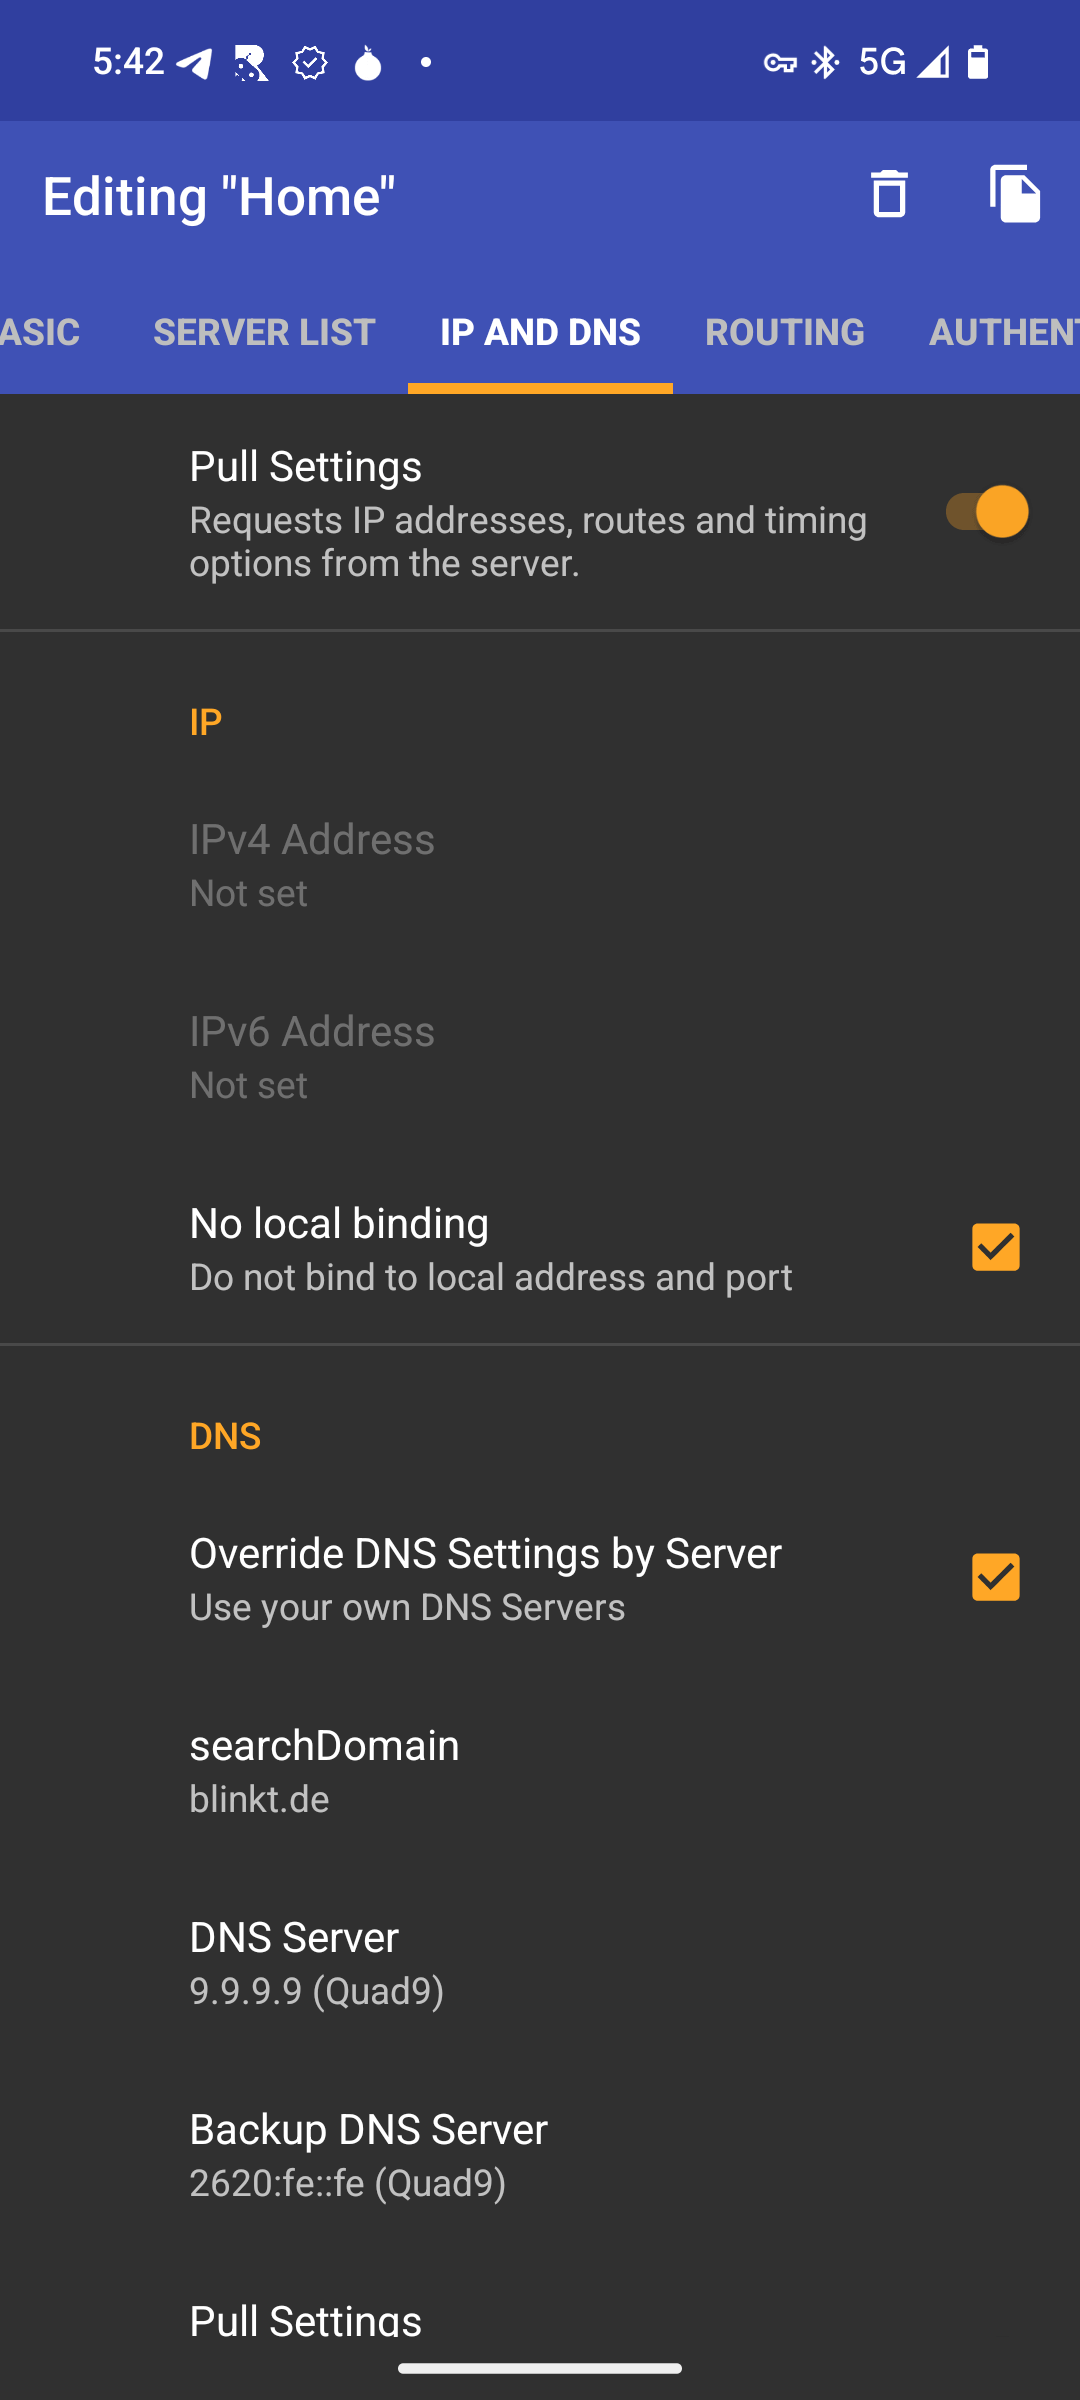
If you’re not able to browse websites when connected, your Router VPN may not be providing valid DNS servers. If so, edit the profile and visit the IP and DNS tab. Click to override the DNS settings and add your own.
iOS Guides
Trusting Your Root CA (iOS)
-
Ensure you have downloaded your Root CA.
-
Open your iCloud Downloads folder and click on the certificate. It will display a dialog box that says
Profile Downloaded. Click “Close”. -
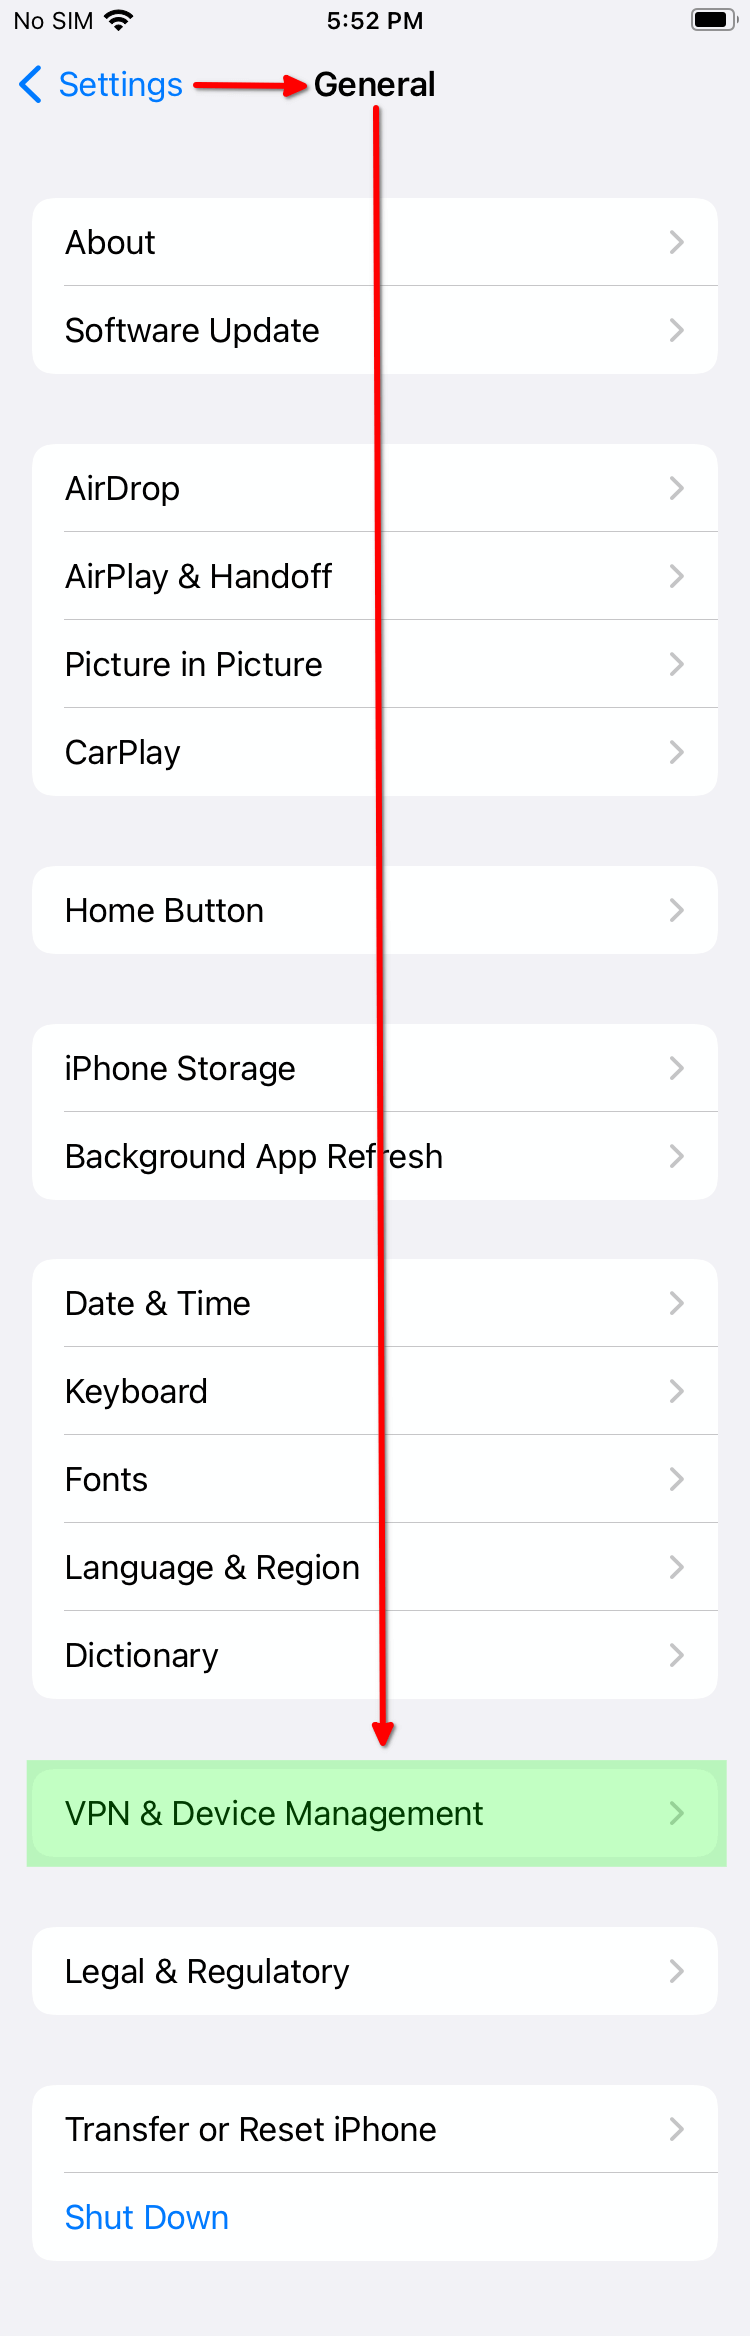
Head to Settings > General > VPN & Device Management:
-
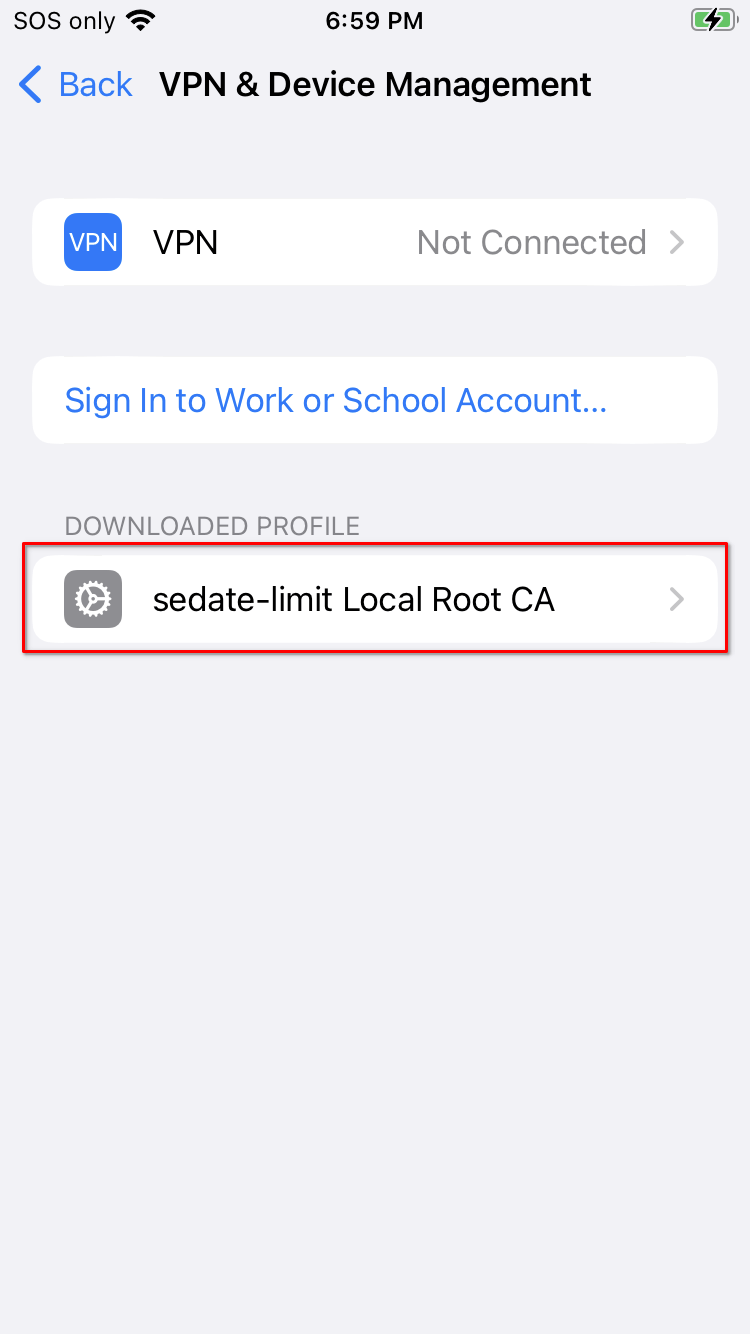
Under “DOWNLOADED PROFILE”, click your Root CA:
-
Click “Install”:
-
Click “Install” again:
-
Click “Install” for a 3rd time:
-
You should see green text with a check-mark saying “Verified” under the Profile Installed dialog:
-
Tap “Done”.
-
Go to
General > About > Certificate Trust Settingsand enable your Root Ca: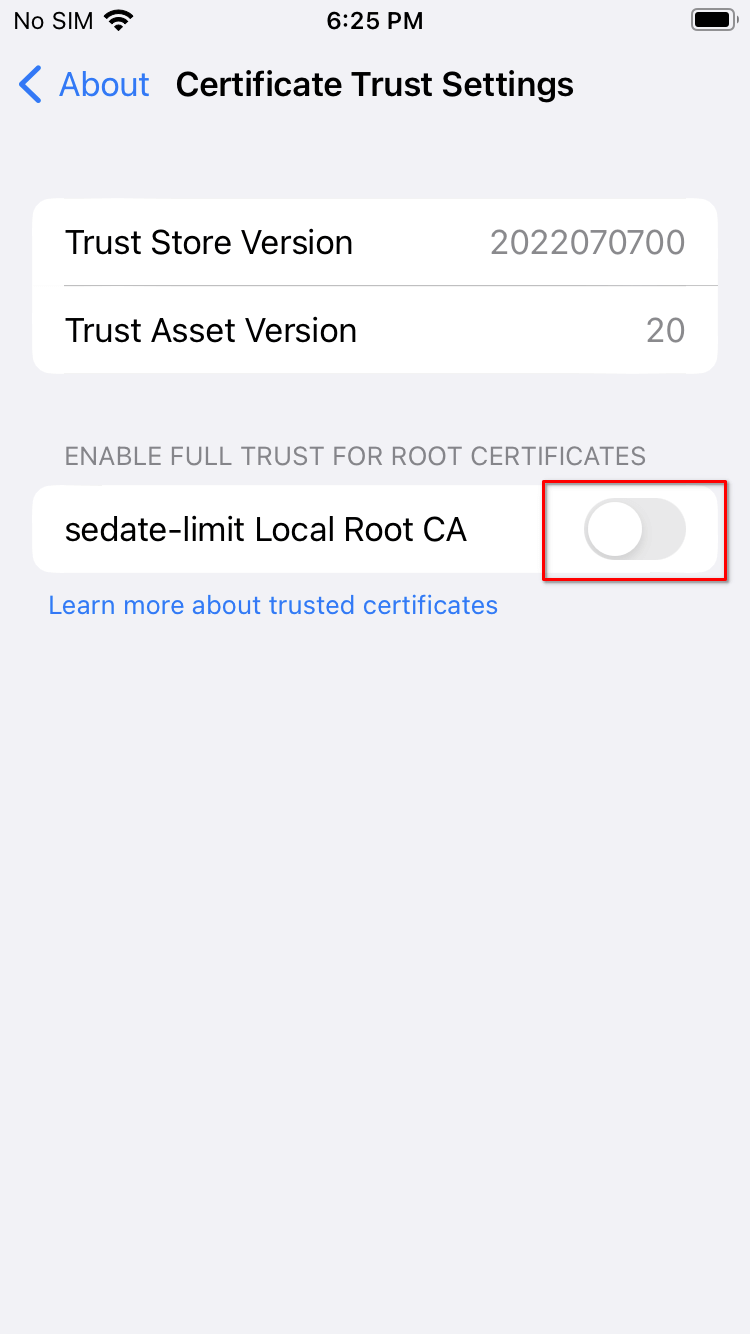
-
Click “Continue”.
Connecting via VPN (iOS)
Follow this guide to privately access your server from your iOS device using a VPN.
Prerequisites
Contents
WireGuard
-
Obtain a WireGuard config file for your device.
- StartTunnel: Follow instructions here
- Router: Follow your router’s instructions.
-
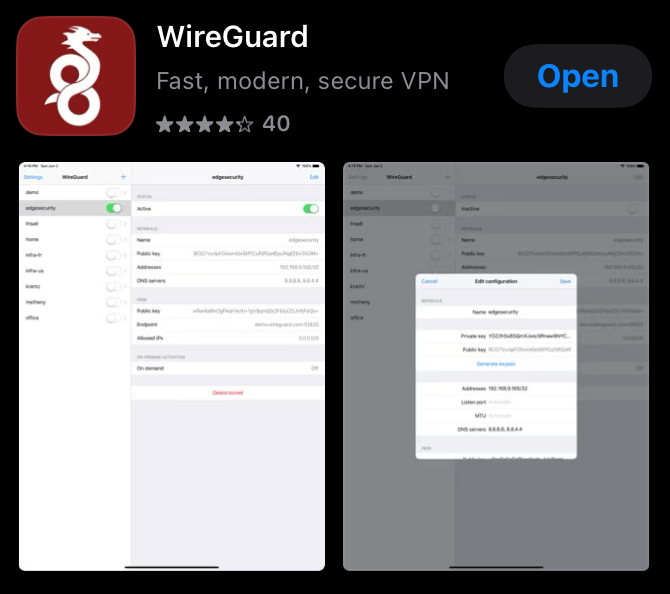
Install WireGuard from the App Store.
-
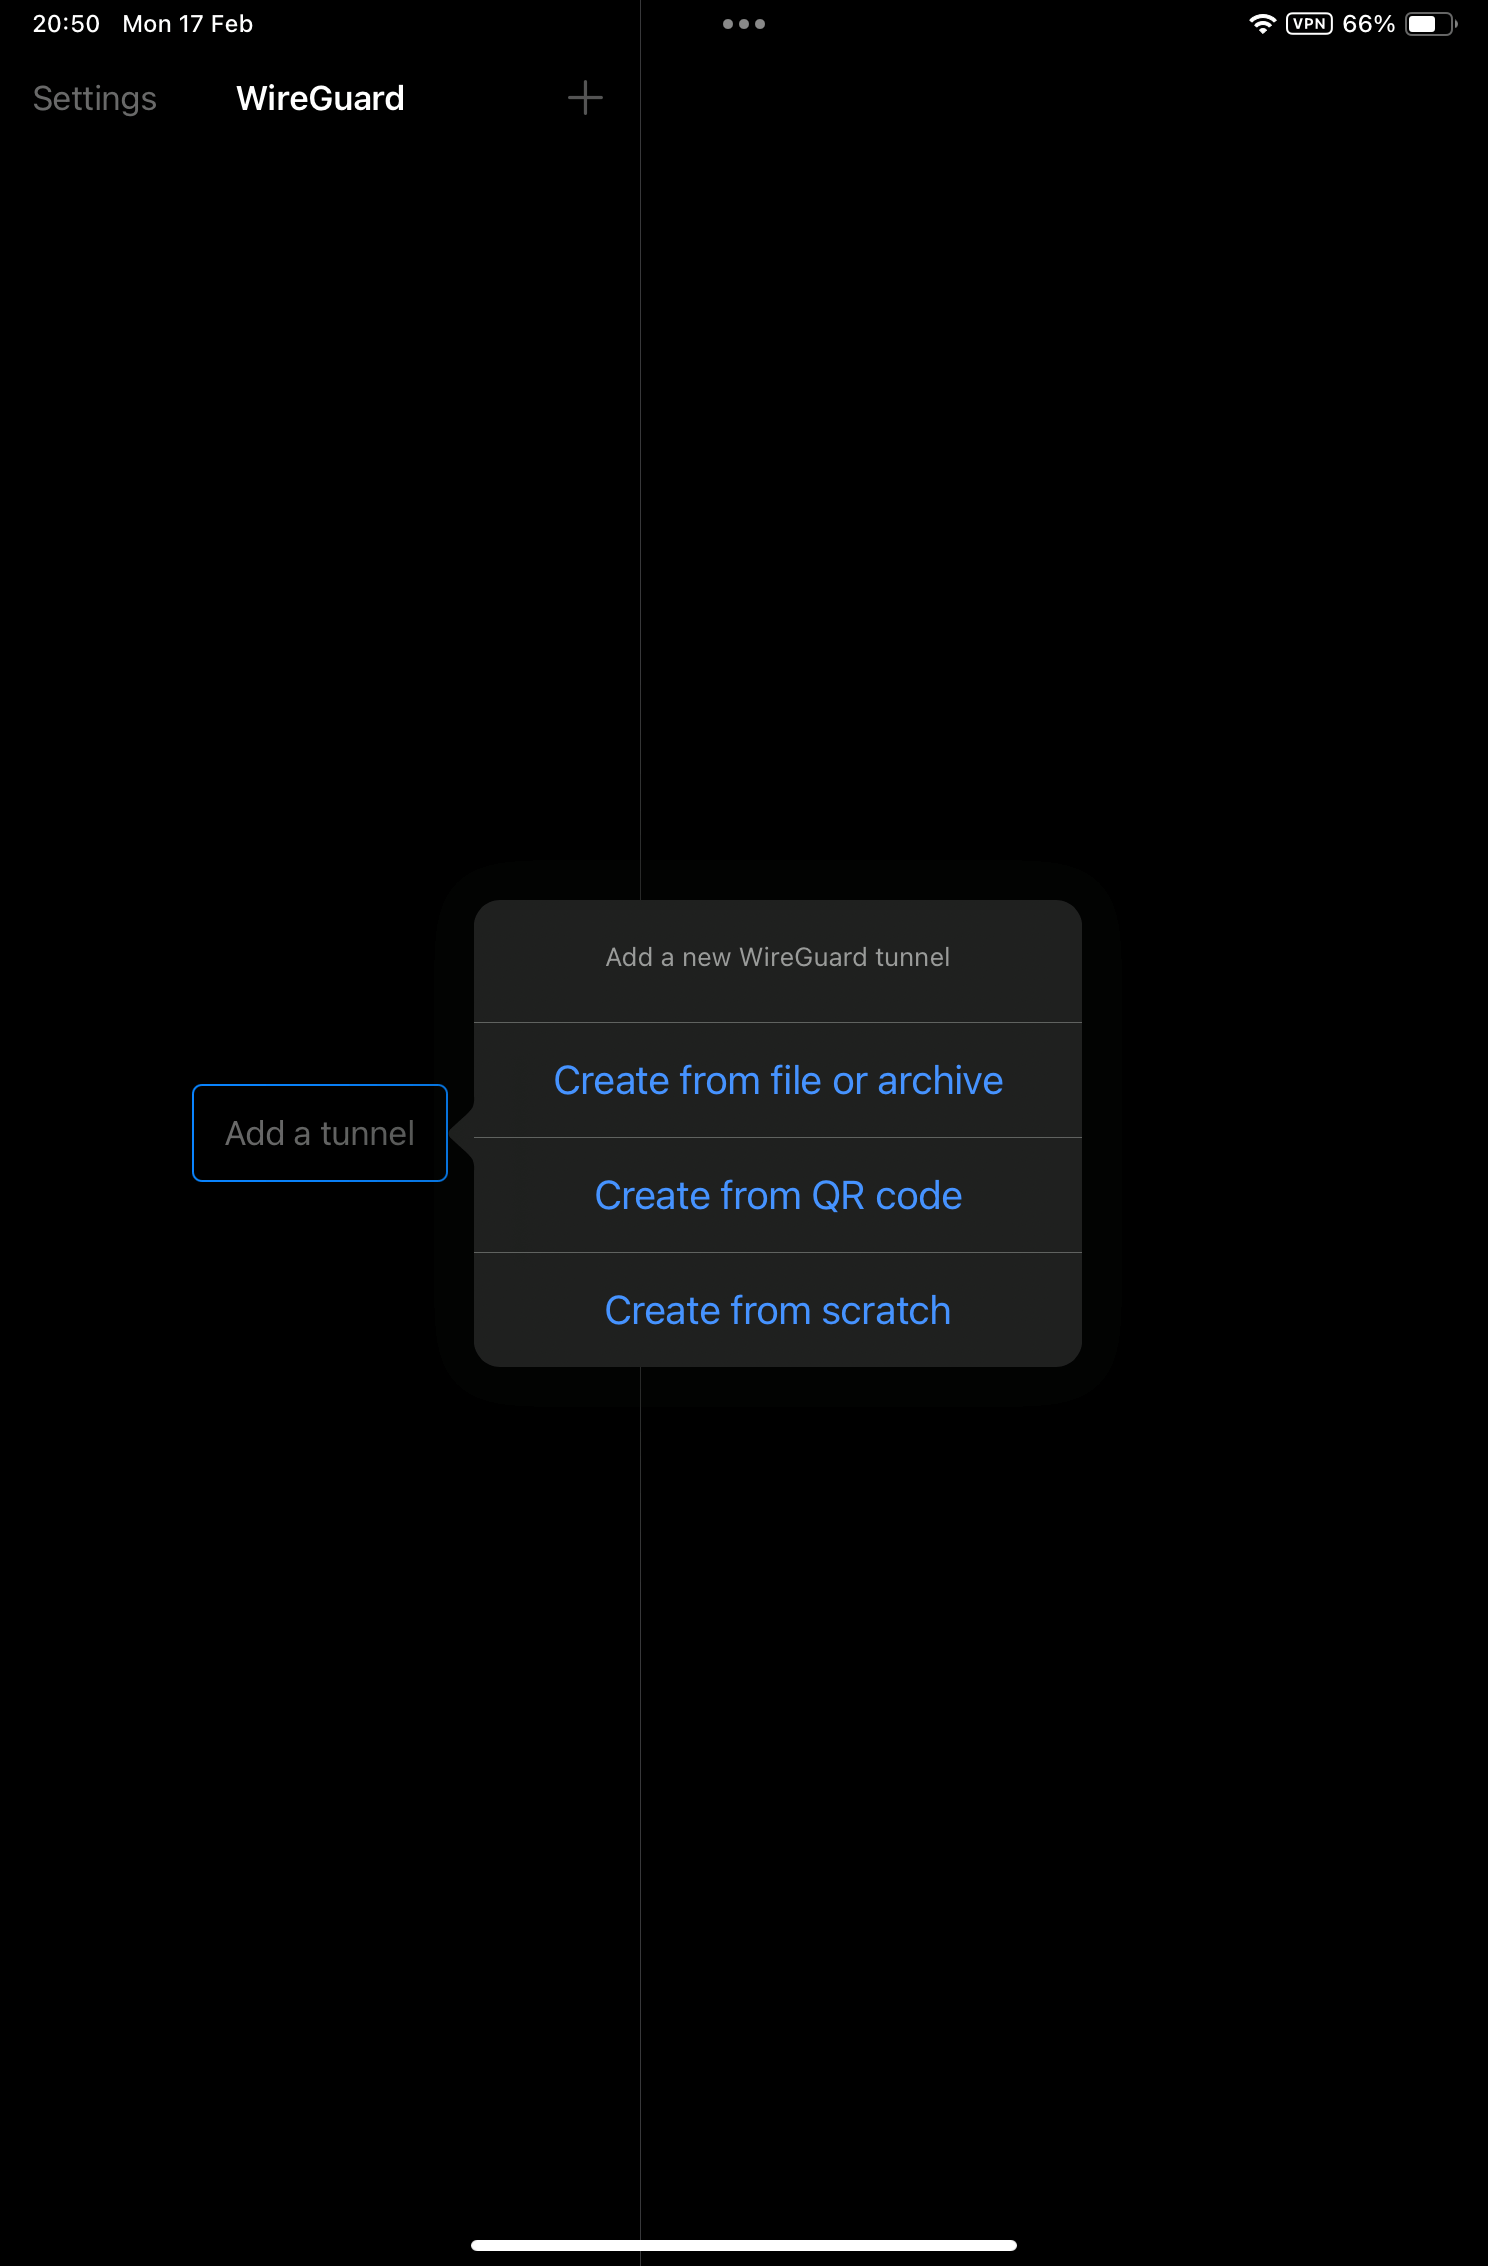
Click
Add a tunnel. -
Import the configuration file created above to your iOS device. If the configuration file can be displayed as a QR code, that is usually easiest. If not, you can download the file and transfer it to your iOS device.

-
Your VPN tunnel will have been created and visible in the WireGuard app where you can click to activate it.

OpenVPN
-
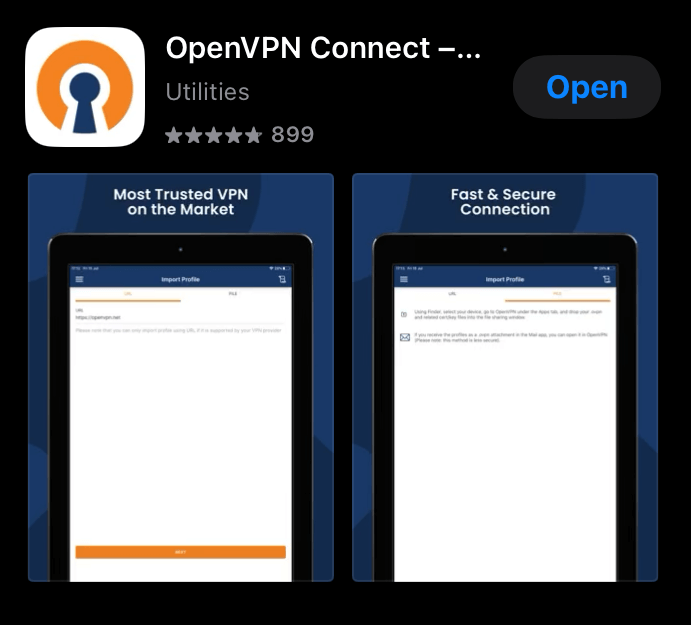
Install OpenVPN Connect from the App Store.
-
Click to accept notifications, accept terms etc.
-
Download the configuration file from your router’s OpenVPN server to your IOS device. If accessing your router UI via a laptop/desktop, you will need to download the file to that device, then send it to yourself via email, message, or other file sharing tool.

-
Import the configuration file and enter the necessary authentication settings you chose or were default on your OpenVPN Server on your router
-
Depending on how you’ve configured your OpenVPN server, you may need to add a username and password before you hit Connect.

-
Once set up, click on the name of the profile allows you to connect and disconnect. You can edit the profile from the icon to its right.

Synology Guides
Creating Backups to Synology
Create a Shared Folder
- In the Synology UI, go to
Control Panel > Shared Folderand choose the folder you want to use as the destination for the backup.
Note
Do not select an encrypted folder. Encrypted folders on Synology enforce a character limit of 143 characters. At this time, StartOS backups use folder/file names that are longer than 143 characters. The backup process will fail if you try to backup to an encrypted folder.
-
Still in the Synology UI, go to
Control Panel > File Services > SMBand click the SMB tab if it isn’t already selected. Ensure that “Enable SMB service” is checked. -
Under Advanced Settings on the same tab, set “Min SMB protocol” to
SMB2and “Max SMB protocol” toSMB3. -
Also on the SMB tab, take note of your device name. Just under “Note” in a pale blue box, you will see “PC (Windows Explorer): “ and “Mac (Finder):”. These both provide network addresses that contain your device’s name. This device name is the “Hostname” you will need to provide within the StartOS “New Network Folder” dialog in step 3 of the “Connect StartOS” section below.
-
Still in File Services, click on the rsync tab. Click the checkbox to enable the rsync service.
-
Back in the Synology UI, click “File Station” and locate the the desired destination folder. Right click the folder, then Properties > General. Next to “Location” will be a folder location. The portion of the location without the volume label is the value you will use for the “Path” within the StartOS New Network Folder dialog. For example, if the Location is
/volume1/Backups, the value you care about isBackups.
Create a Backup
-
In StartOS, go to
System > Create Backup. -
Click “Open New”.
-
Complete the form:
-
Hostname: The name of your Synology device on the LAN.
-
Path - The name of your shared folder, not the full directory path (e.g.
Backupsfrom the example above). -
Username - Your Synology user who owns the shared folder.
-
Password - Your password for the above user.
-
-
Click “Connect”.
Warning
If you receive
Filesystem I/O Error mount error(13): Permission denied, ensure you have entered all the correct values in the form. The hostname can be particularly tricky.
TrueNAS Guides
Creating Backups to TrueNAS
Create a Shared Folder
-
Ensure you have already created a ZFS disk pool in
Storage > Poolas a place to store your backups. If you need help with this step, see the TrueNAS documentation. -
In the TrueNAS UI, create a user for writing backups. Go to
Accounts > Users > ADD.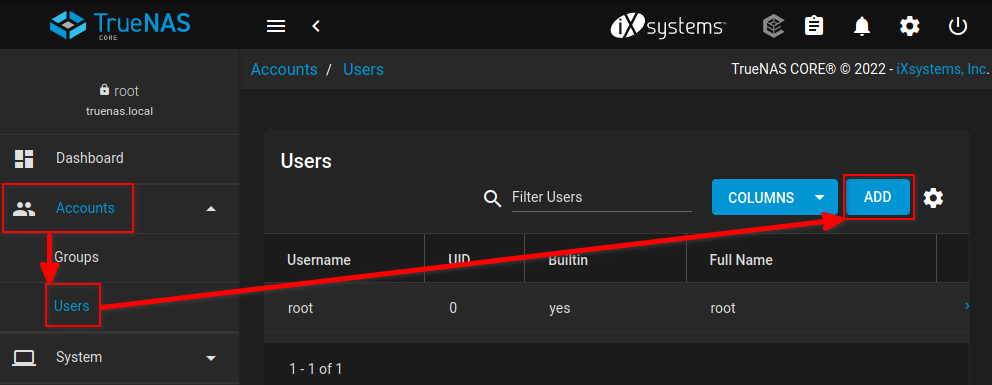
-
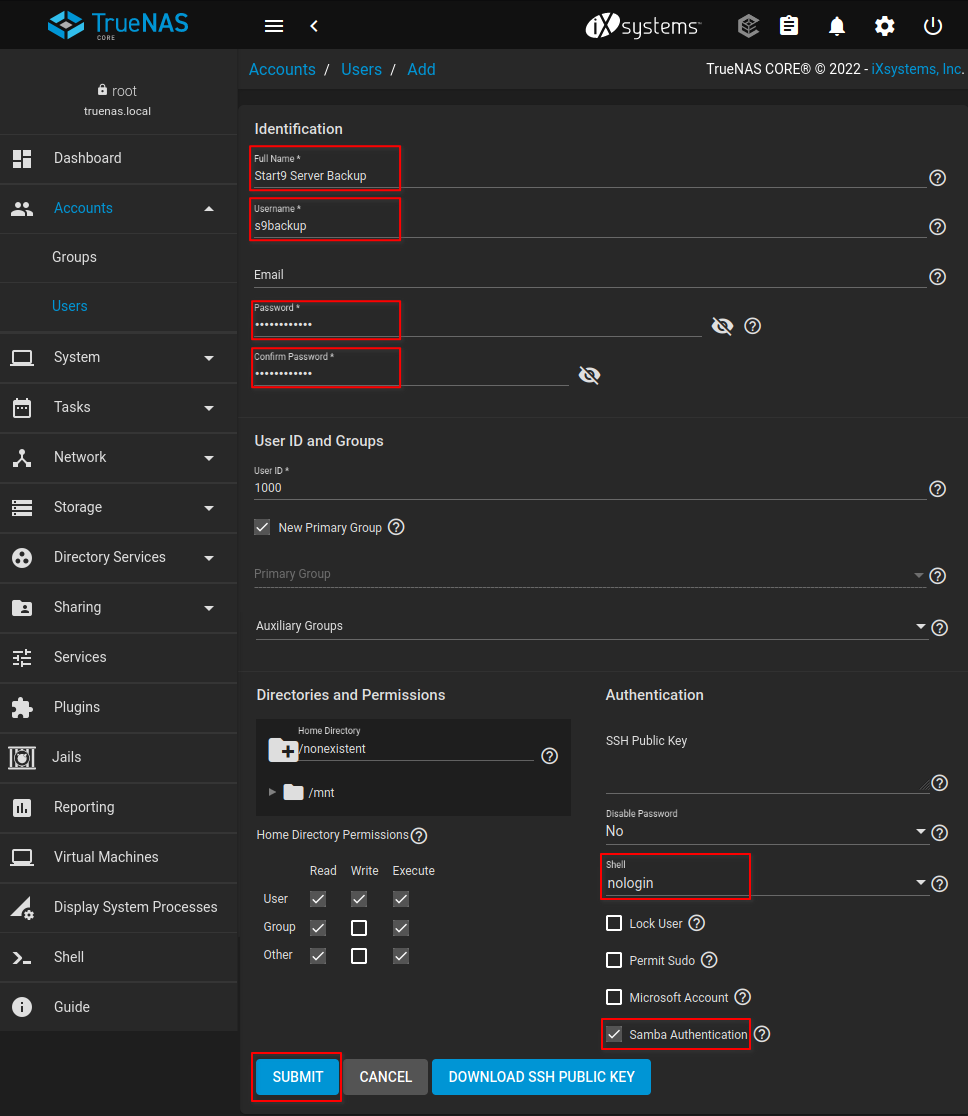
Enter a Full Name, Username, and Password for the new user. Near the bottom, click “Shell: nologin”, and enable “Samba Authentication”. Click “SUBMIT”. In this example, we will use “Start9 Server Backup” for the full name and “s9backup” for the username. You may choose a different values.
-
Go to
Services > SMB. enable SMB and check the box “Start Automatically”.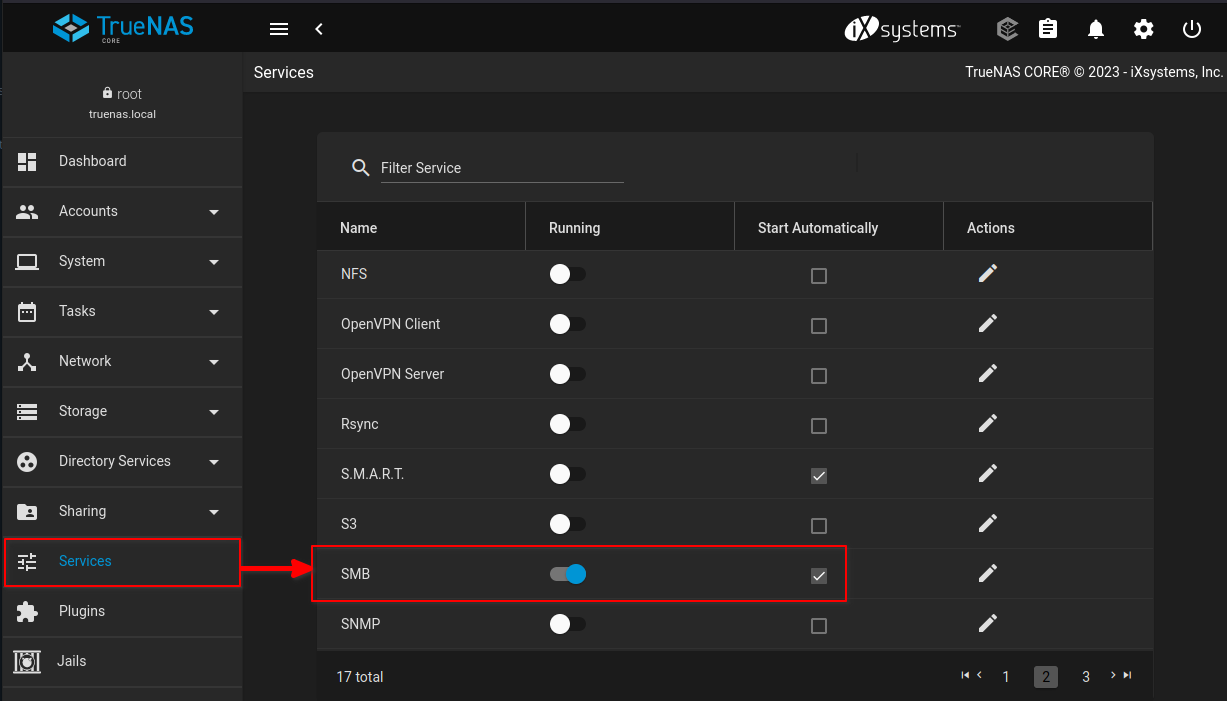
-
Open a shell and create your backups directory. In this example, we will create a directory called
start9backupsharein the root of our storage pool. You may choose a different name or path.mkdir /mnt/zpooldisk1/start9backupshare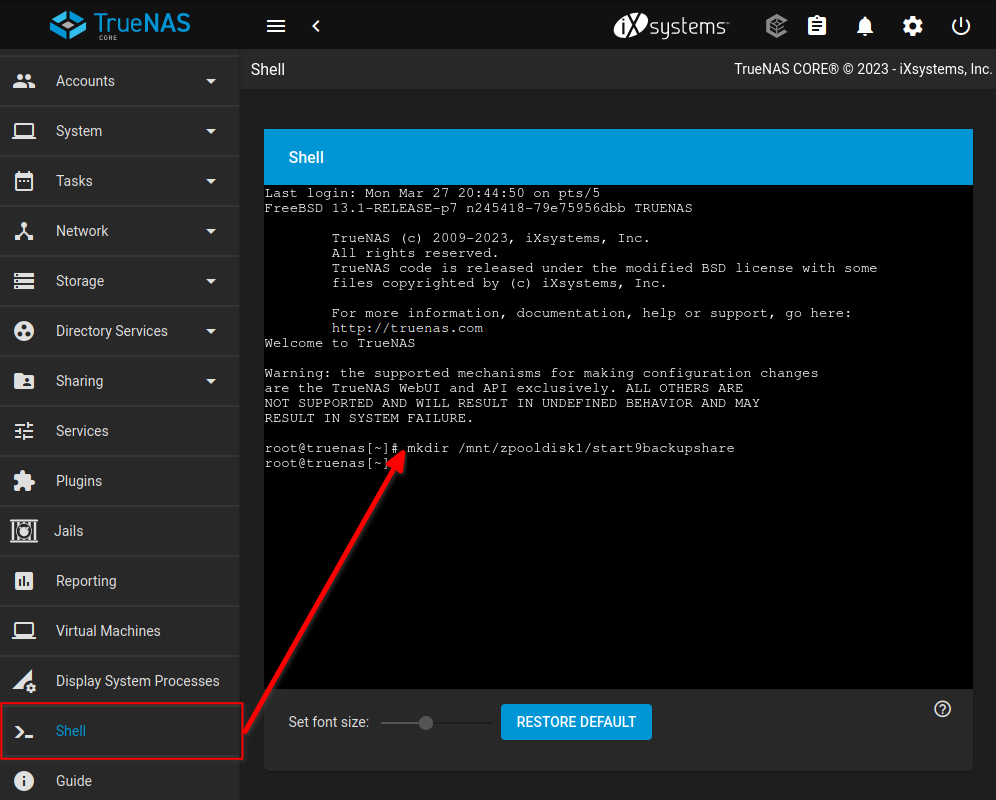
-
Under
Sharing > Windows Shares (SMB), drill down into the path until you find the directory to be shared. Give the share a name and click “SUBMIT”. In this example we will name the share thenasshare. You may choose a different name.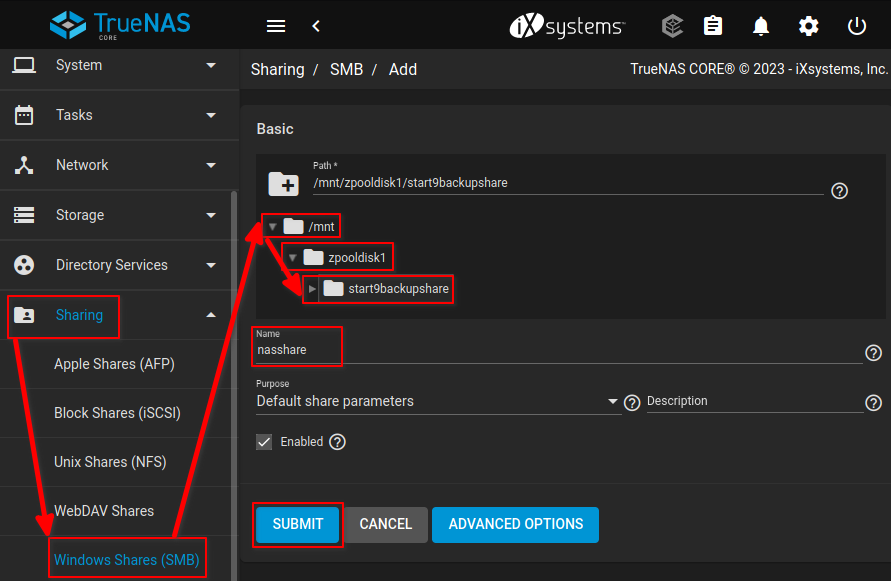
-
A
Configure ACLdialog will emerge. Click “CONFIGURE NOW”.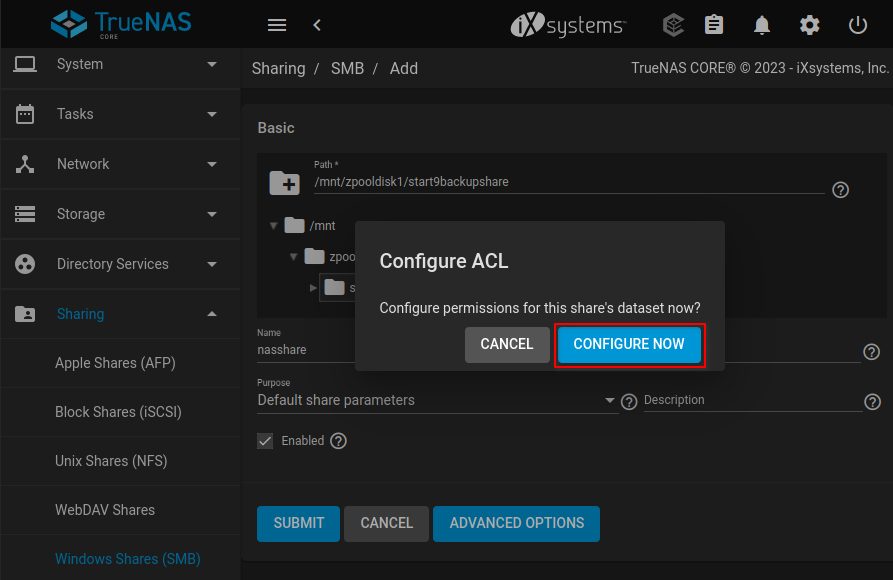
-
You will be brought to an
Edit ACLscreen. Under “User”, click “Apply User” and select the username we created in step 3. On the right-hand side,Permissions Typeshould be set to “Basic” andPermissionsshould be set to “Full Control”. Click SAVE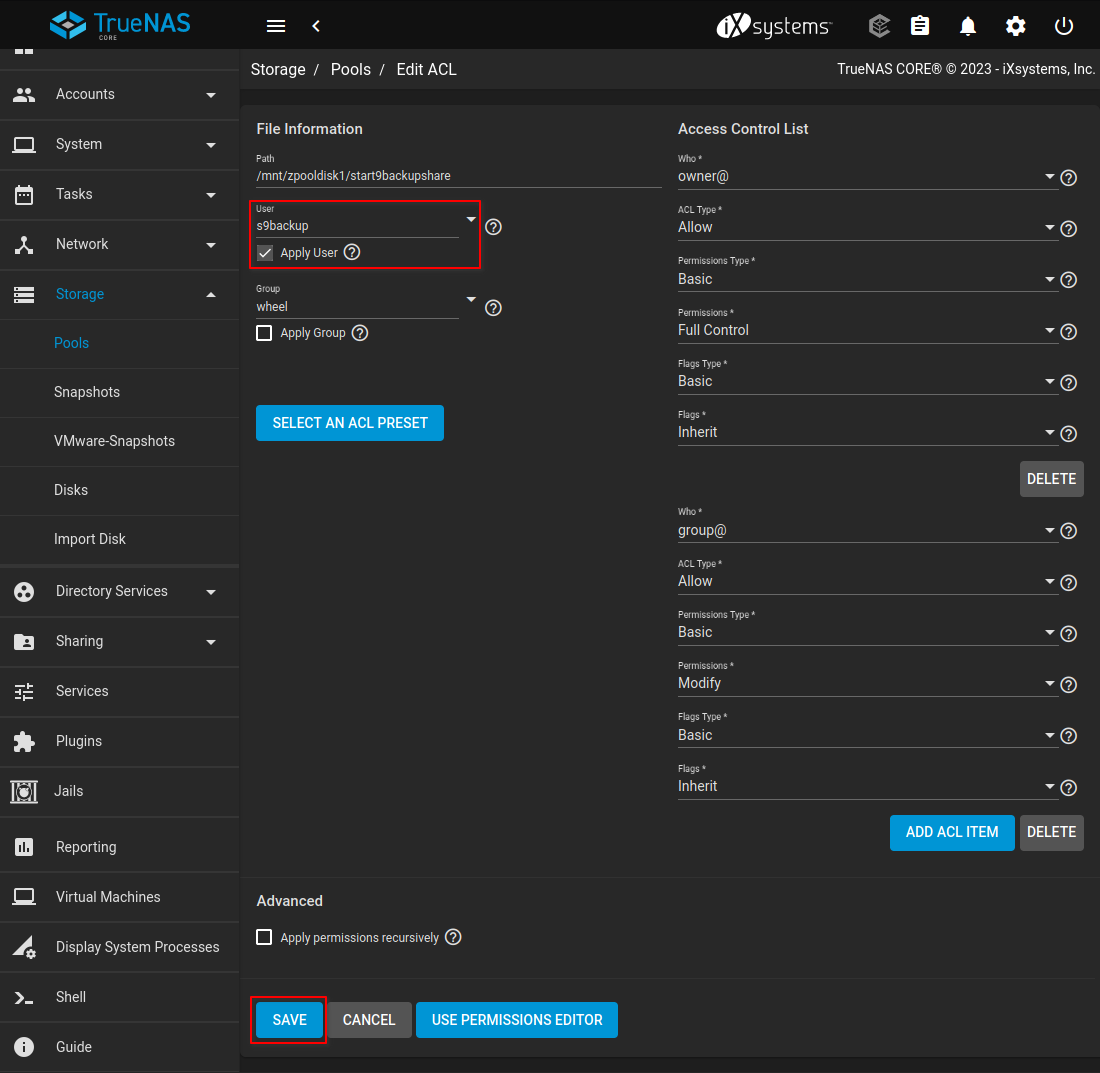
Create a Backup
-
In StartOS, go to
System > Create Backup. -
Click “Open New”.
-
Complete the form:
-
Hostname: The name of your TrueNAS device on the LAN. (e.g truenas.local)
-
Path - The name of your shared folder, not the full directory path (e.g. “nasshare” from the example).
-
Username - Your TrueNAS user who owns the shared folder. (e.g. “s9backup” from the example)
-
Password - Your password for the above user.
-
-
Click “Connect”.
Warning
If you receive
Filesystem I/O Error mount error(13): Permission denied, ensure you have entered all the correct values in the form. The hostname can be particularly tricky.
📱 Service Guides
Some services that run on StartOS have guides that go beyond the simple “install and config” instructions that accompany each service. This can be because there’s a prerequisite to learn/setup first, because there are client applications you can connect or because more than one service can work together to achieve funtionality that goes beyond the individual service.
Bitcoin
Lightning
Jellyfin
Nextcloud
Nostr
Vaultwarden
Bitcoin
These guides will help you to setup external tools to connect or interact with Bitcoin, such as a wallet.
Blockchain Migration
Description
If you already have a synced Bitcoin blockchain on one StartOS server, and would like to skip IBD on another StartOS server, follow this guide.
Warning
This is an advanced feature and should be used with caution. Start9 is not responsible for any damage you might cause through SSH access.
Instructions
-
In this guide, we will refer to your synced node as
synced.localand your unsynced node asunsynced.local. Simply replace these URLs with your own. -
In
unsynced.localUI, install Bitcoin. Do not configure or start it. -
In
synced.localUI:-
Ensure you have already have an SSH key.
-
Stop Bitcoin.
-
-
SSH into
synced.local:ssh start9@synced.local -
Once inside the shell, run the following commands:
sudo -imkdir -m 0700 -p .sshssh-keygen -t ed25519 -N '' -f .ssh/temp.keychmod 600 .ssh/temp.key*cat .ssh/temp.key.pub -
Copy the output of the final
catcommand to your clipboard. -
In
unsynced.localUI, go toSystem > SSH > Add New Key, and paste the value from above. Click “Submit” -
In
synced.localshell, run the following commands, replacingunsynced.localin the second command with the correct URL:cd /embassy-data/package-data/volumes/bitcoind/data/main/sudo rsync -e "ssh -i ~/.ssh/temp.key" -povgr --append-verify --rsync-path="sudo mkdir -p /embassy-data/package-data/volumes/bitcoind/data/main ; sudo rsync" ./{blocks,chainstate} start9@unsynced.local:/embassy-data/package-data/volumes/bitcoind/data/main/ -
Wait some hours until the copy is complete. On a gigabit network, the limiting factor will be the write speed of your SSD on the unsynced server.
-
When the copy is complete, in
synced.localshell, run the following commands:rm .ssh/unsynced.key*exit -
In
synced.localUI, restart Bitcoin. -
In
unsynced.localUI:-
configure and start Bitcoin for the first time. You should see it begin at 99%+ pre-synced!
-
Delete the
temp.keySSH key we added above.
-
Lightning Network
Bitcoin’s Lightning Network is a second-layer scaling solution designed to enable faster and cheaper transactions on the Bitcoin blockchain. It allows users to create off-chain payment channels, which can facilitate multiple transactions without needing to record each one on the main blockchain.
Contents
Getting Started
-
Opening Your First Channel - We use Ride The Lightning (RTL) as the tool to interact with and to fund our CLN or LND wallet, then open a private channel to Start9.
-
Getting Inbound Liquidity - We look at the common ways to receive payments having only just opened a channel with all the liquidity on your side.
Implementations
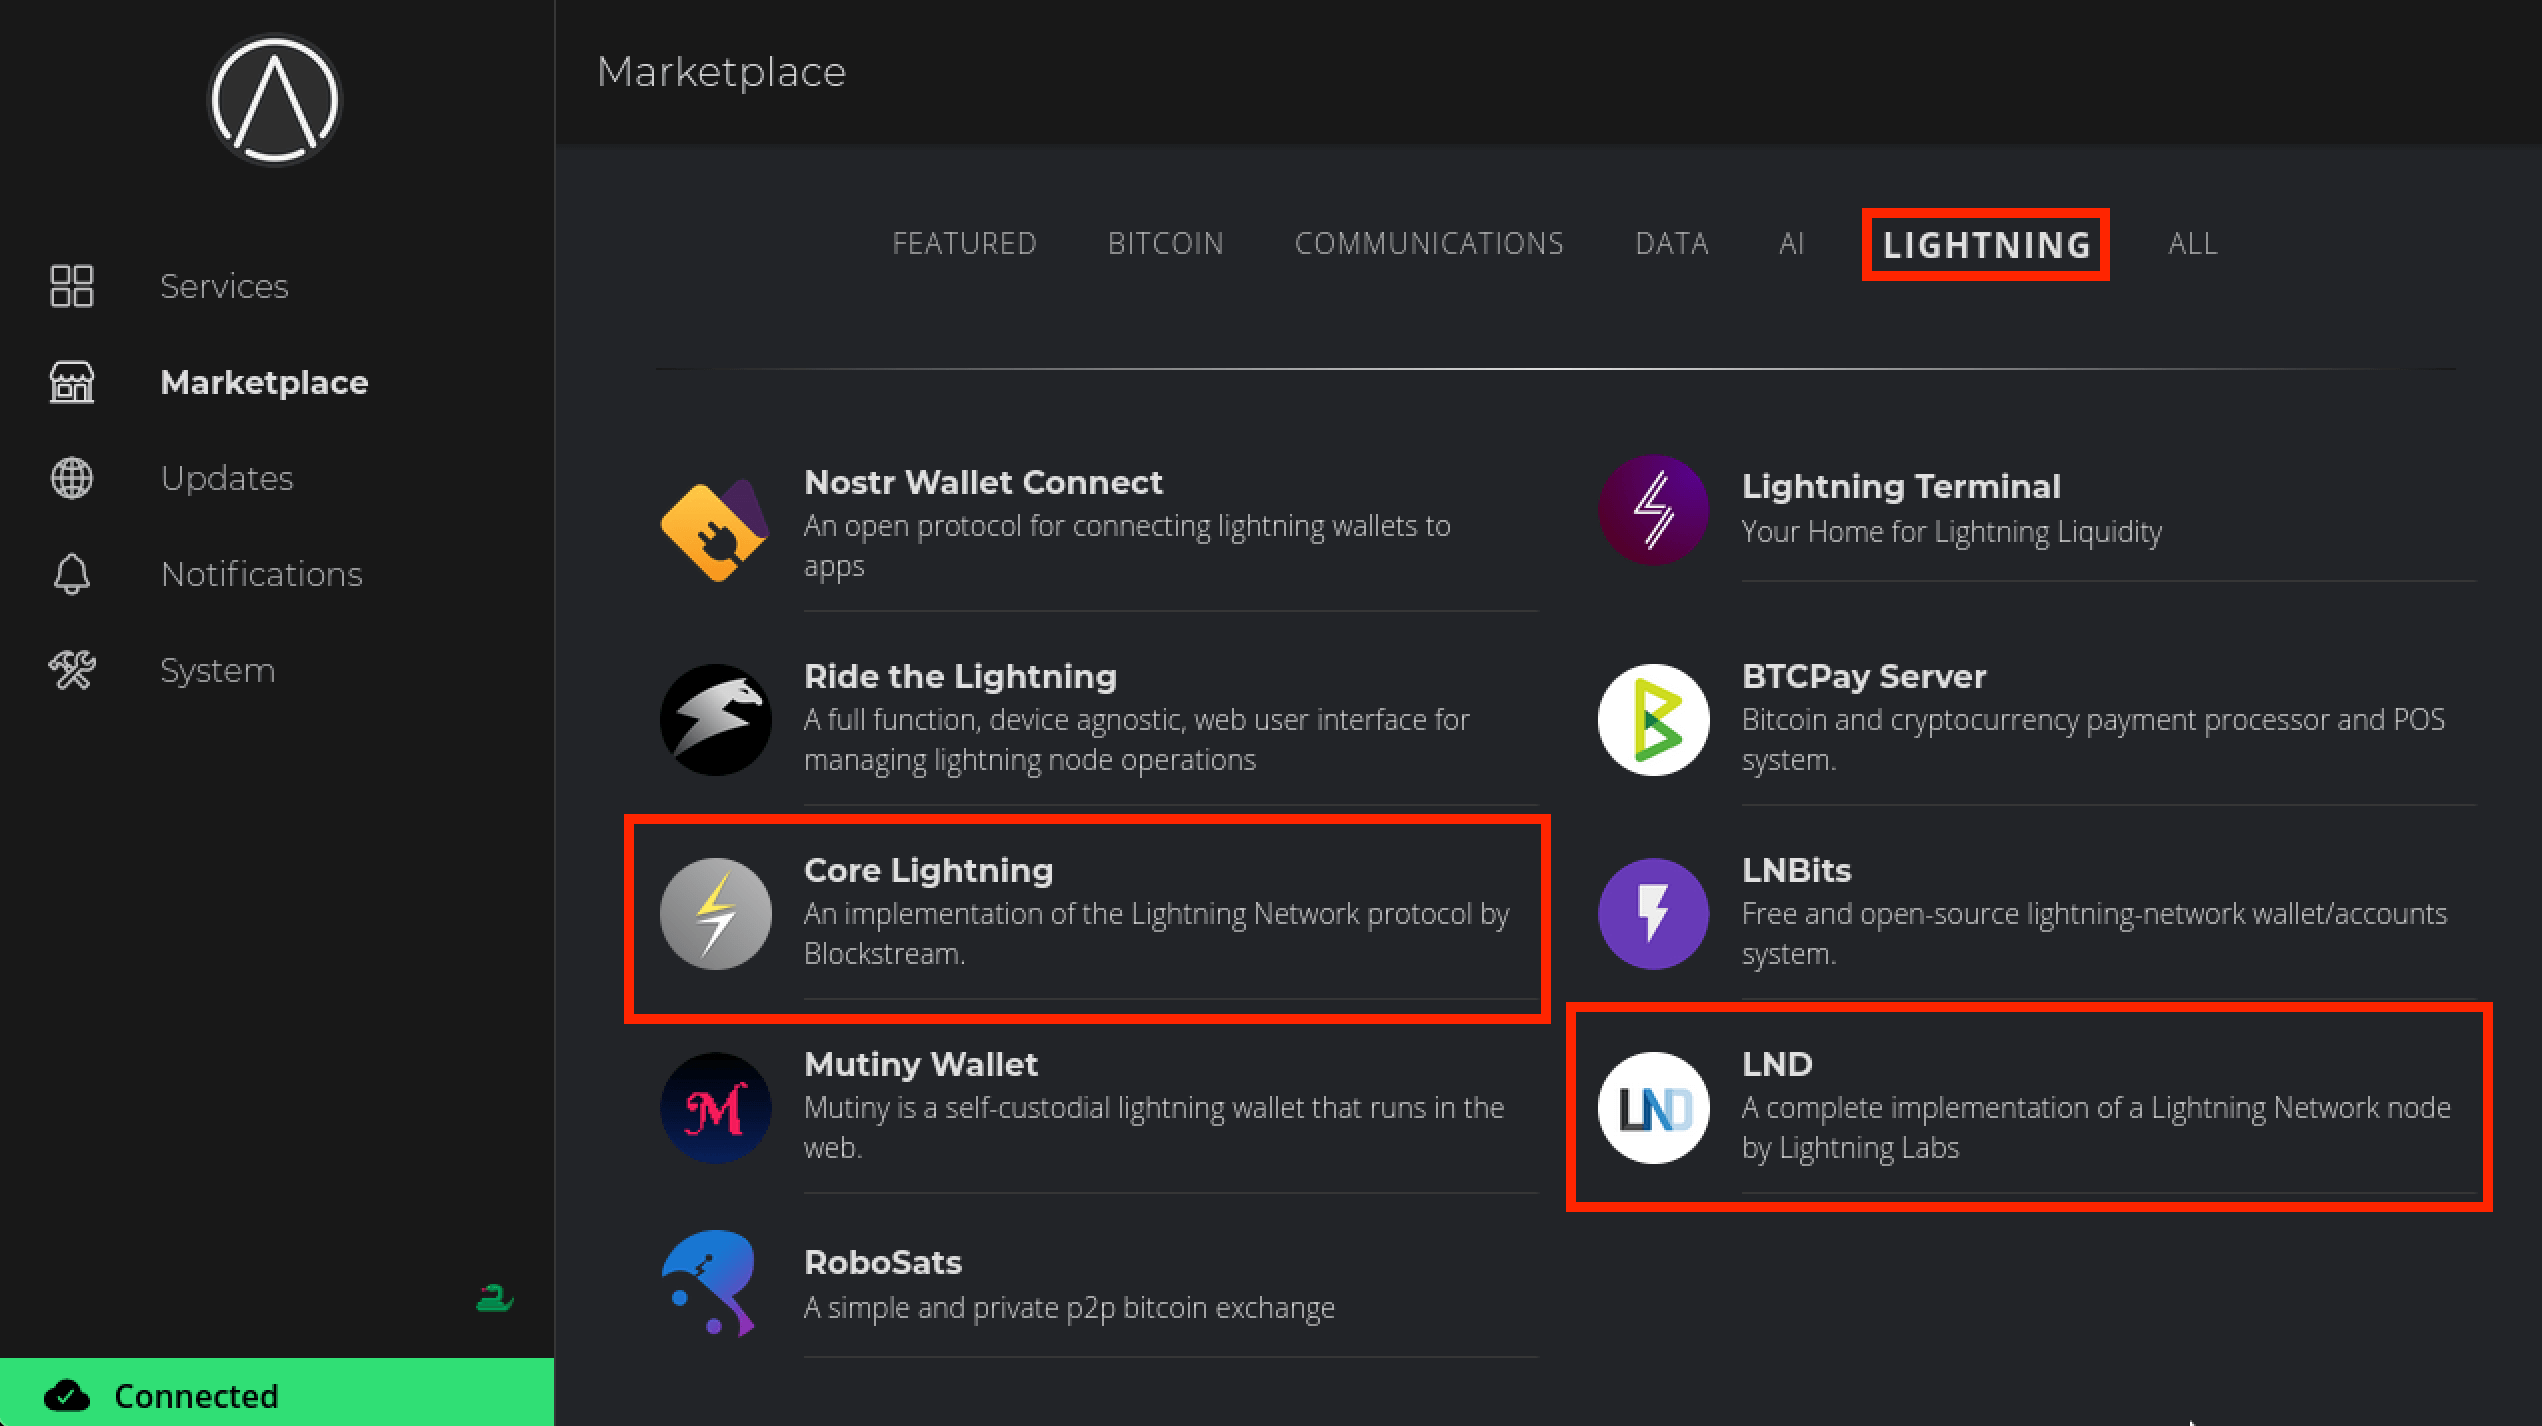
StartOS currently supports two independent Lightning Network implementations available as services in the marketplace: LND and CLN.
LND (Lightning Network Daemon)
Developed by Lightning Labs, LND is the most widely used implementation for creating and managing Lightning Network nodes. It the implementation that is most widely supported and is required by other services like Alby Hub. (More on LND)
- LND guides - Setting up, using and connecting to LND.
- Alby Hub – Learn how to set up Alby Hub on StartOS.
CLN (Core Lightning)
Formerly known as c-lightning, CLN is developed by Blockstream. It focuses on modularity and performance. CLN is designed to be efficient and stable. (More on Blockstream).
- Core Lightning guides - Setting up, using and connecting to Core Lightning.
Alby Hub
Alby Hub lets you manage your own lightning node, make payments, receive tips, and connect to apps with one click. Set up Alby Hub to work with your locally installed LND service or alternatively use the embedded LDK light node inside Alby Hub. (More on Alby Hub)
- Alby Hub – Learn how to set up Alby Hub on StartOS.
LNbits
LNbits core is a powerful wallet accounts system you can use to create secure sub-wallets on top of LND or CLN, allowing you to be an “Uncle Jim” to friends and family. Extremely extensible, it can also provide a wide range of other features like connecting bolt cards or ATMs. (More on LNbits)
- LNbits guides – Create and connect to a walled-off wallet in a layer above your lightning network implementation of CLN or LND.
Opening Channels
Here we’ll show you how to install a lightning node and how to open a channel with Start9! We recommend first taking a moment to understand the important concept of liquidity.
Running a Node and Making a Channel with Start9
-
First, ensure that you have Bitcoin Core installed, running, and fully synced.
-
Install a lightning node. There are two options we offer on the Start9 marketplace - LND and Core Lightning. In this guide we’re going to use Core Lightning (CLN). Though you can use LND and the process will be almost exactly the same.
-
Install one of the above lightning implementations - as mentioned in this guide we’ll use CLN.
-
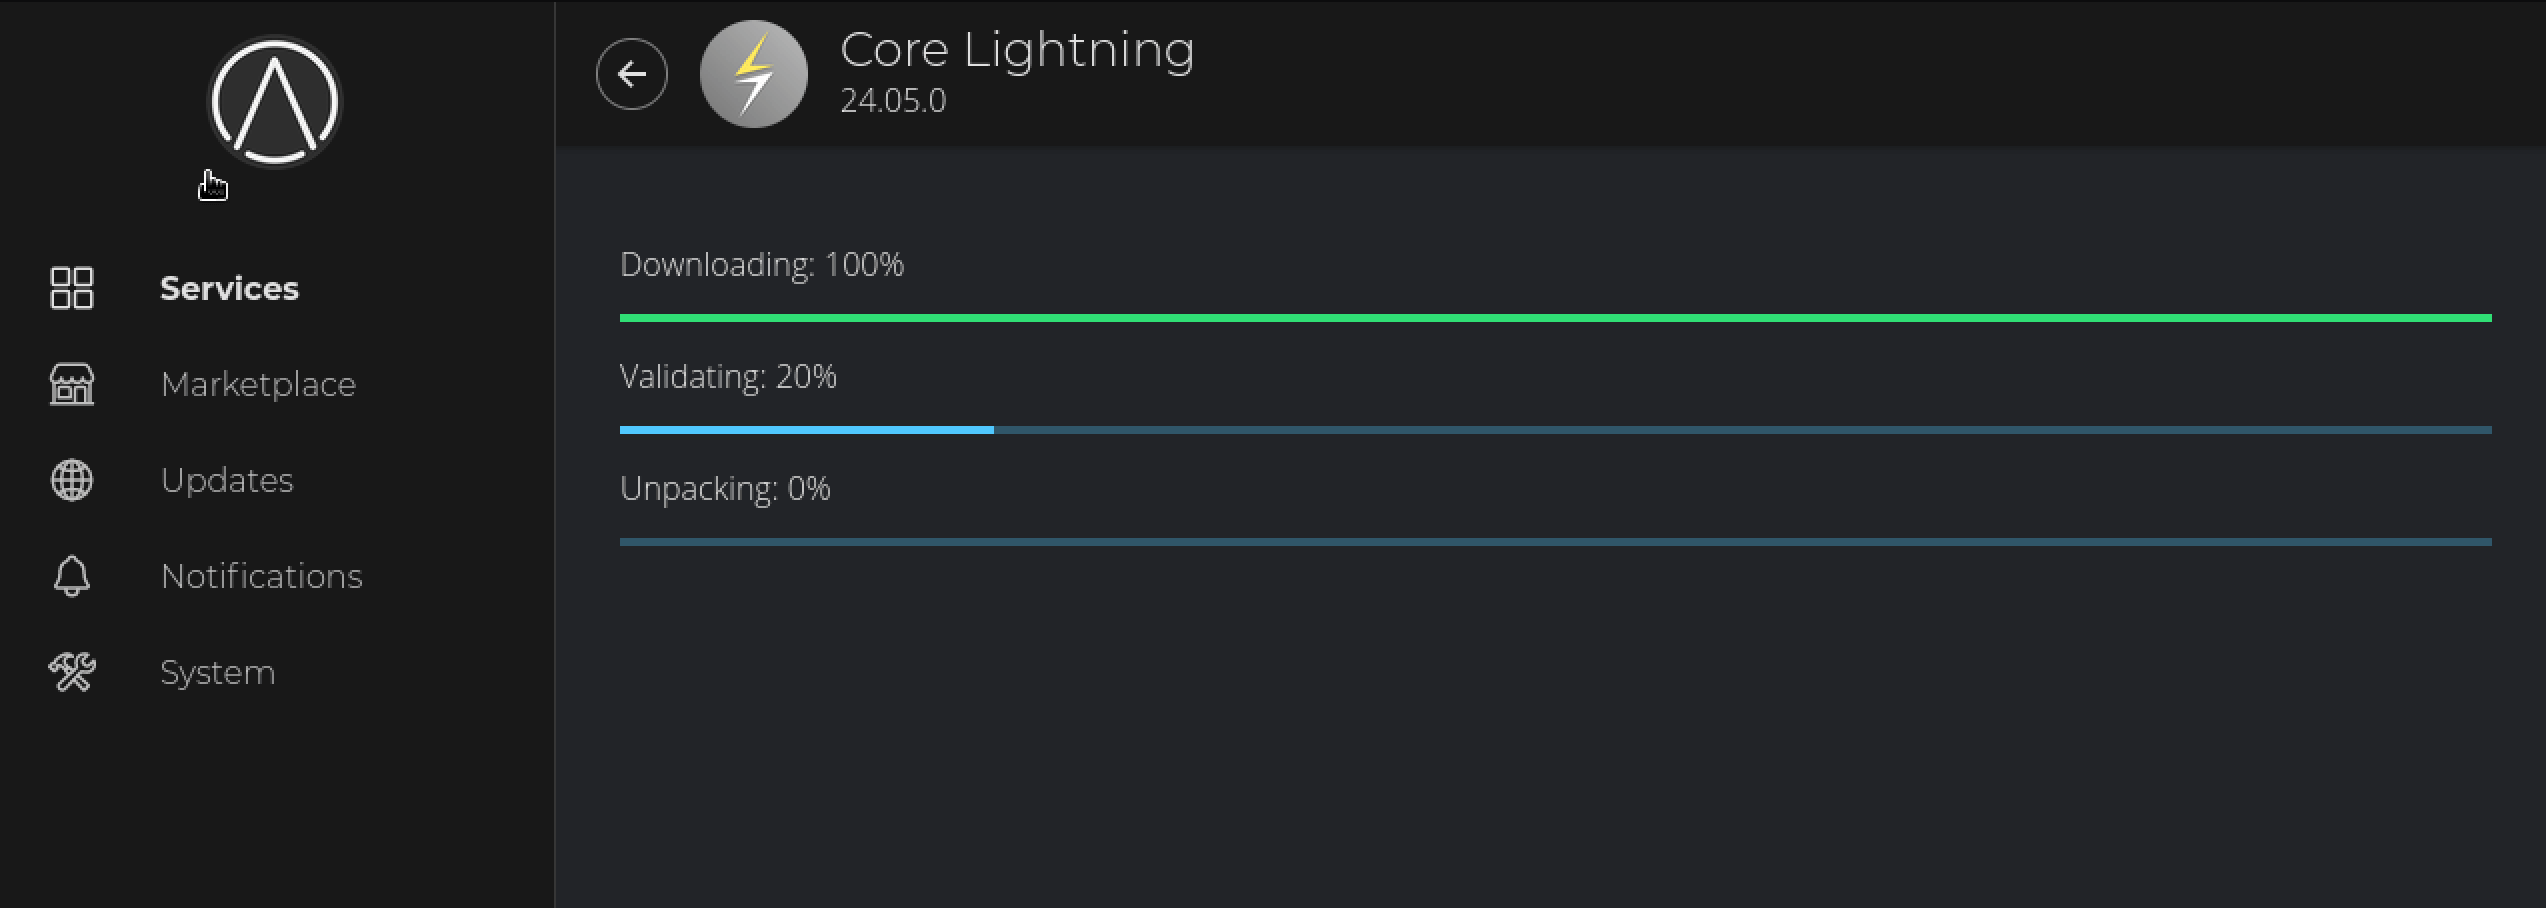
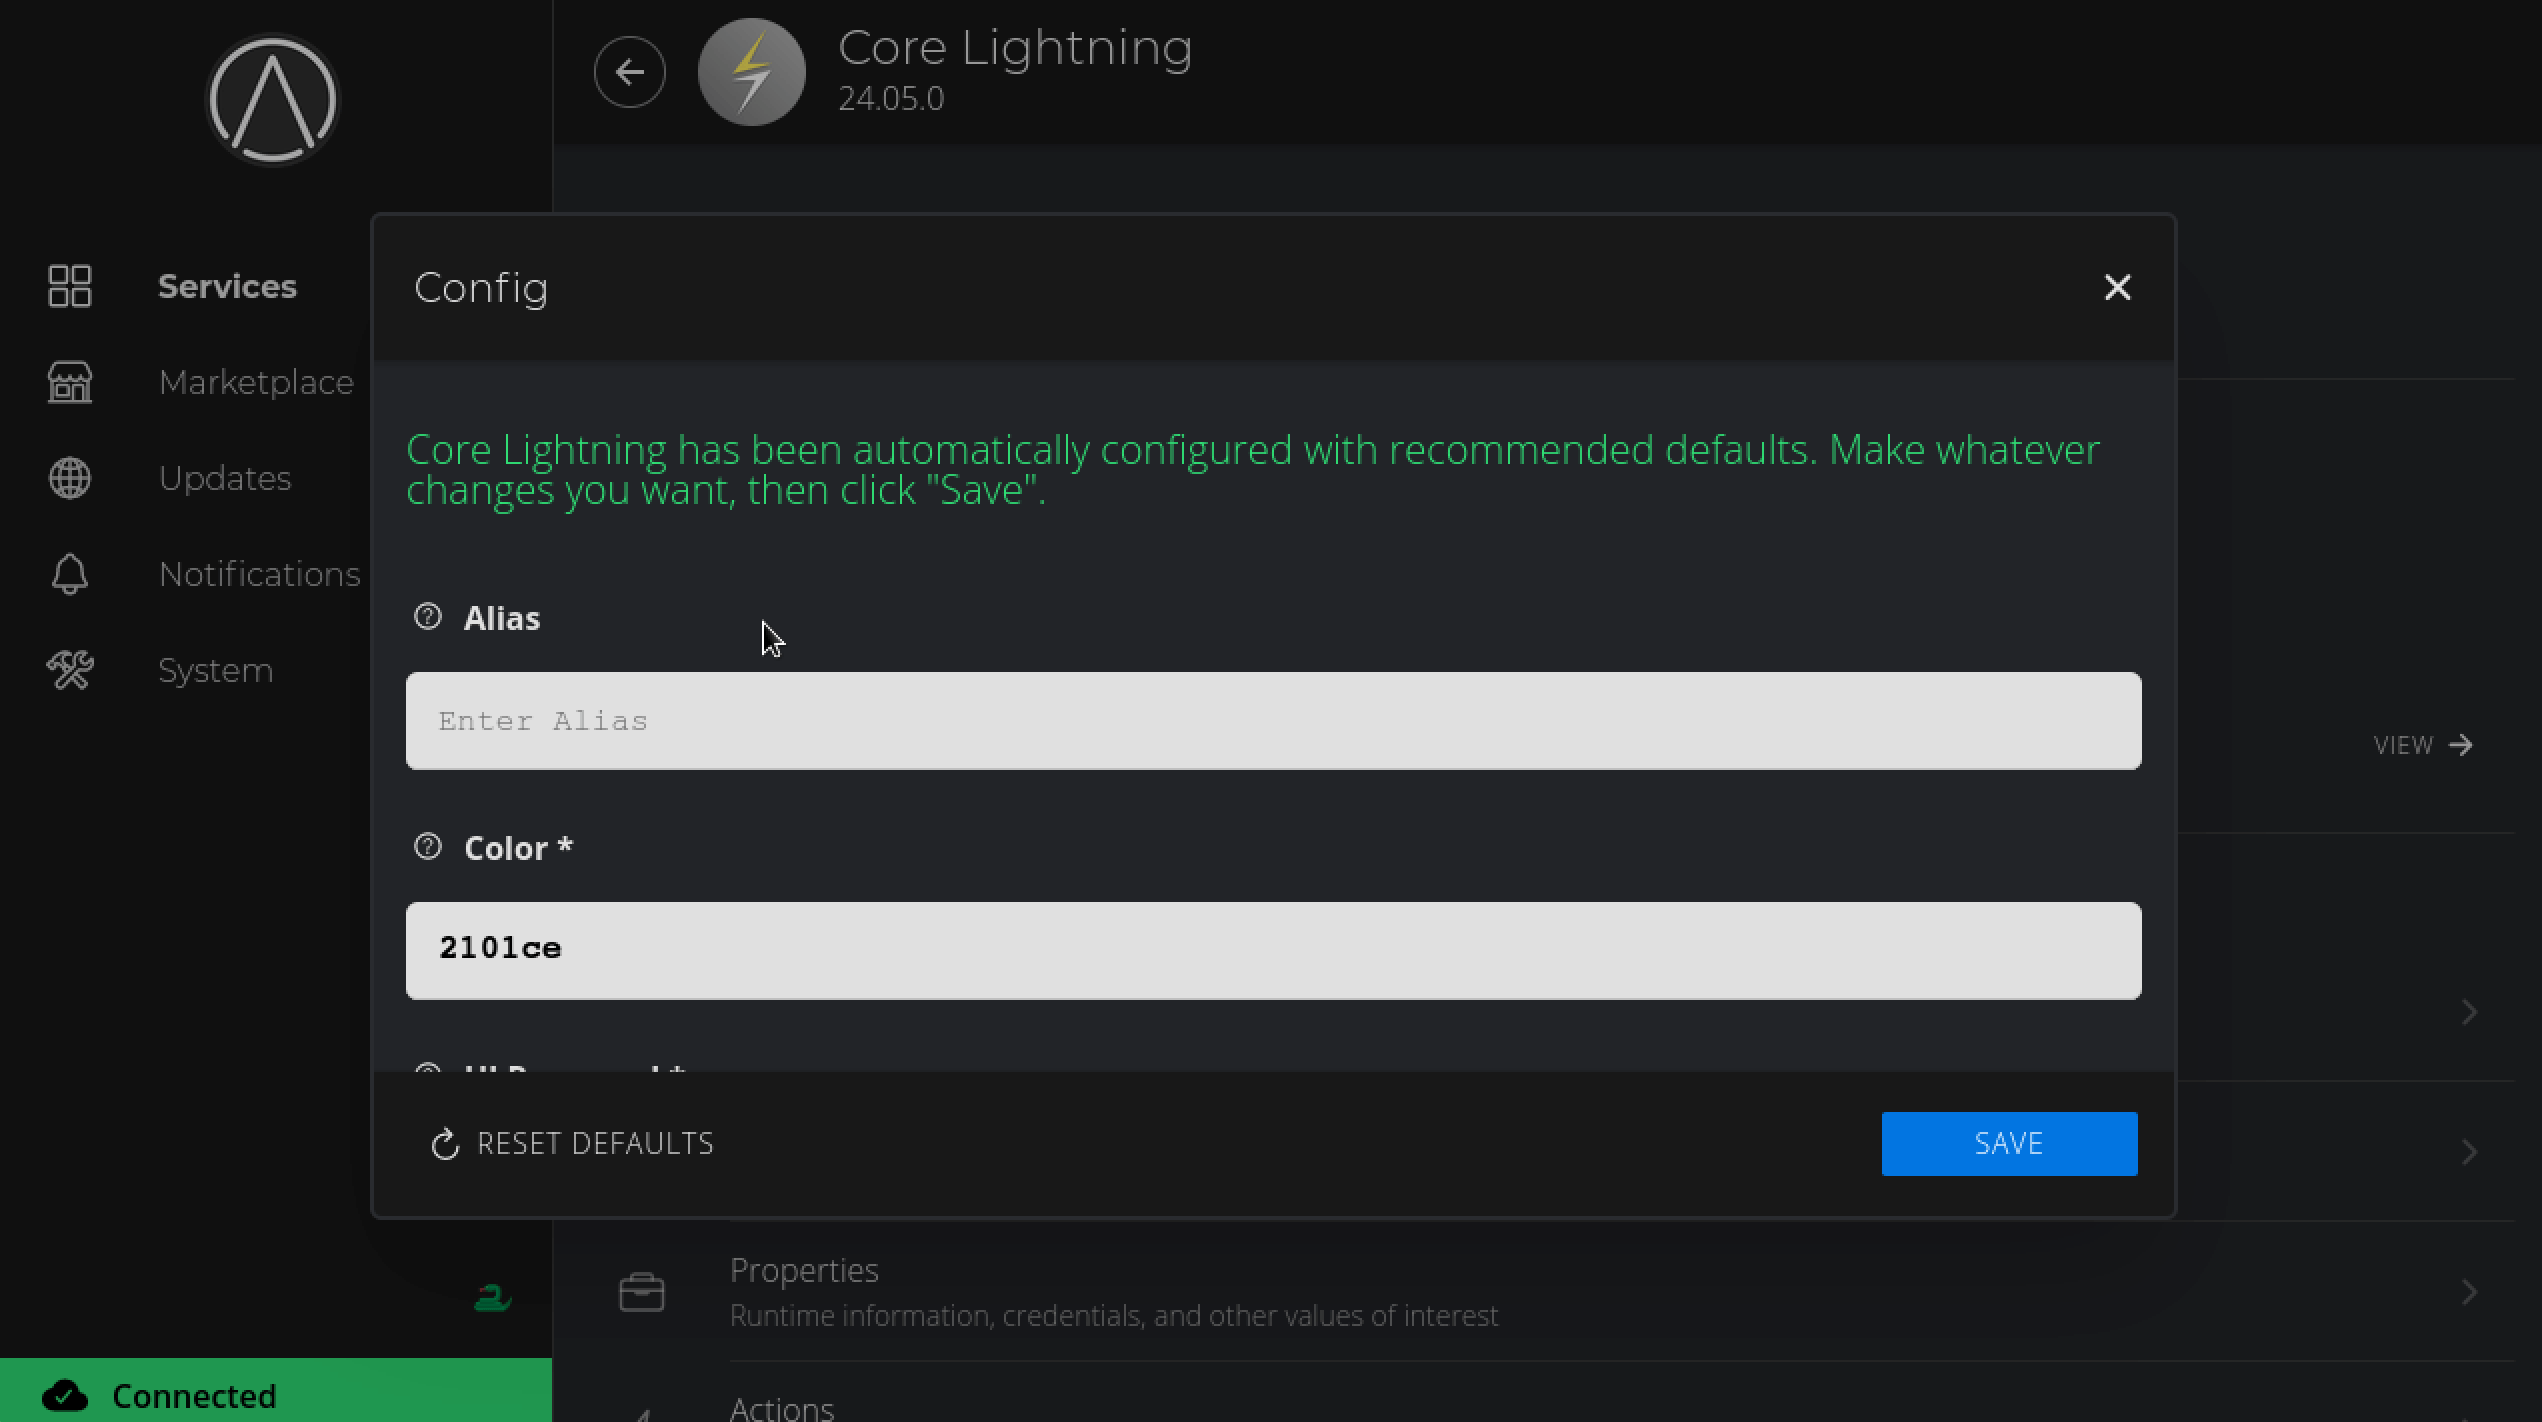
You’ll see CLN say Needs Config. Click Configure:
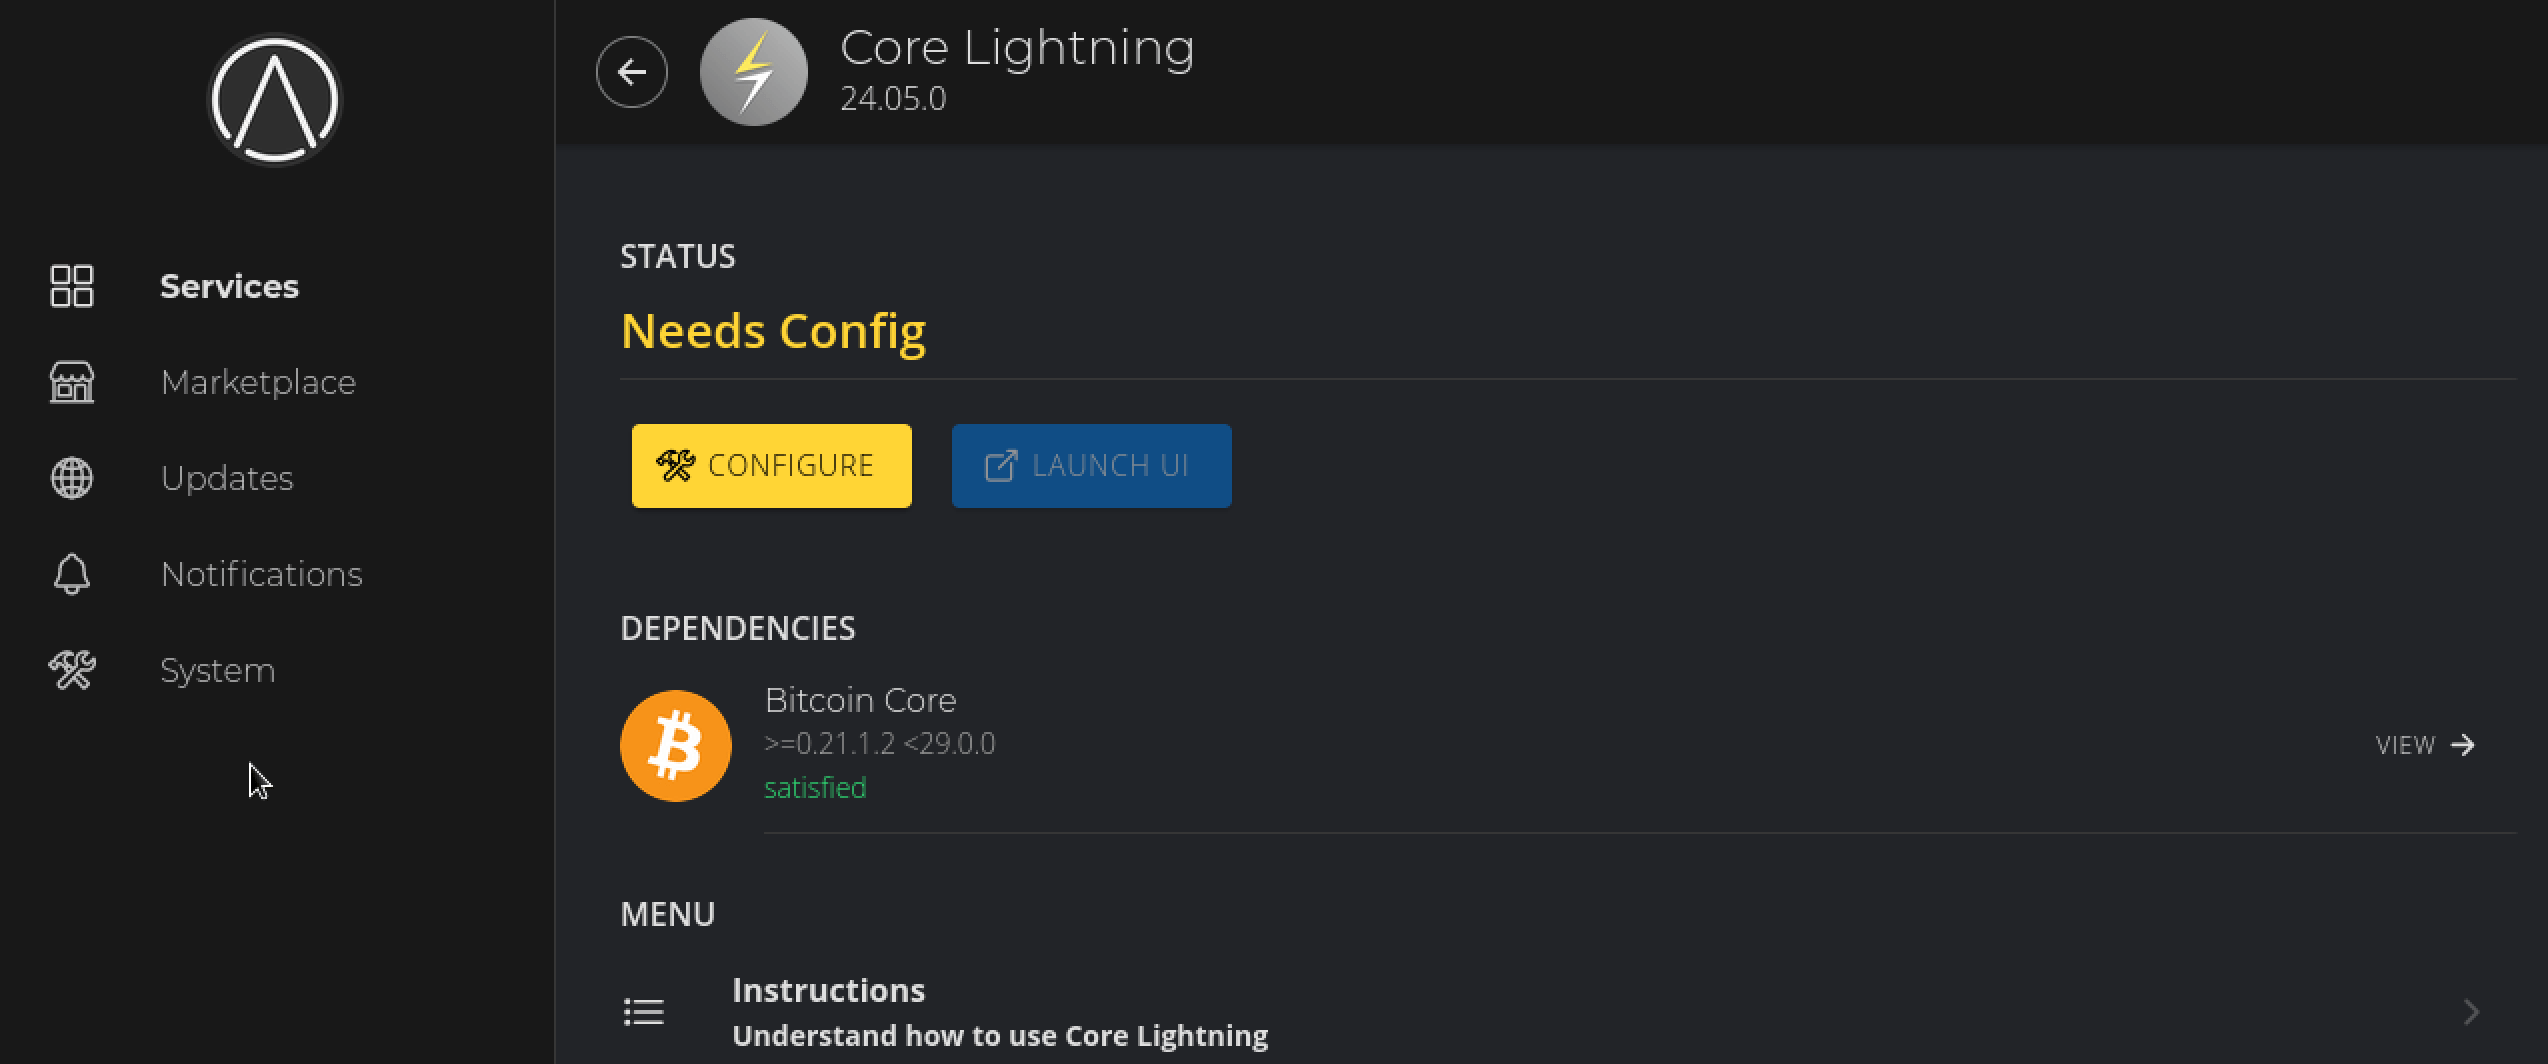
-
You can leave the settings as their default values and hit SAVE.
-
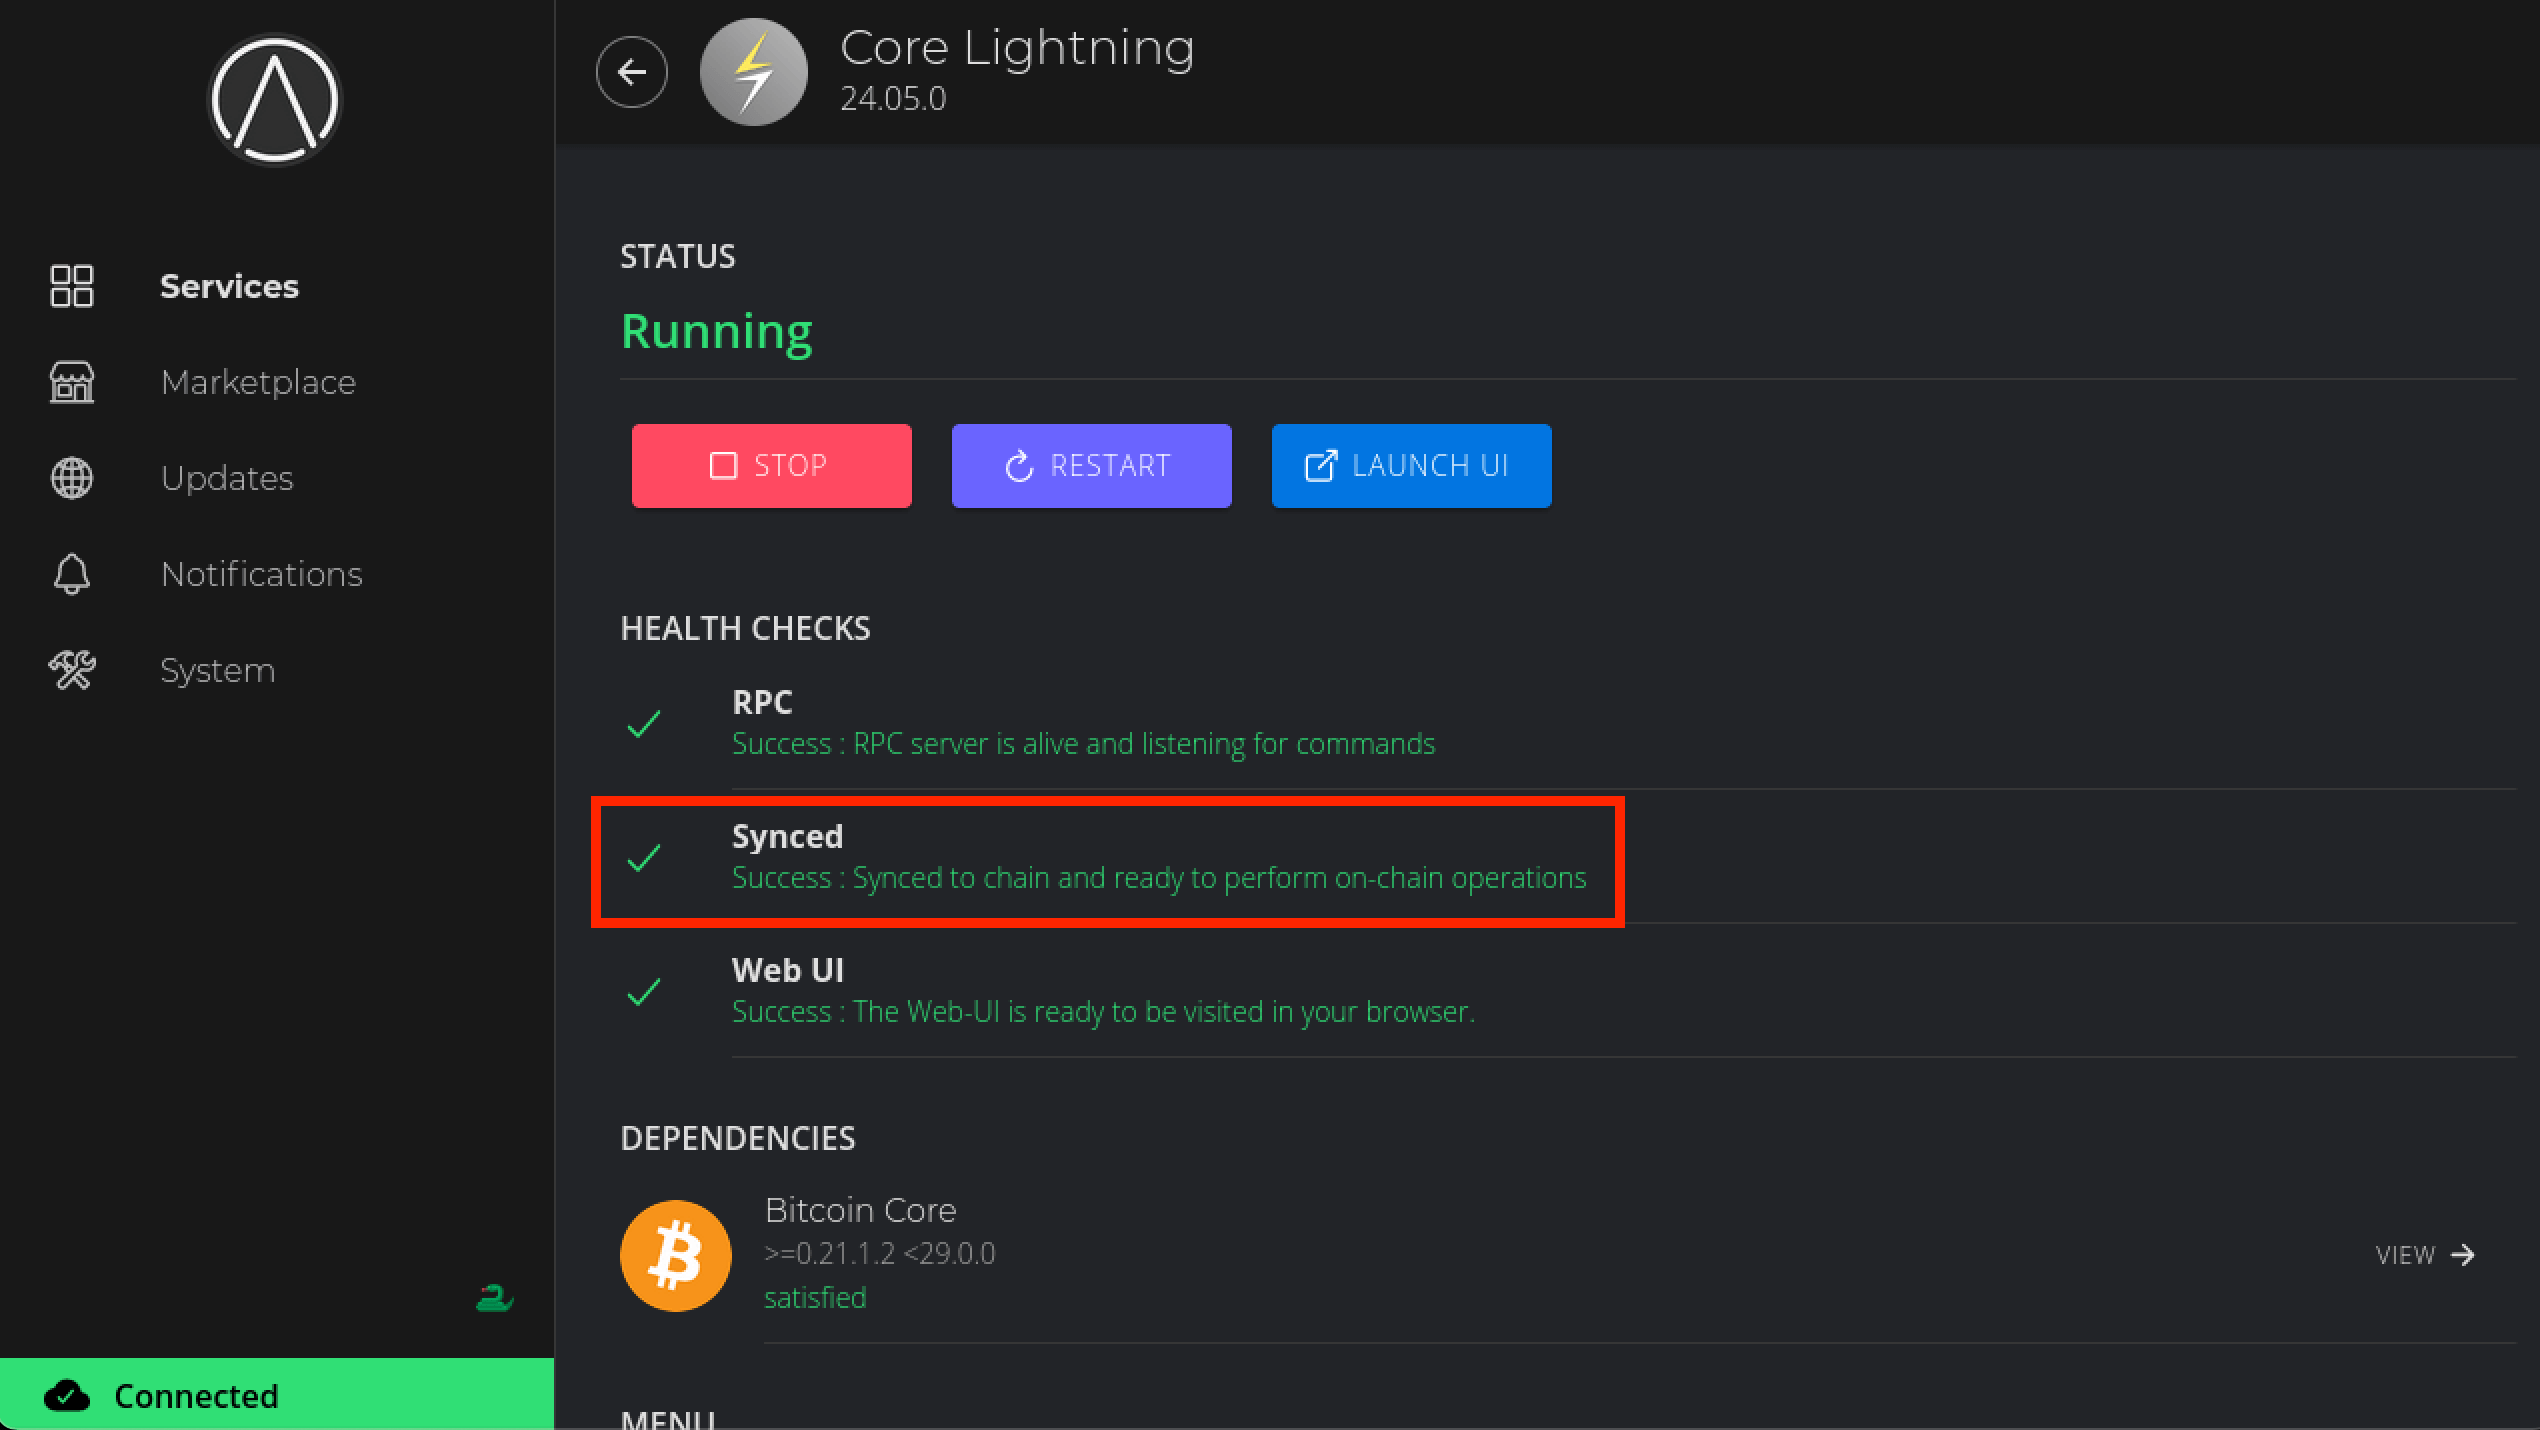
Now hit Start and wait for CLN to sync up to the network. This may take a couple of hours.
-
Once the Synced health check turns green (as below) you can proceed to the next step.
-
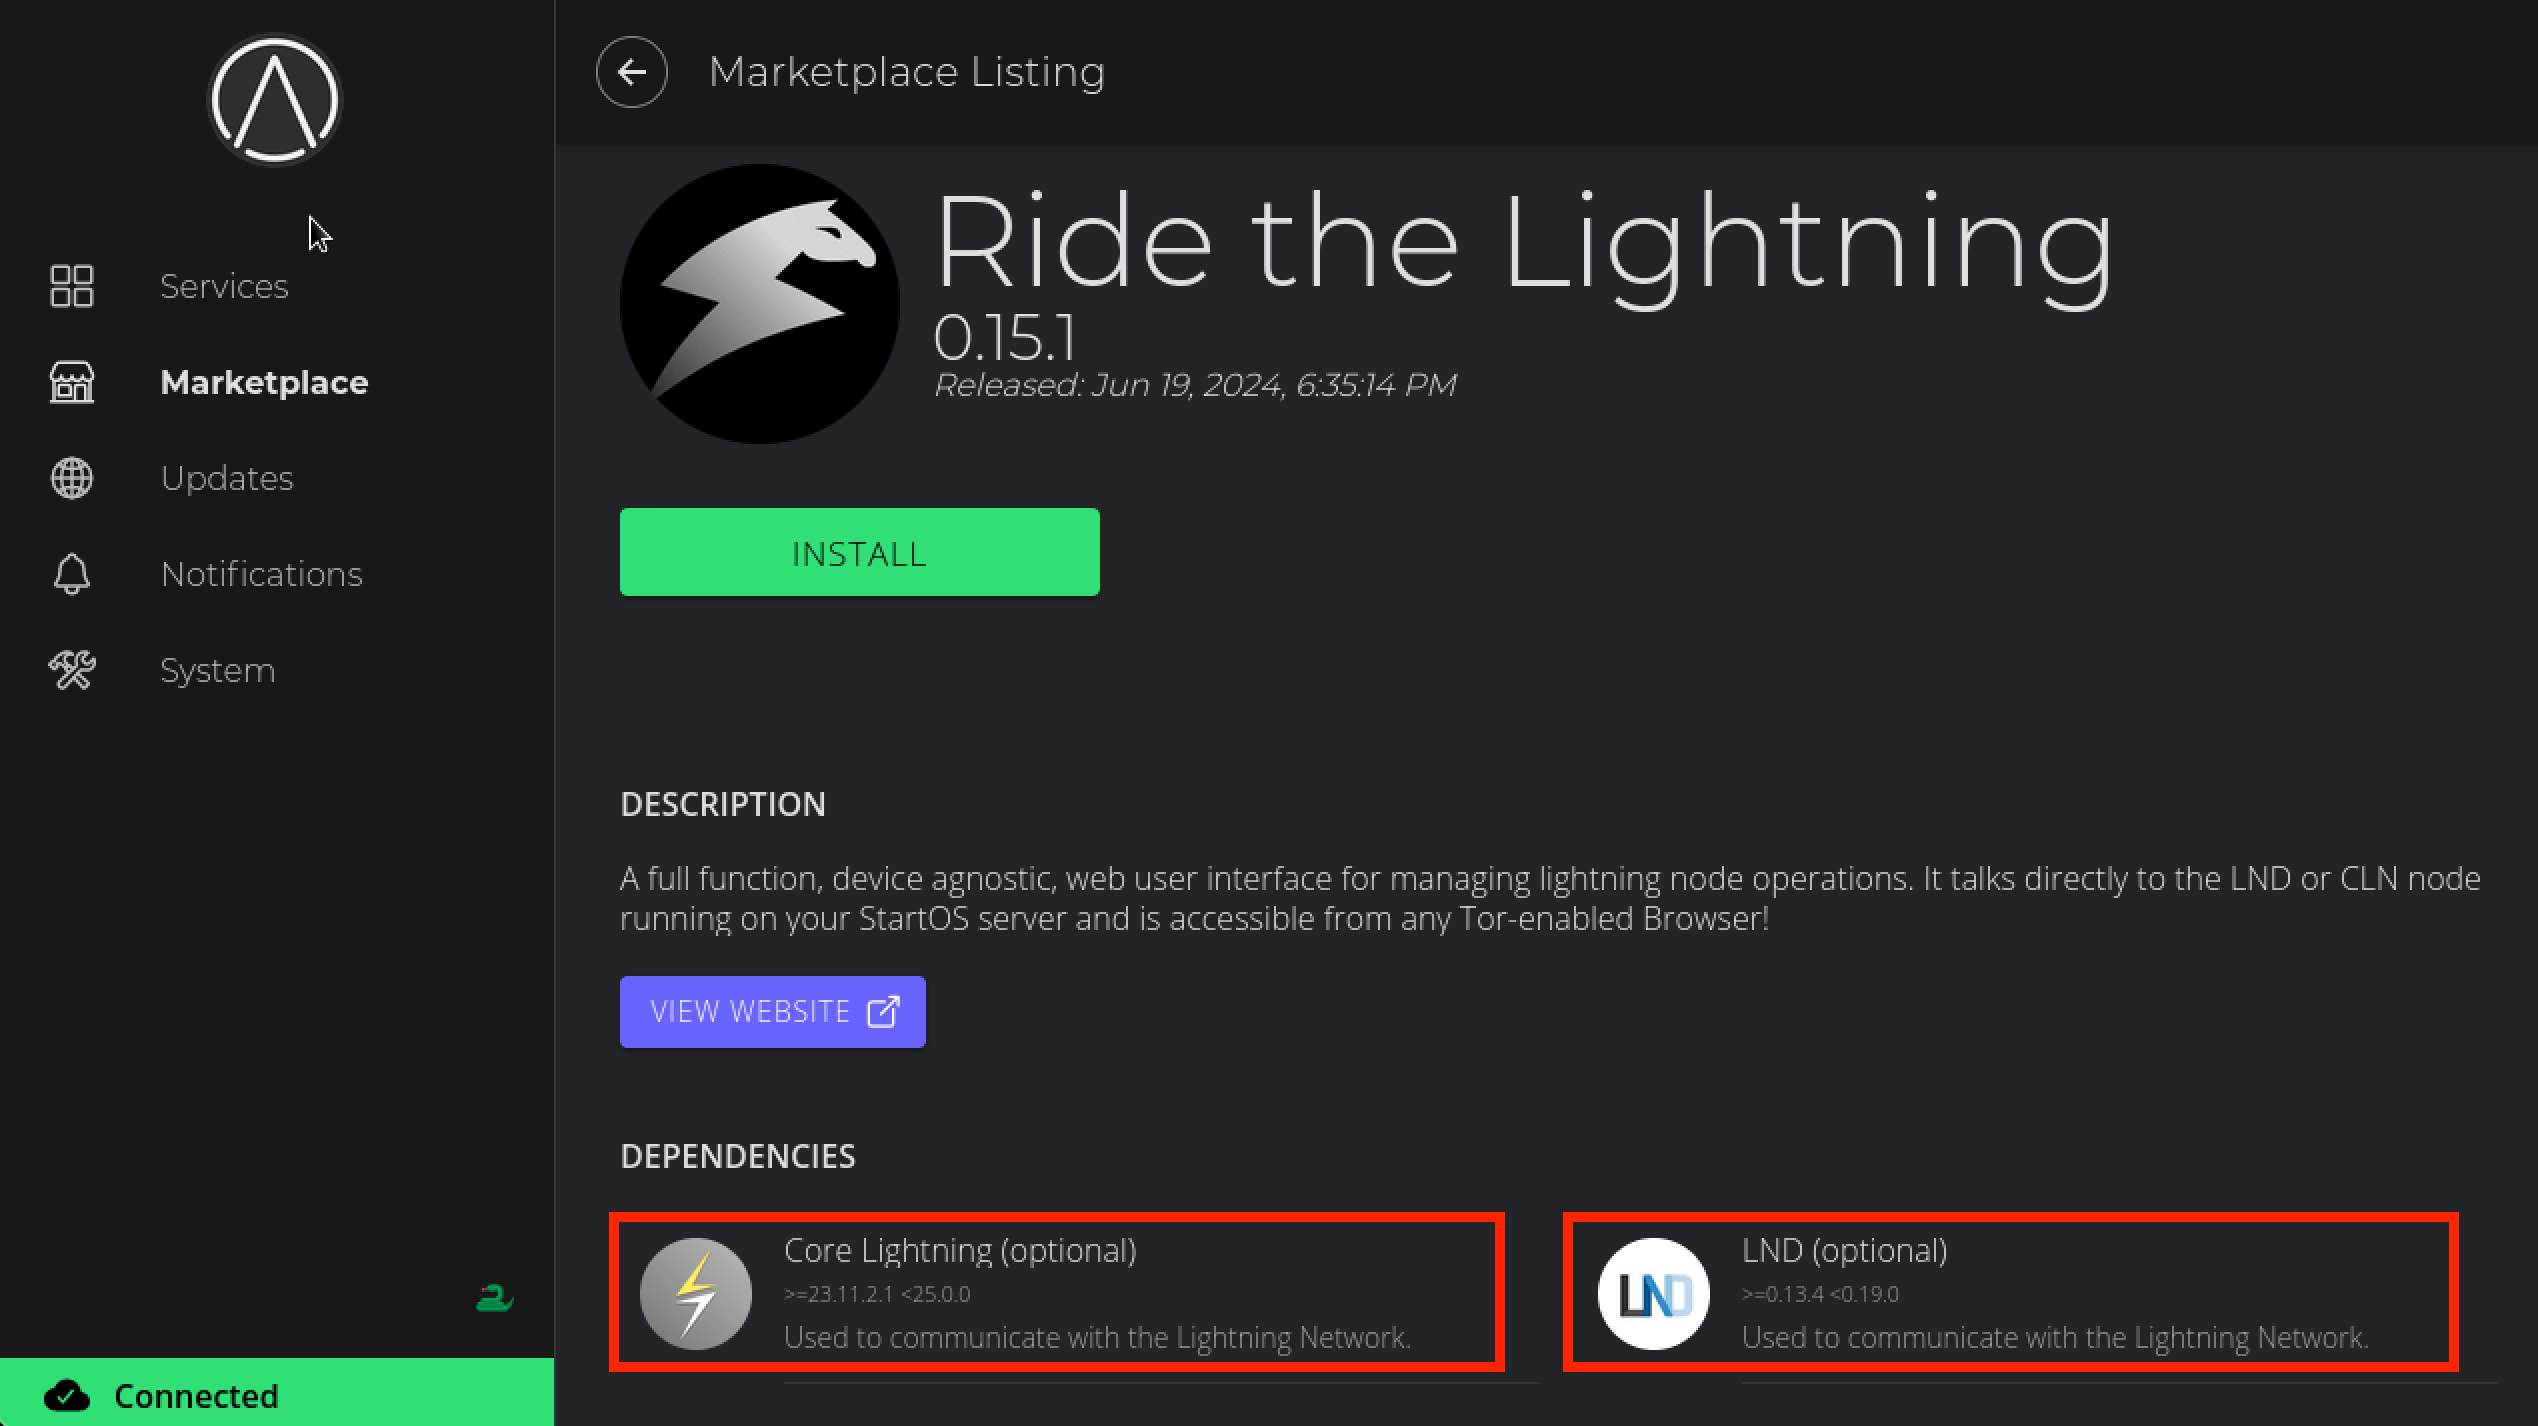
To interact with your node we will use Ride The Lightning (RTL) - this is a service that provides a graphical user interface for our lightning node.
This will work with either (or both!) lightning implementations.
-
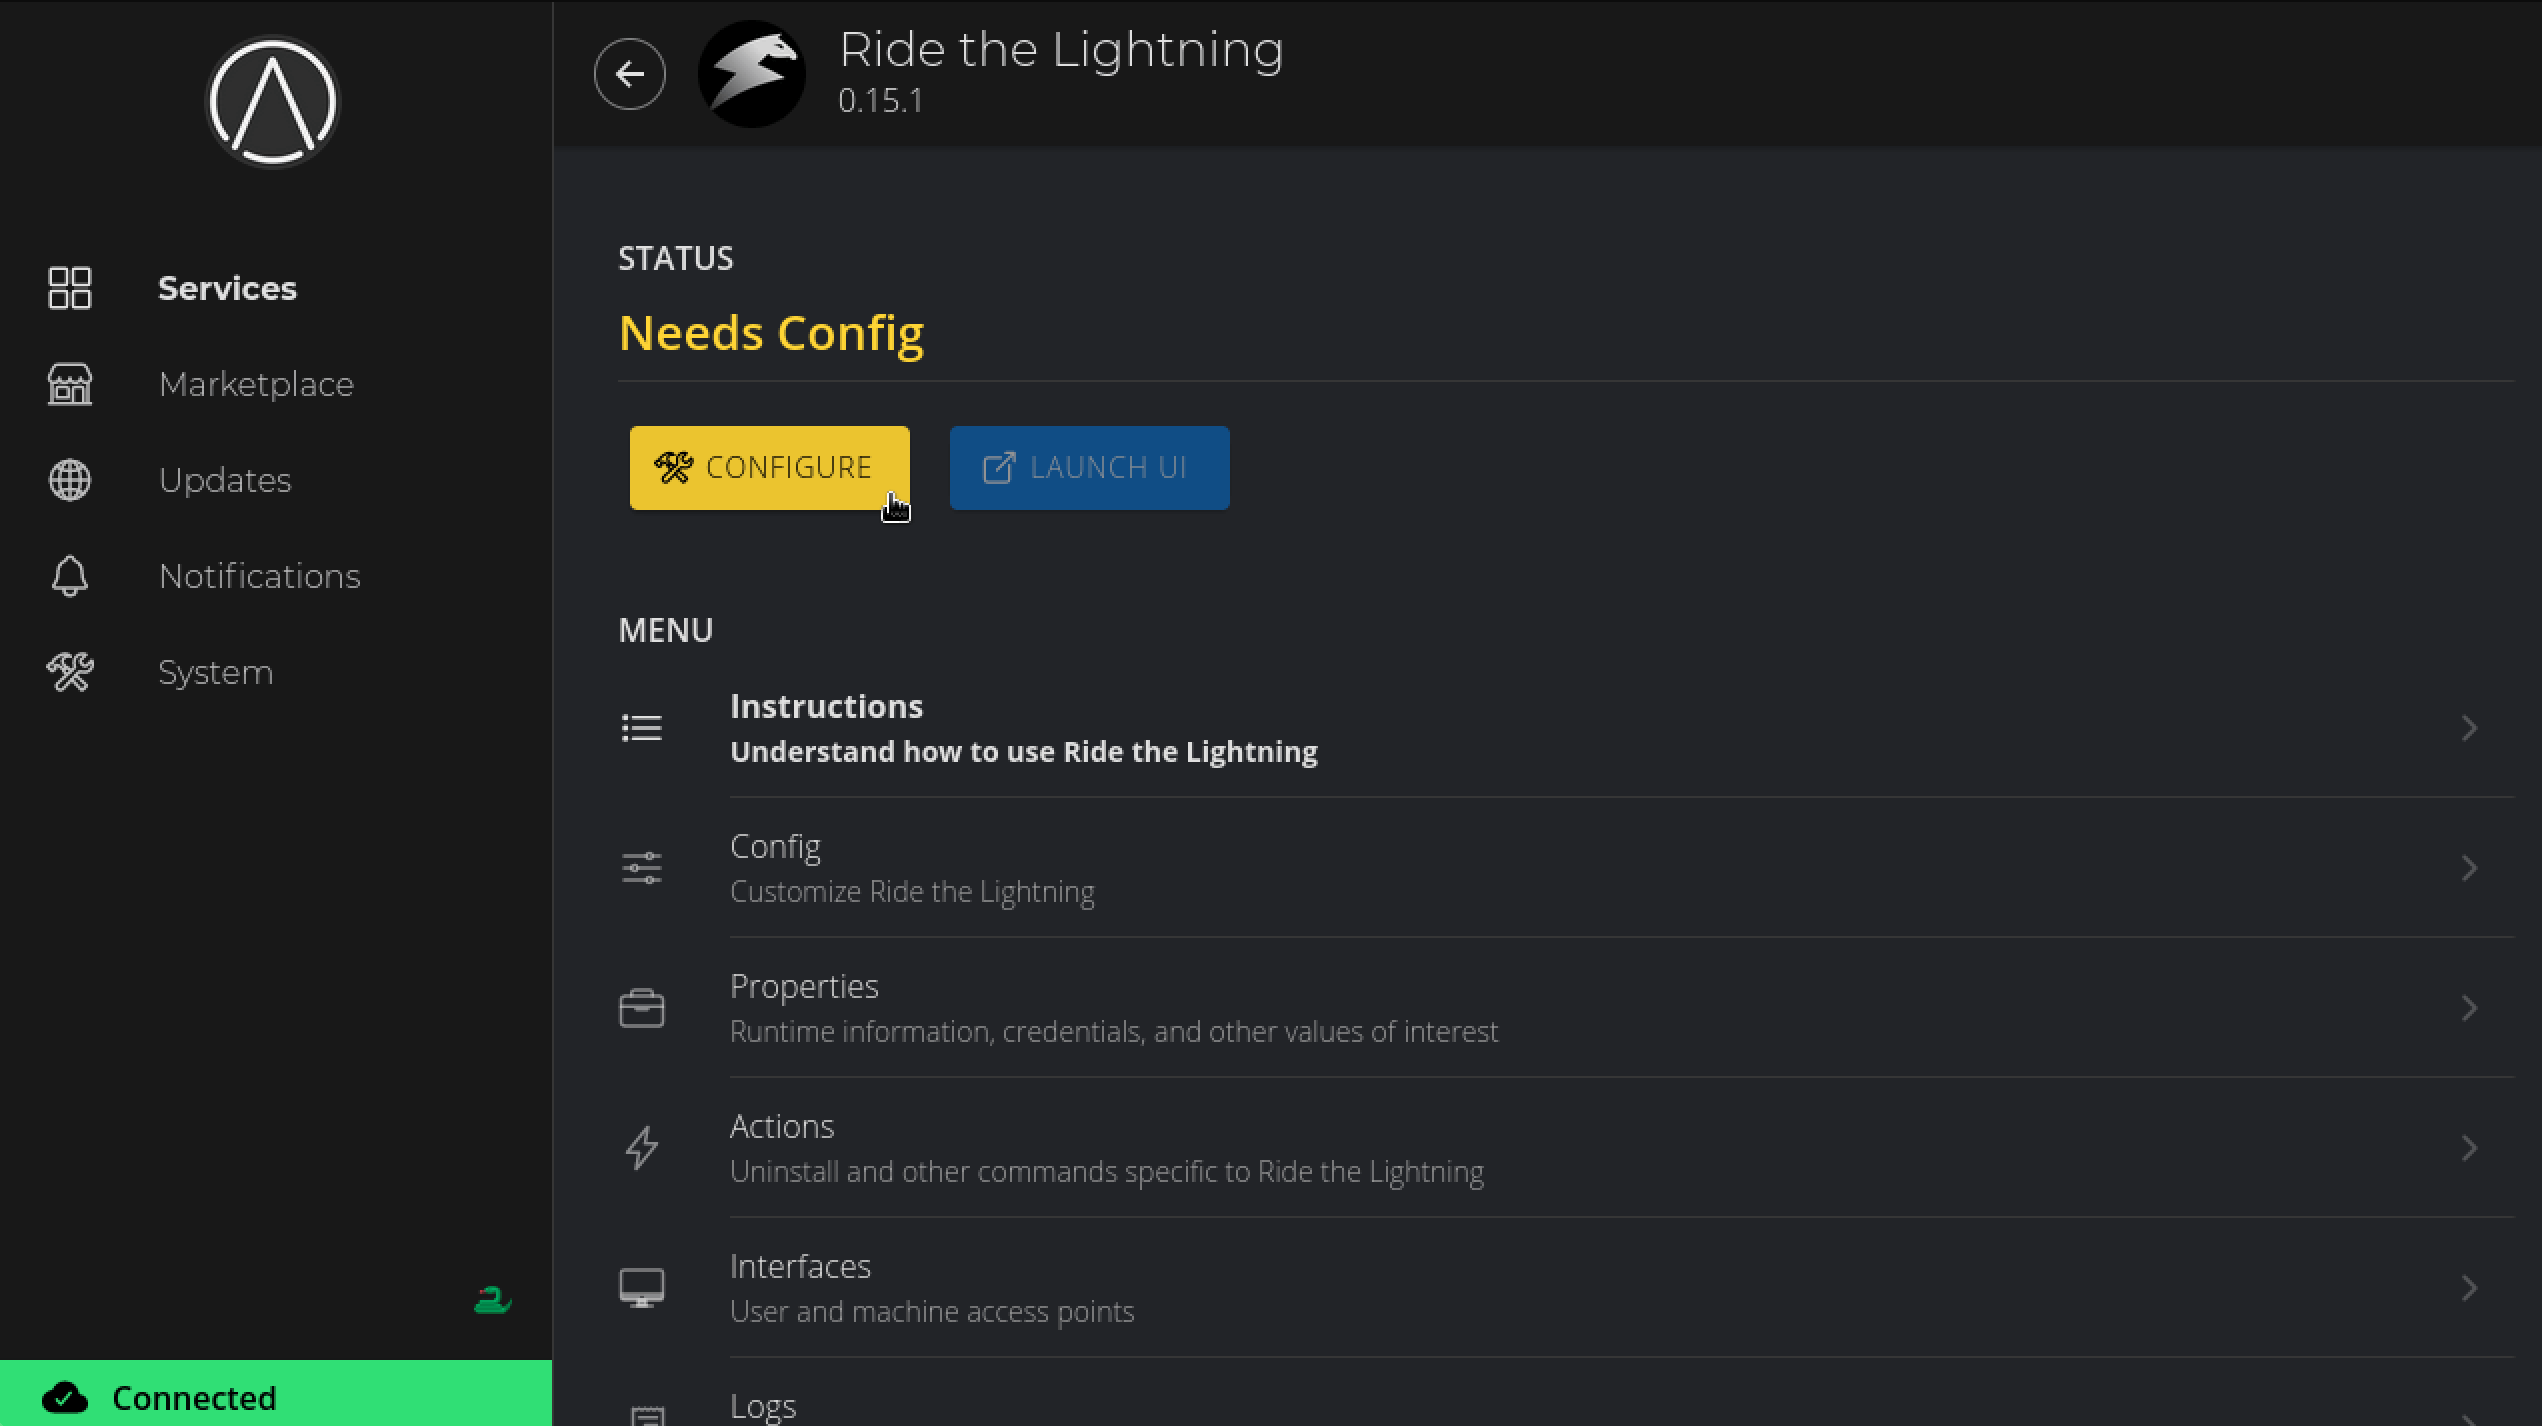
Install it and click on Configure just like with CLN.
-
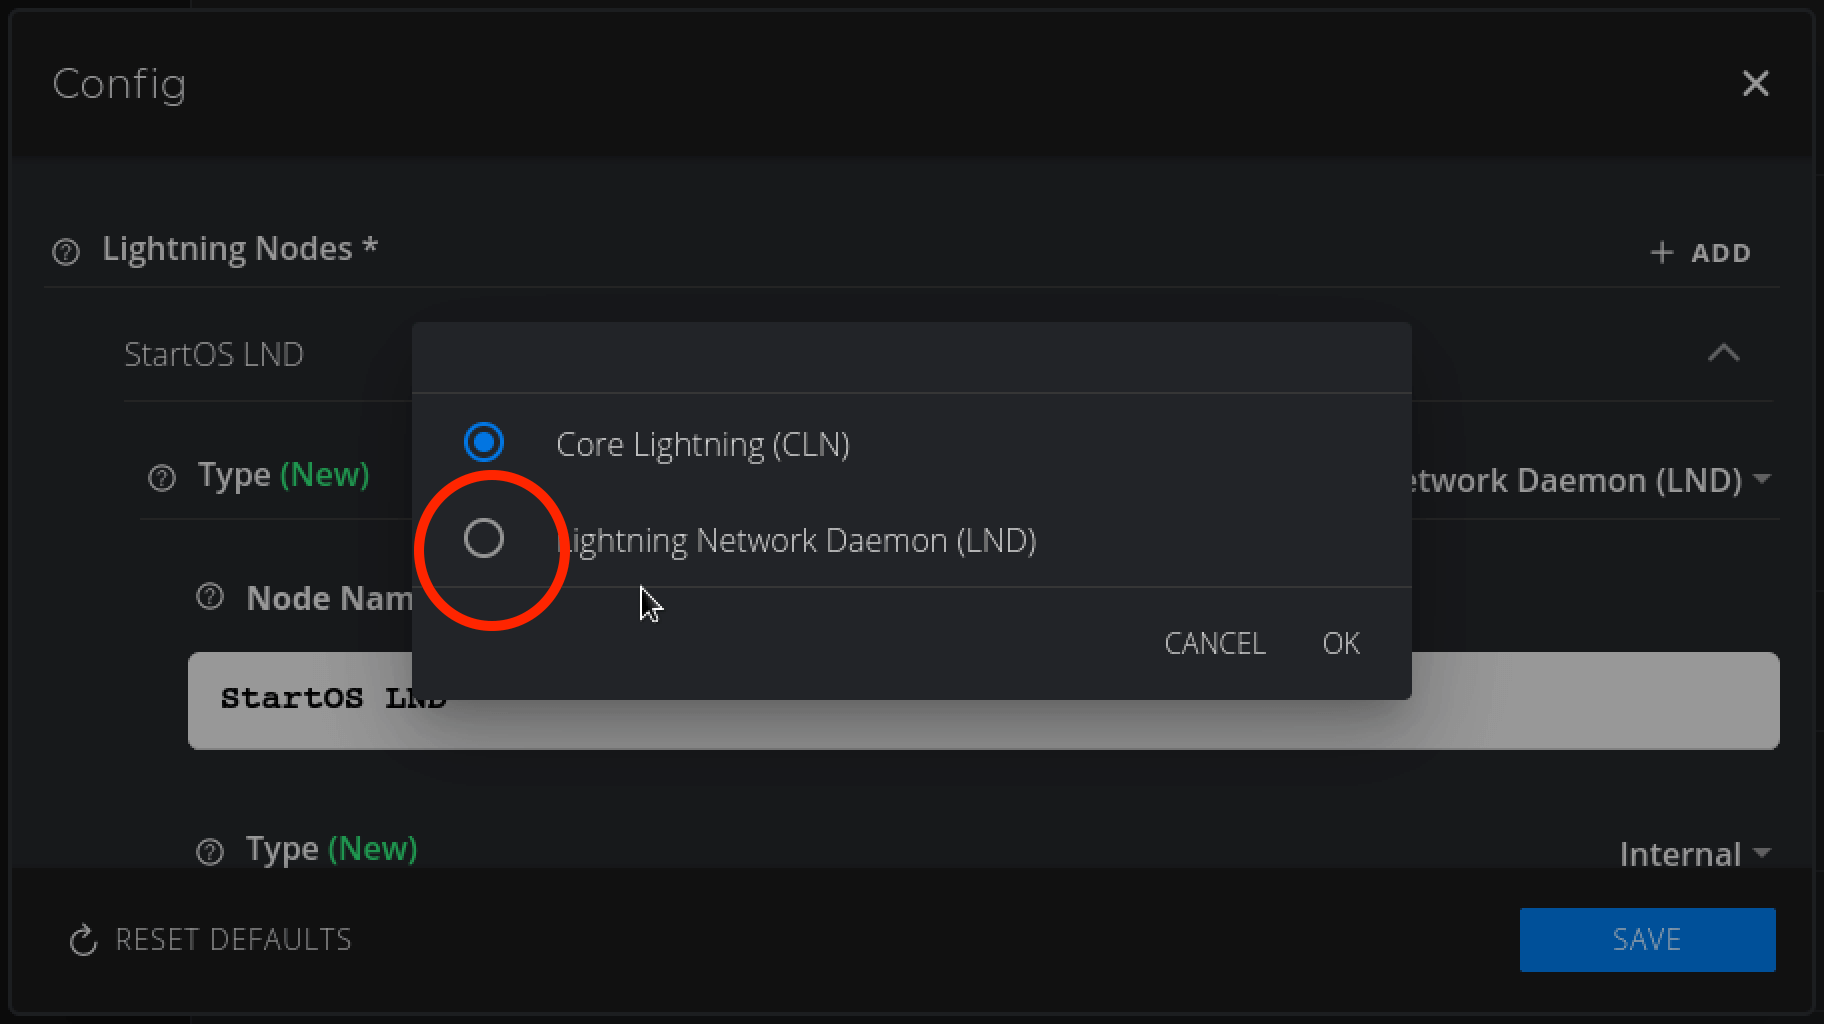
It will default to LND. In this case we are using a CLN node instead, so we will change the default setting as shown:
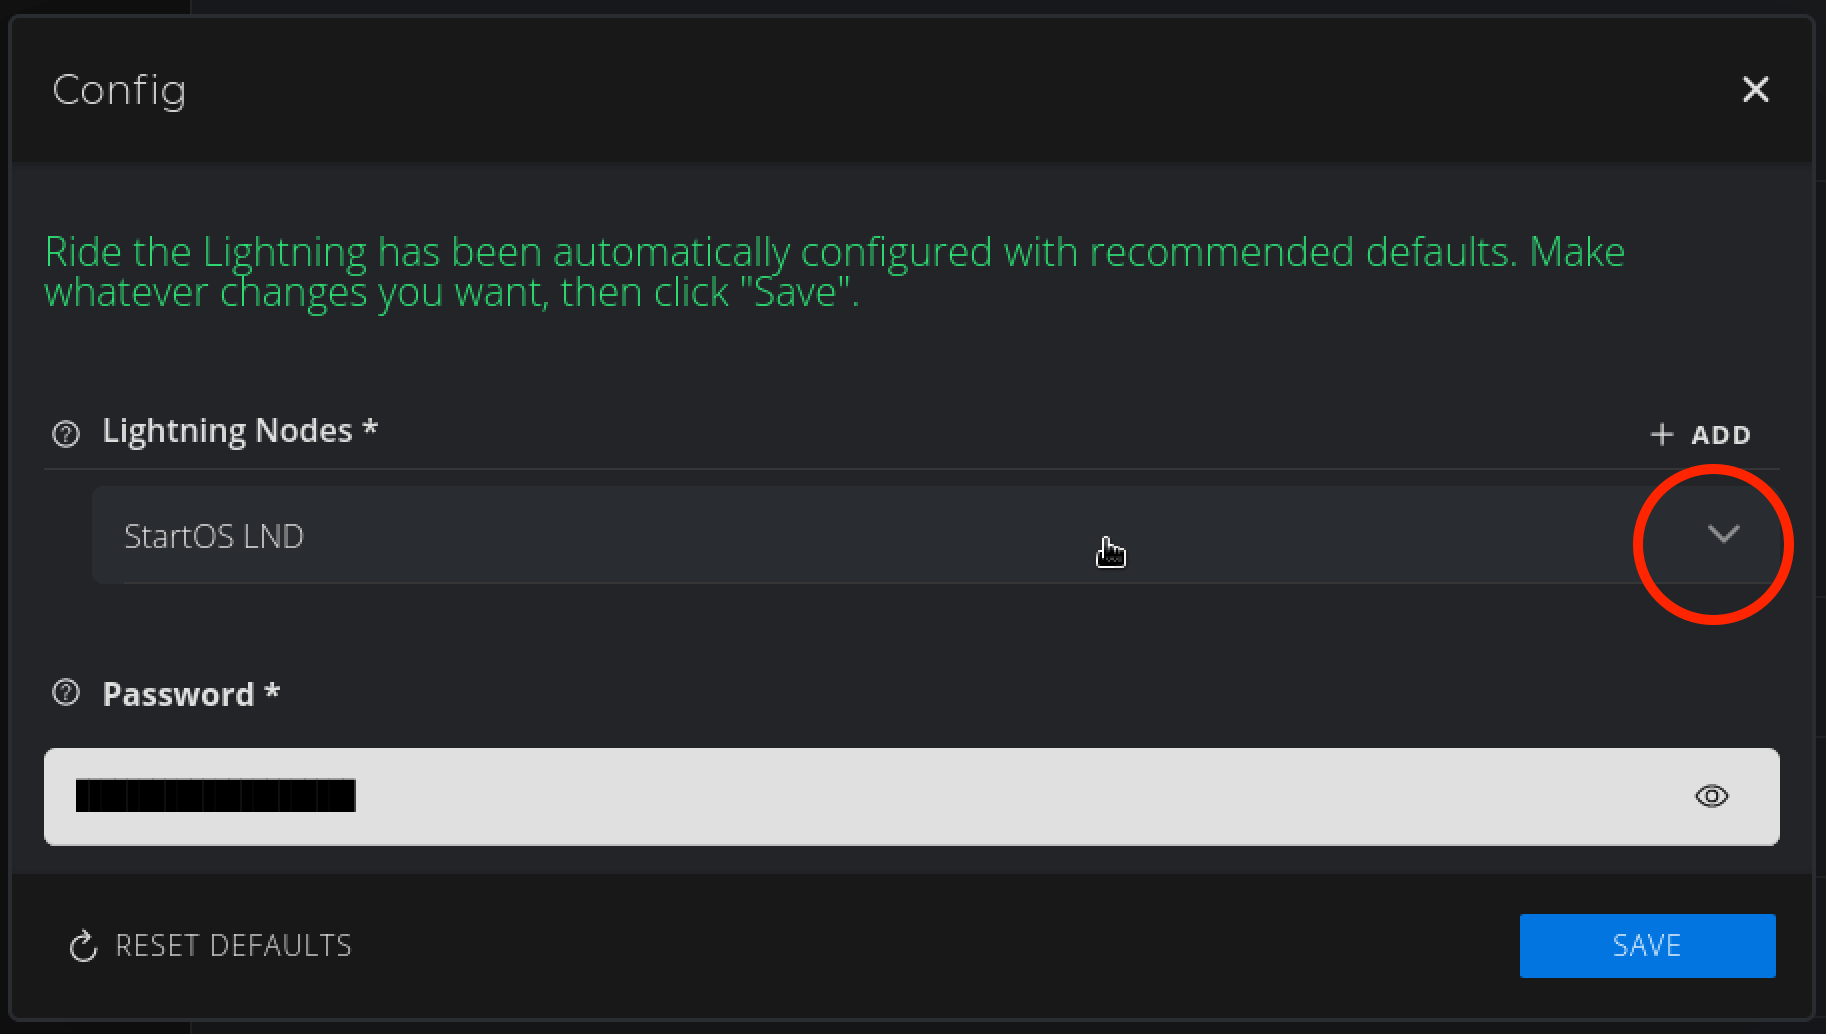
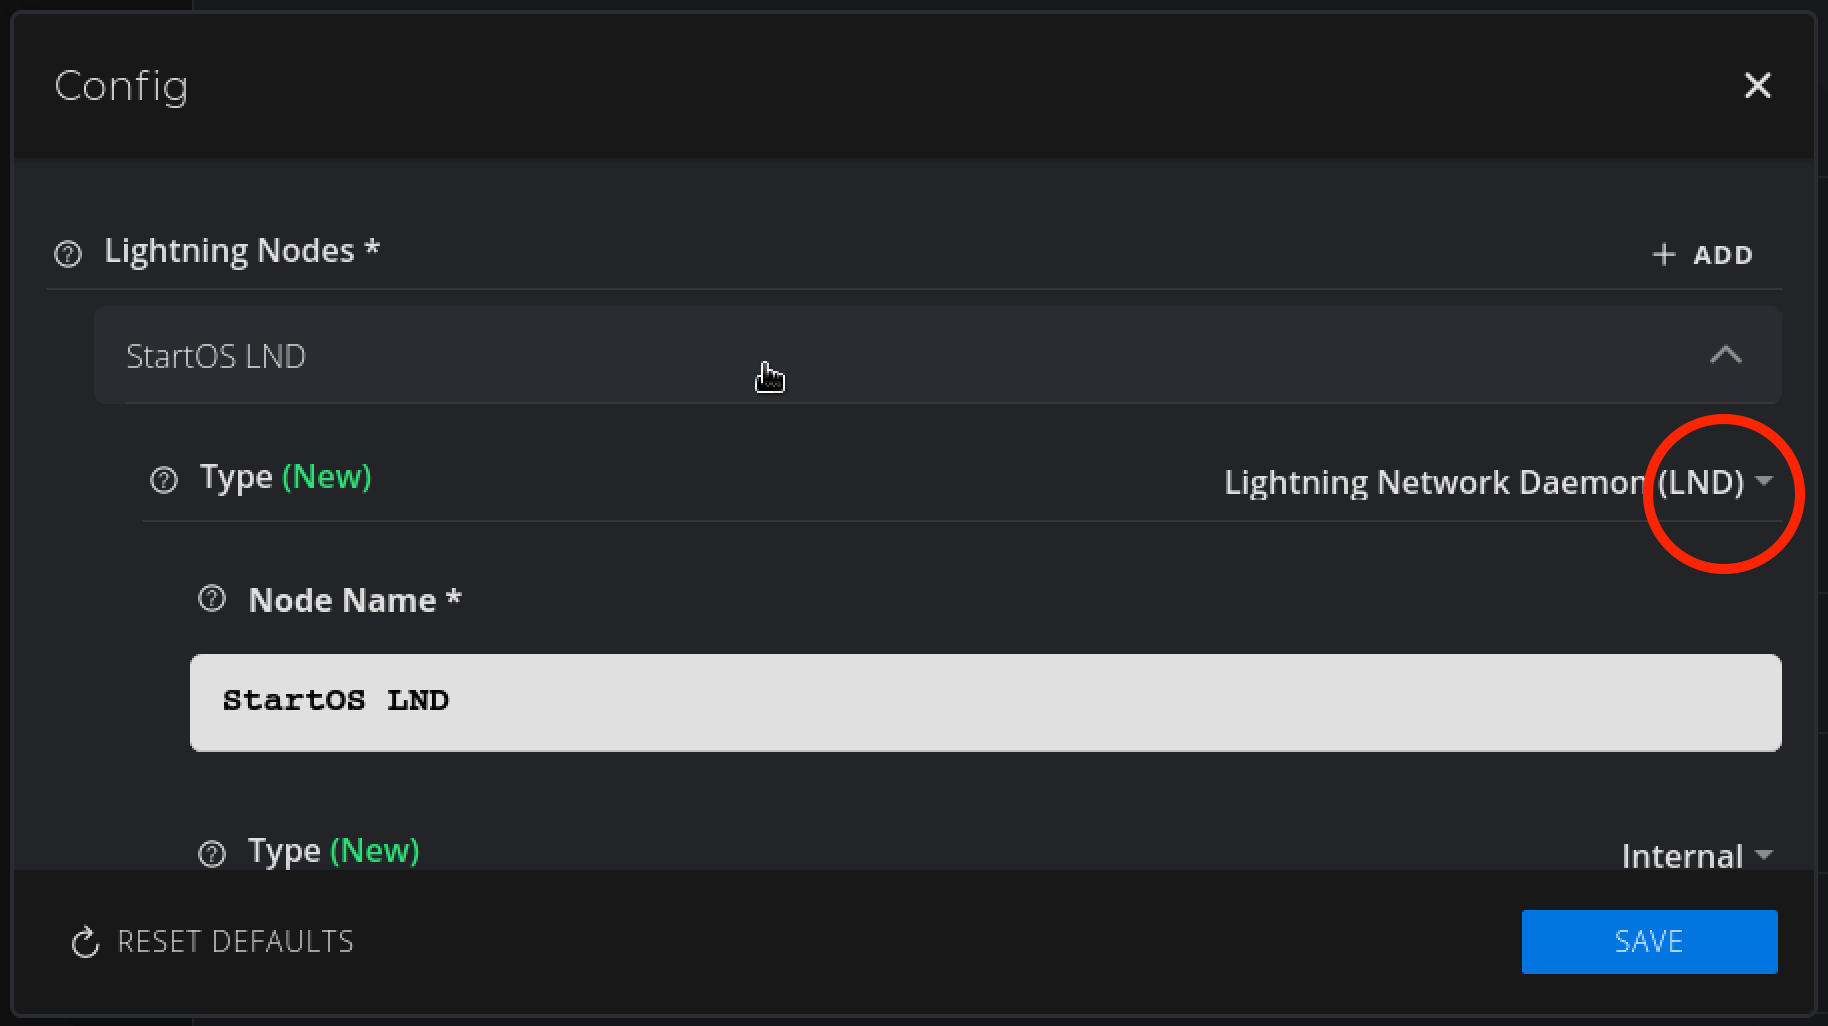
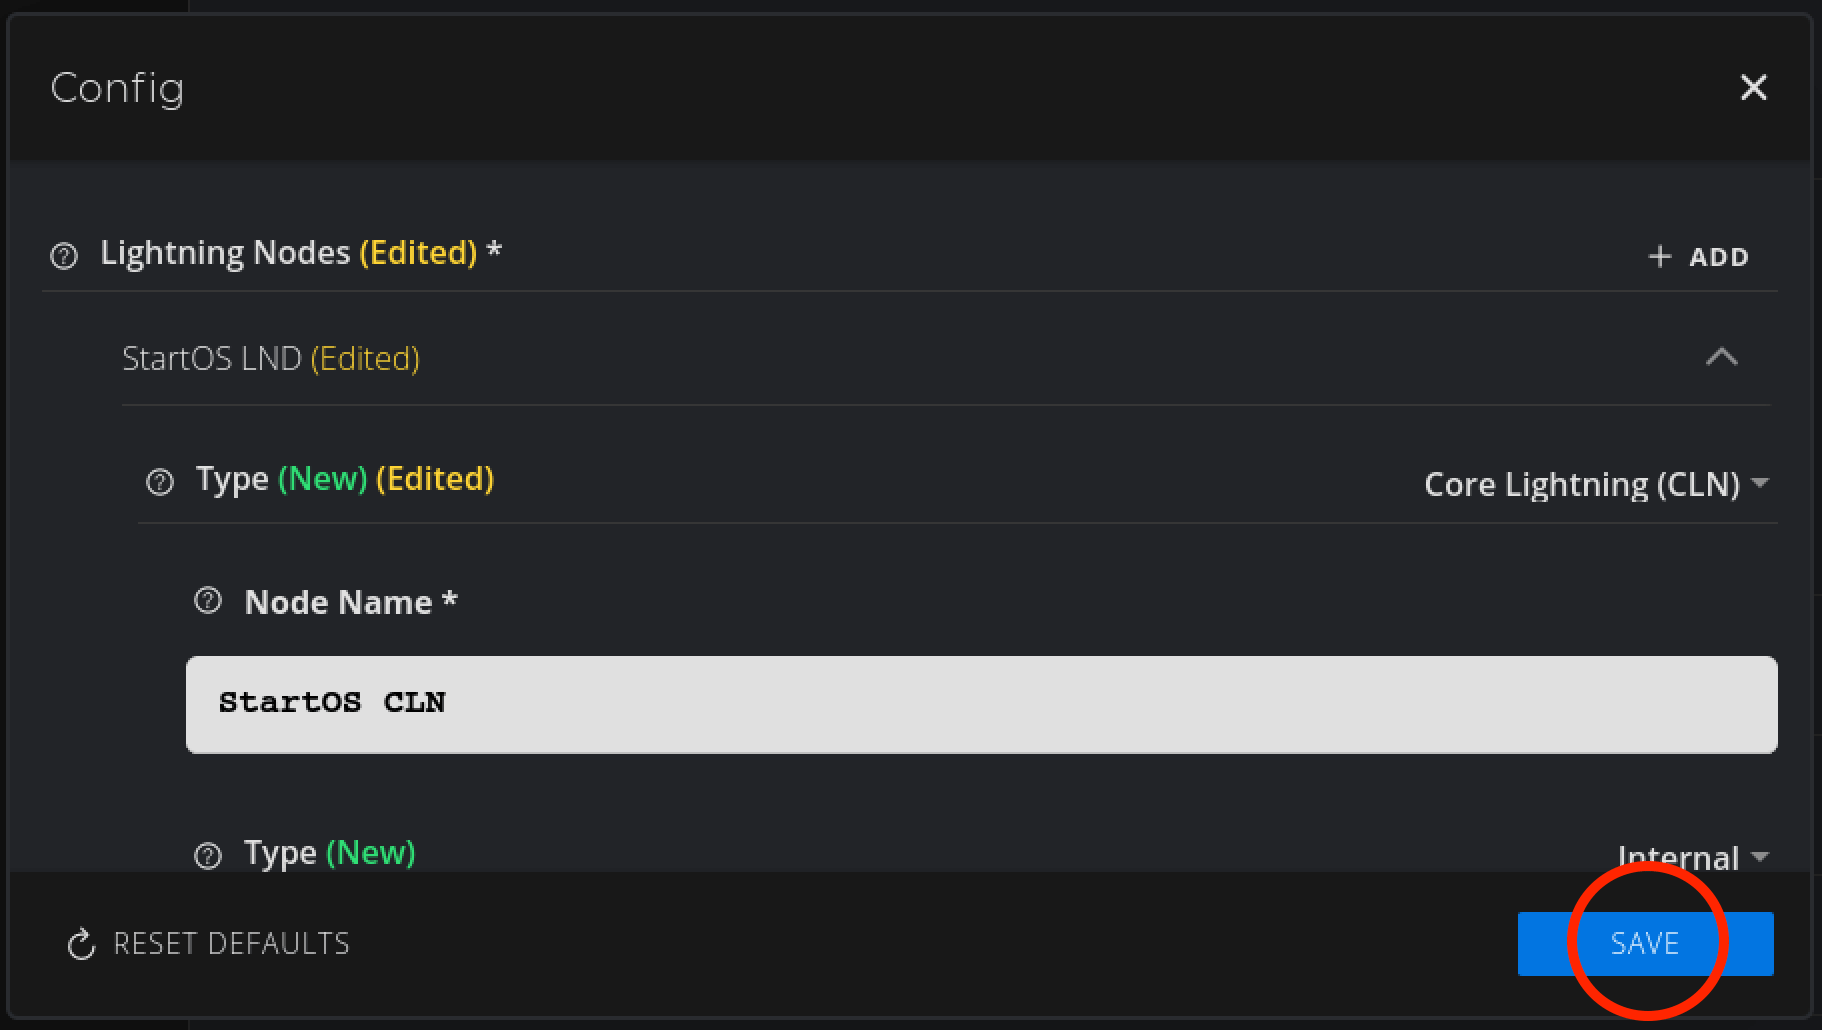
Change to Core Lightning (CLN) and hit OK:
Hit Save:
-
Now hit Start:
-
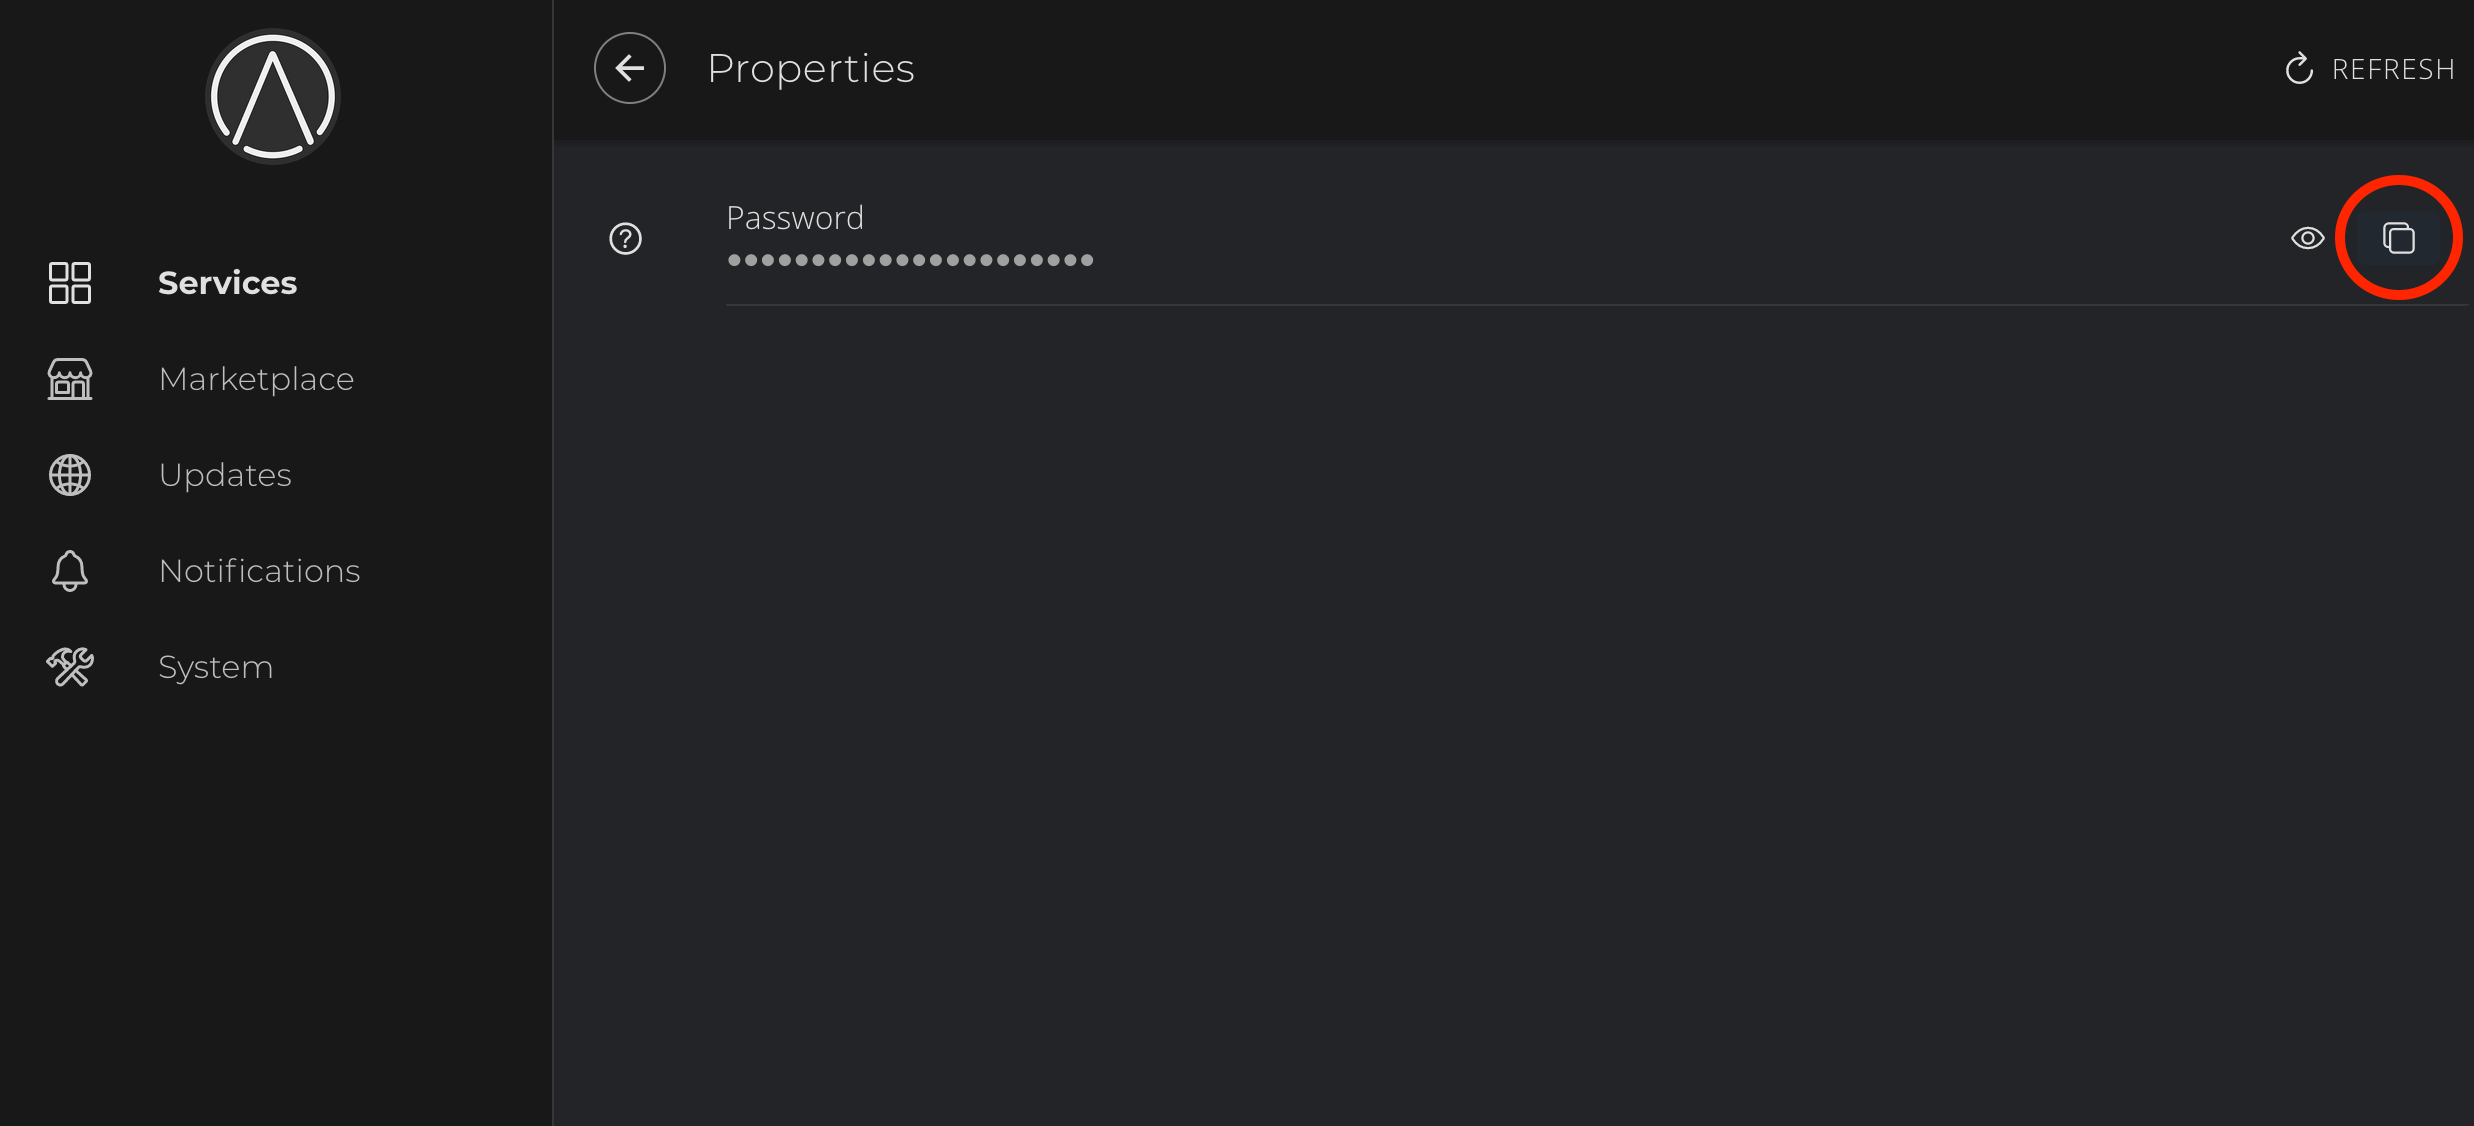
With RTL started, click Properties:
-
Copy the automatically generated password:
-
Head back to the RTL service and click Launch UI:
Enter the copied password and log in:
Tip
You can add the password to your password manager for convenience.
-
Once in RTL, click On-chain then click Generate Address:
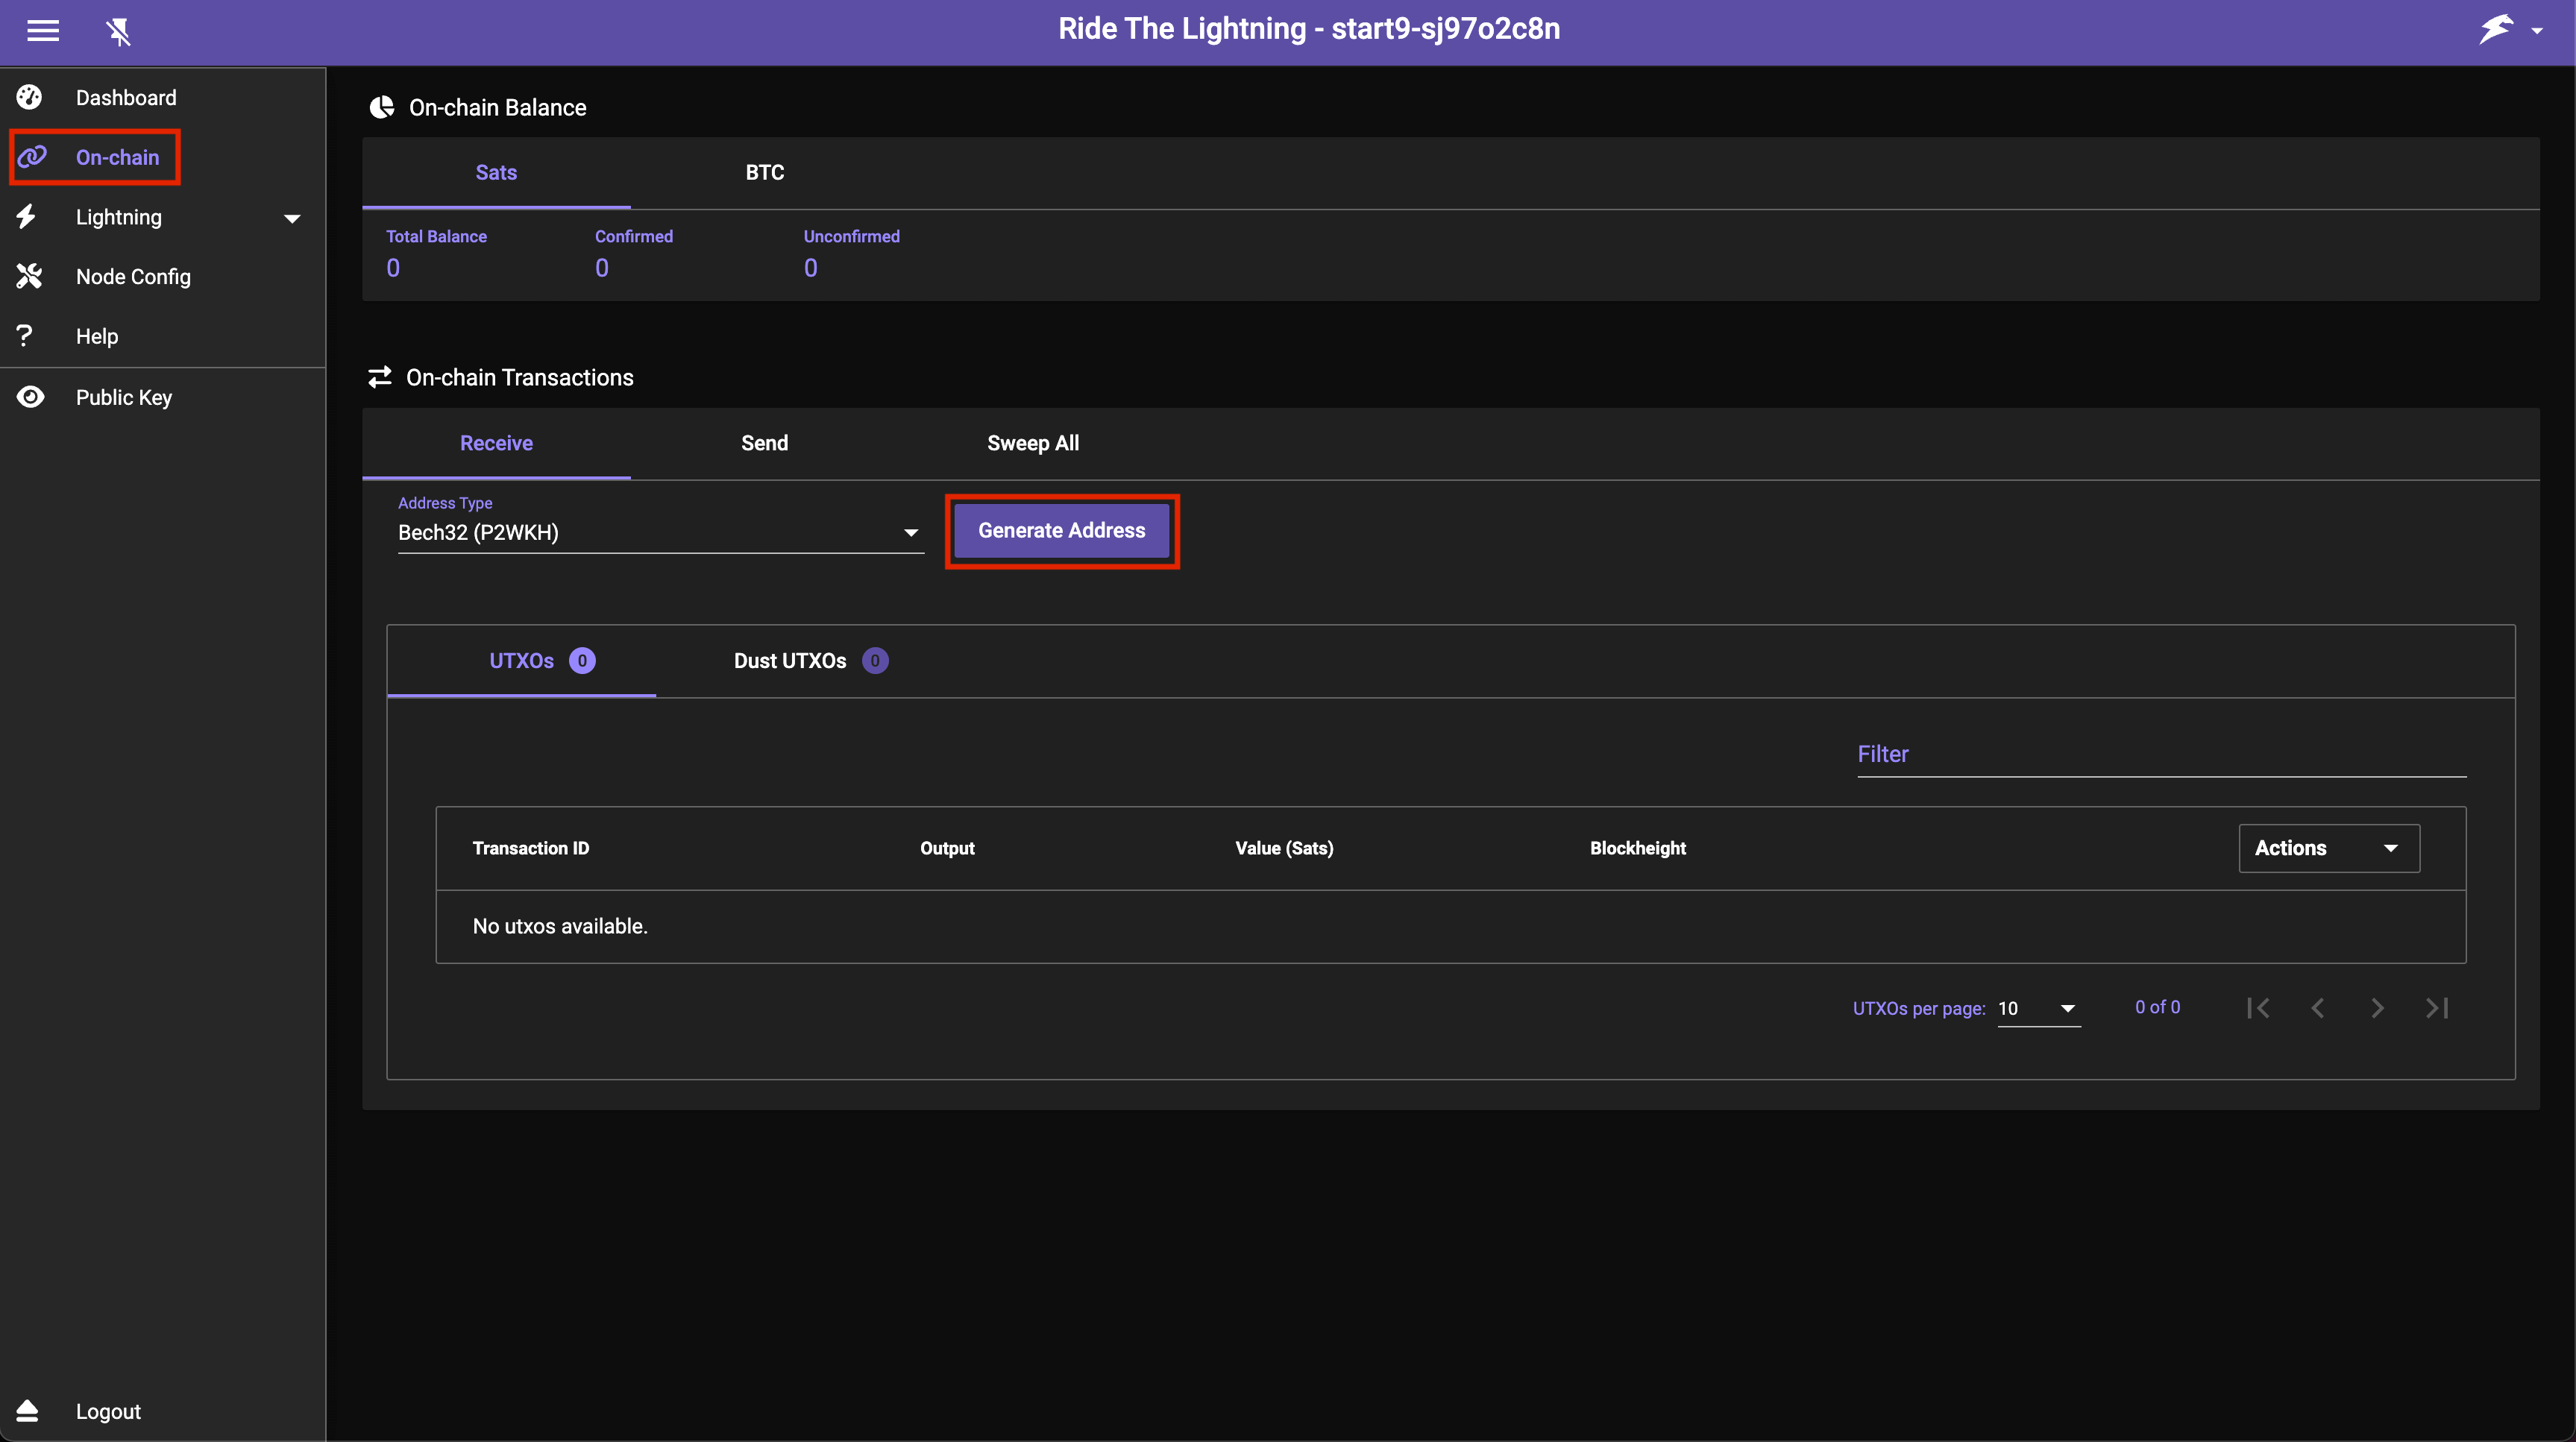
-
Send bitcoin to the generated address to add funds to your lightning wallet:
Warning
Please do not send money to the address pictured above as we will not receive it. If you are intent on sending us money please head here.
-
Once your sats confirm on-chain you’ll see this:

-
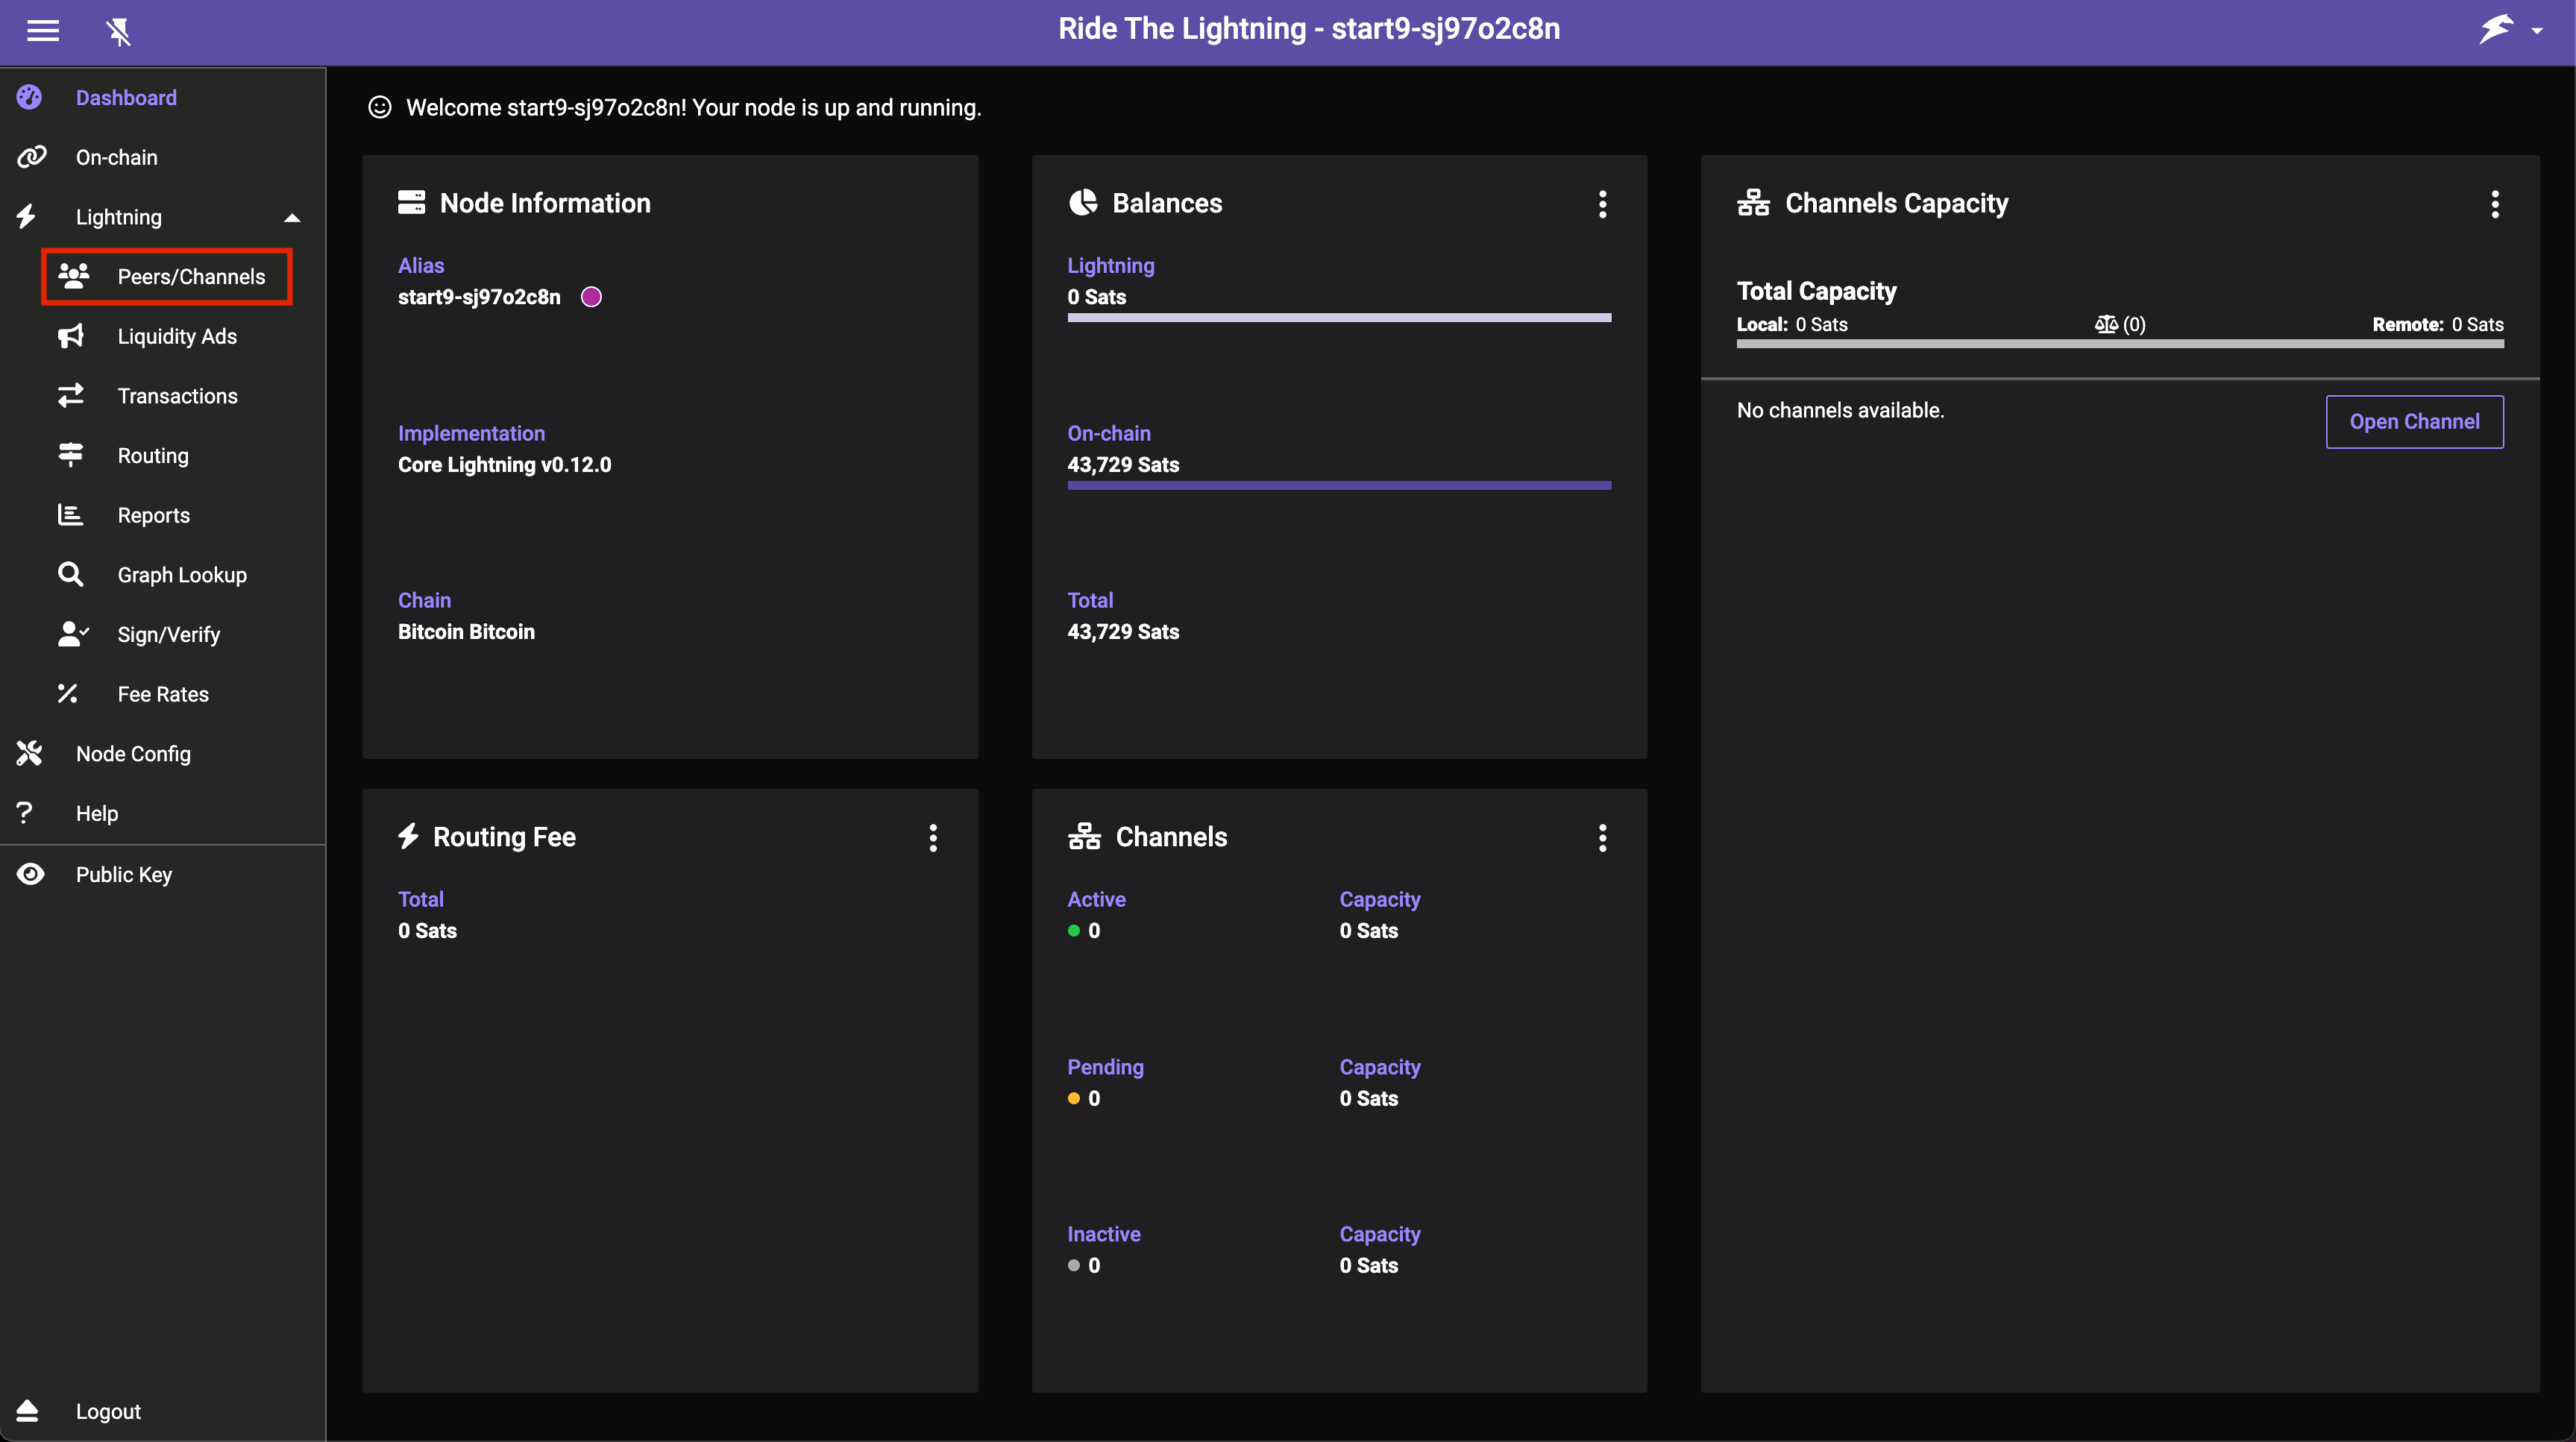
Now we must add a peer with which to make channels. In this example we will be opening a channel with Start9 so we will add Start9’s node as a peer. Click Peers/Channels:
-
Click Peers then Add Peer:

-
Enter the details of the lightning node you’d like to open a channel with. Start9’s node can be found here and is what we’ll use in this example. You can use another node if you like - ideally one that is well connected. Once chosen and added as below, click Add Peer:
Note
The syntax is as follows NodePublicKey@ipaddress:port - If it’s a Tor node it will be PublicKey.onion:port instead.
-
Then you can enter an amount (the size of the channel), select Private Channel (unless you want a public channel - see below), and a Fee Rate (check a block explorer for an idea of current necessary fees):
Note
Here we are creating a very small channel with a capacity for payments of only a few dollars. You will likely want your channel to be larger than this so that it’s actually usable for reasonably sized payments. Channels this small may well get closed by the remote peer.
Note
Using a private channel is what we advise as a default. You may wish for the channel to be public if you intend on becoming a routing node or for other reasons.
-
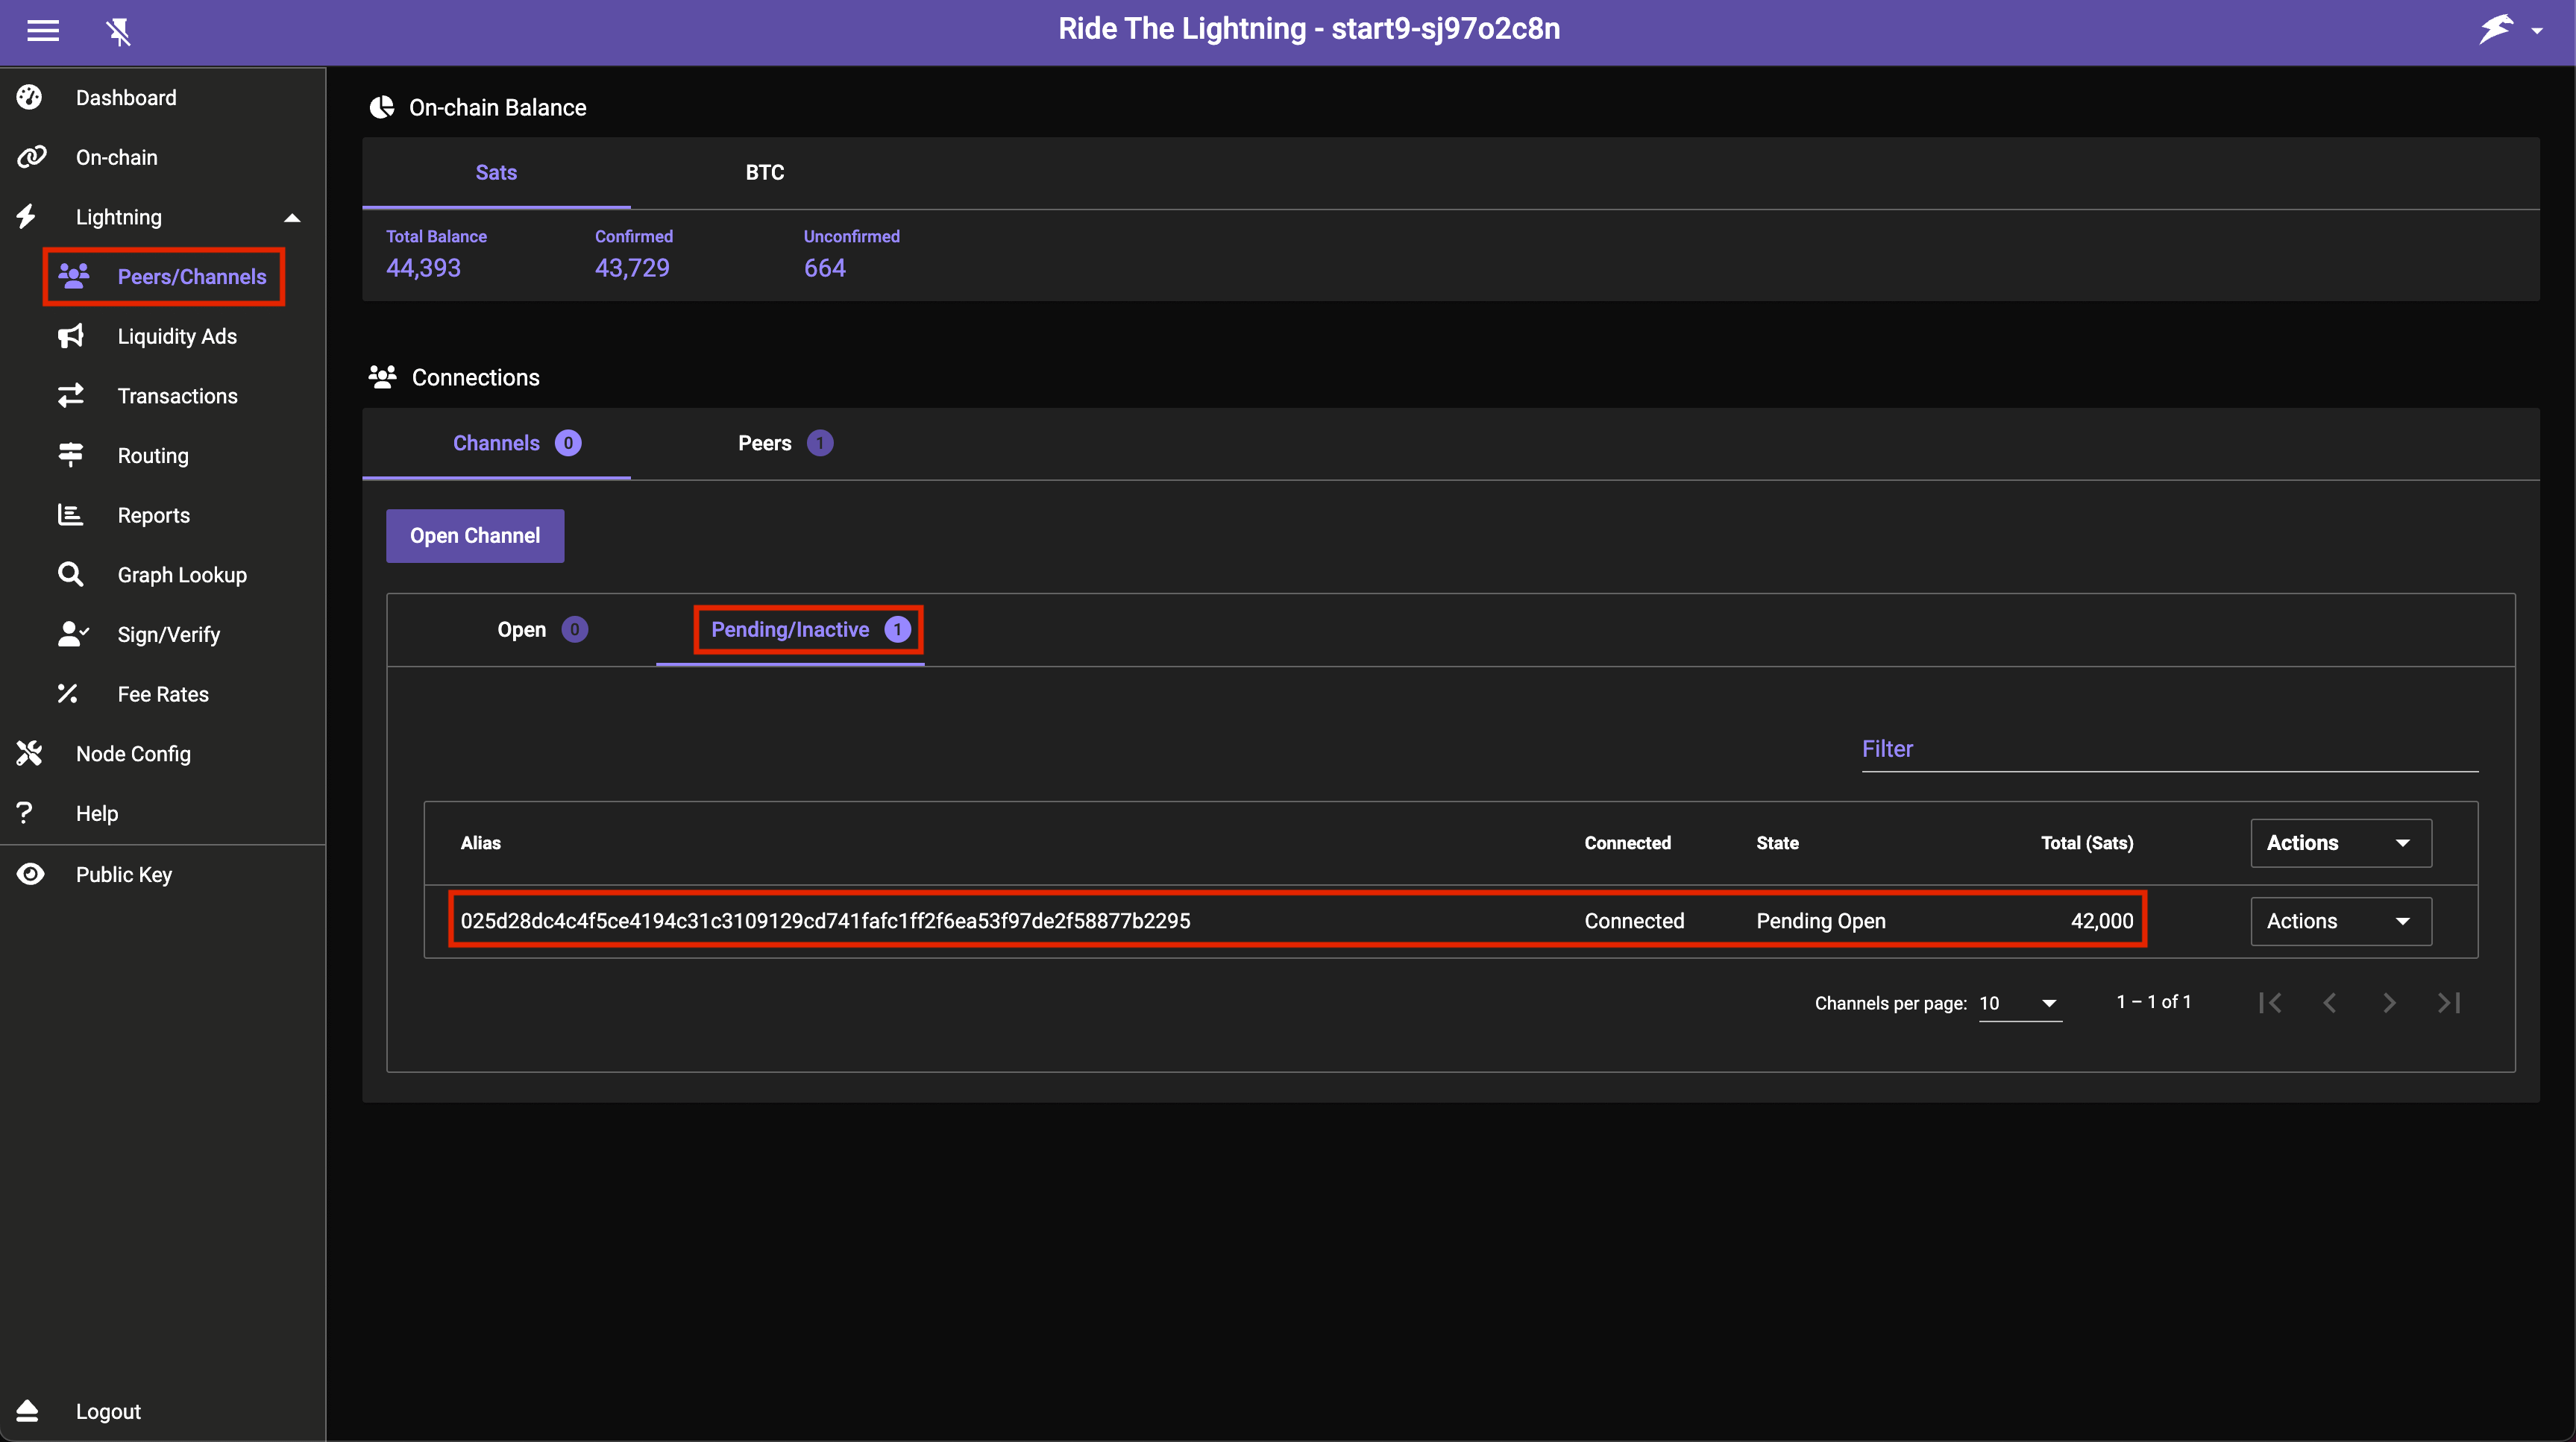
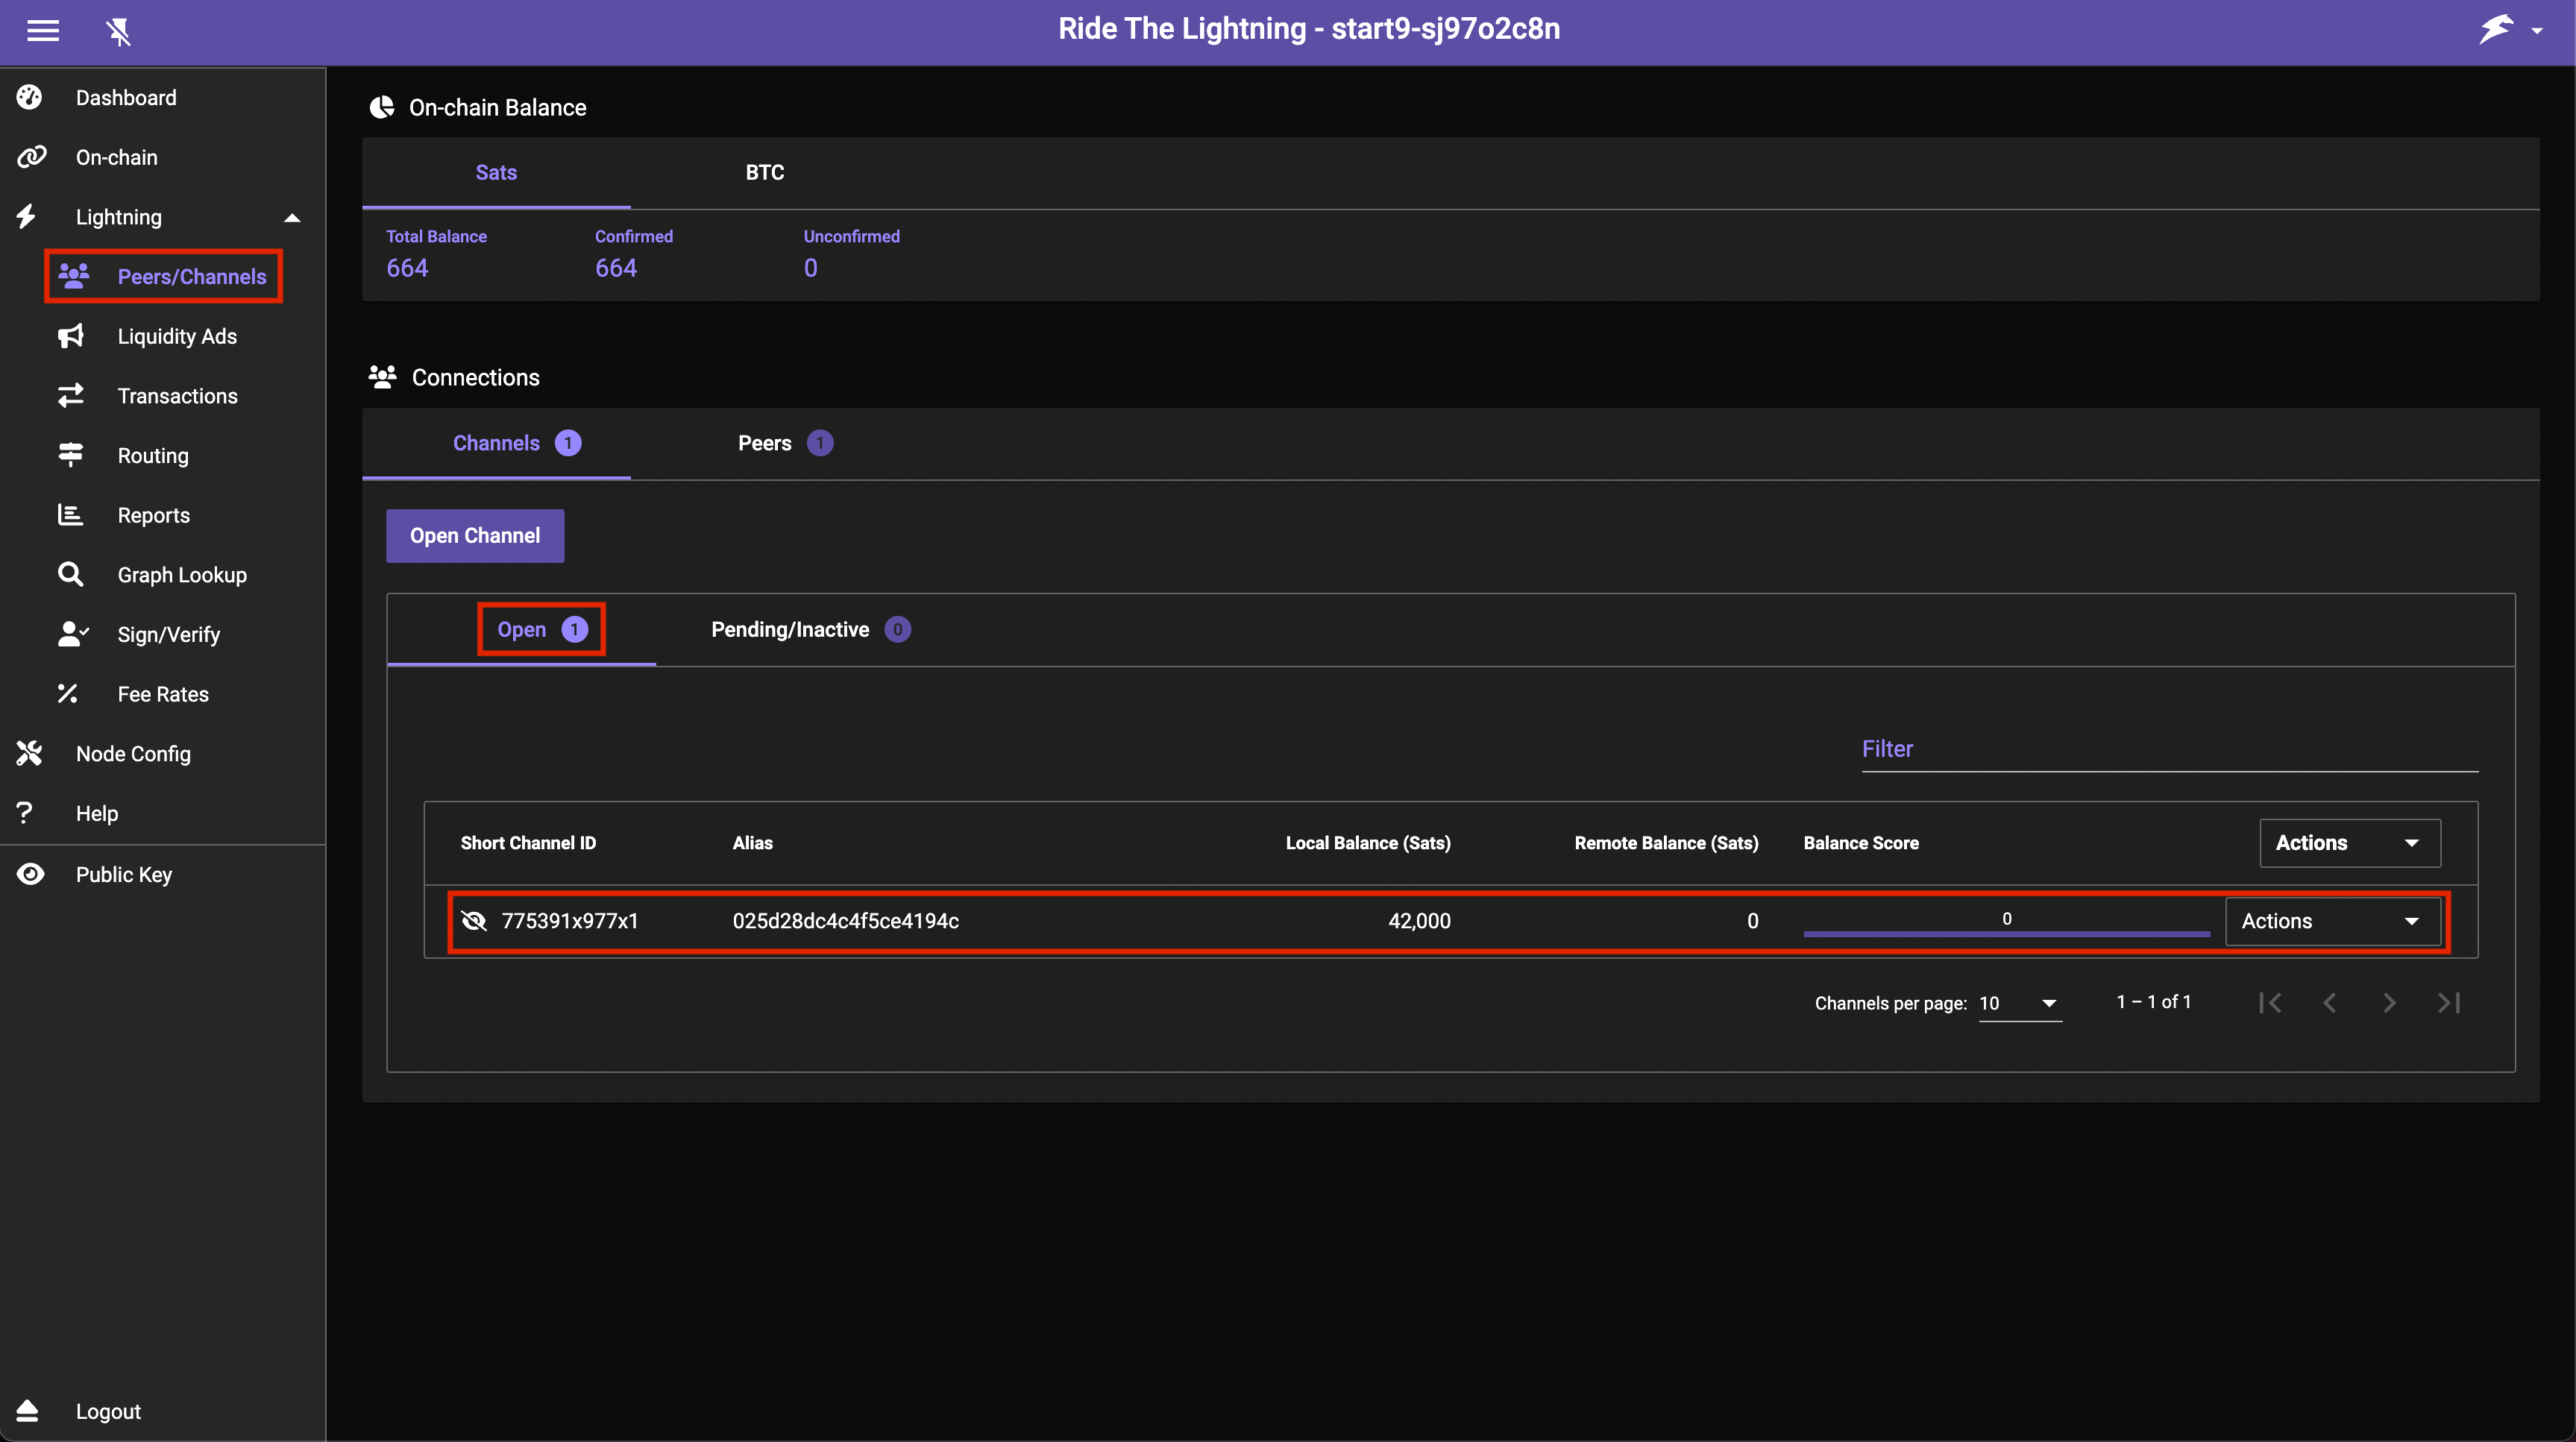
You will now see your channel in Channels -> Pending/Inactive:
-
Once the transaction opening the channel gets added to a block your channel will soon appear here under Open:
-
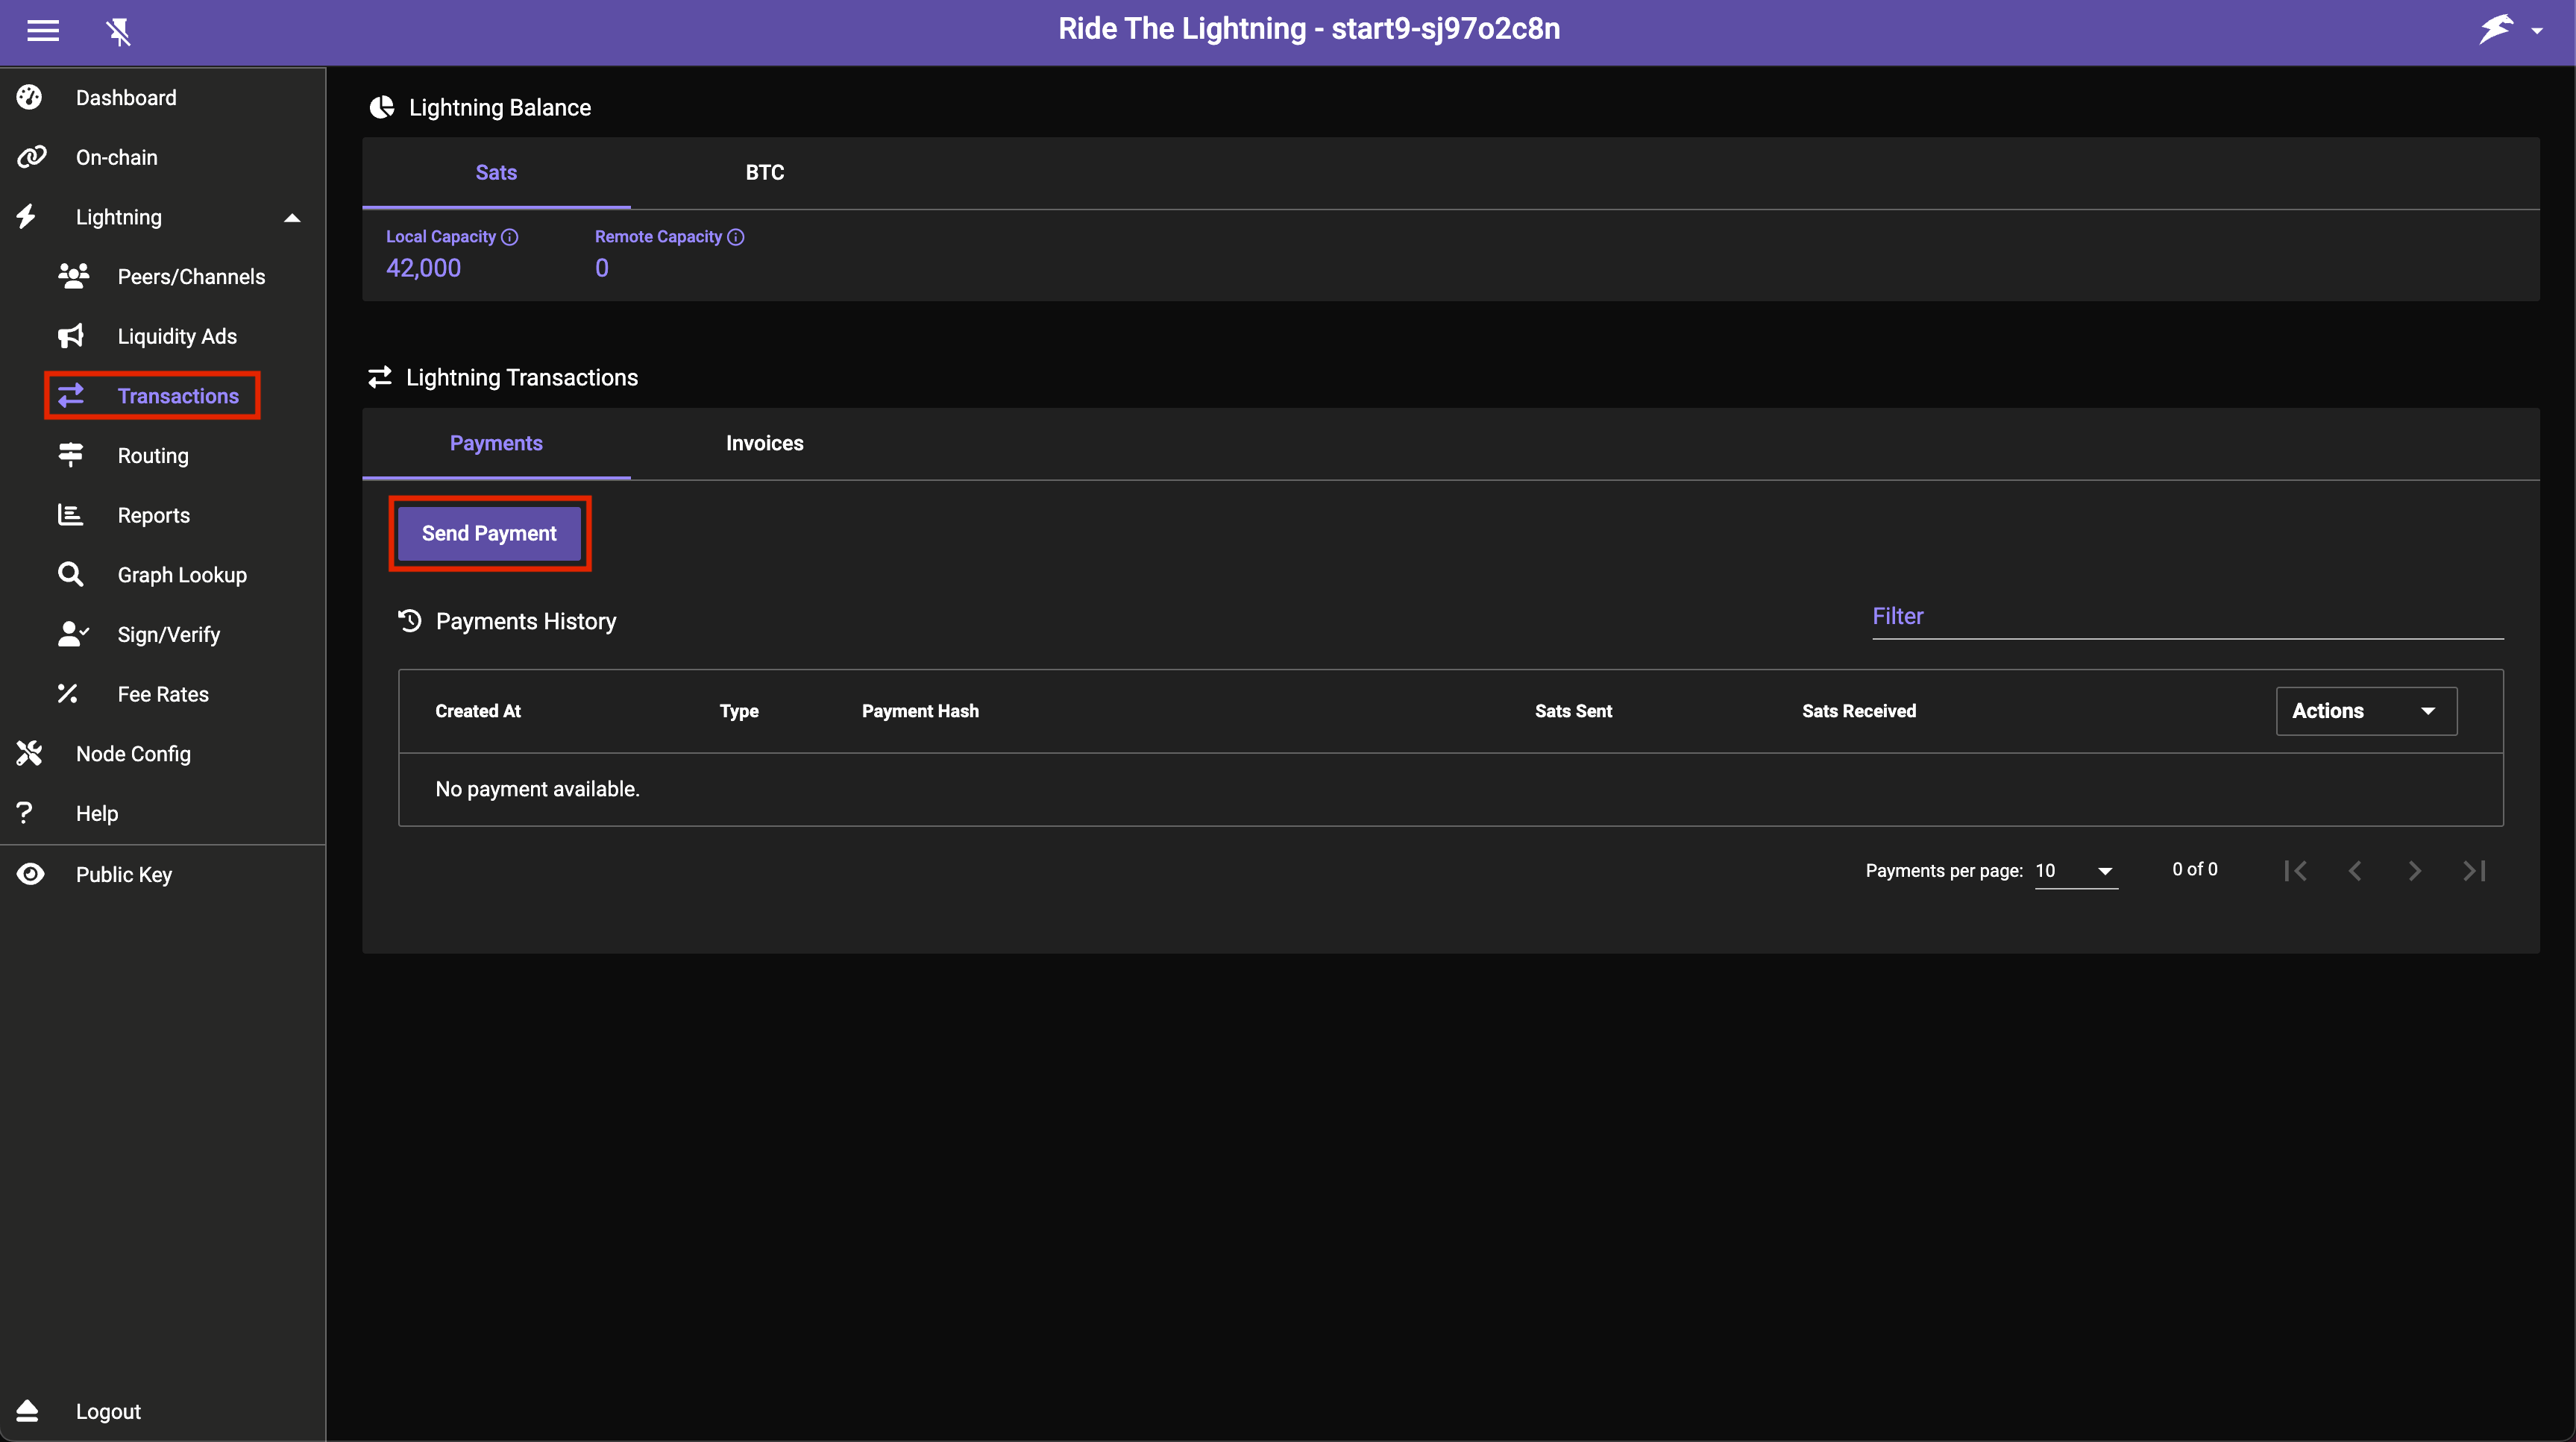
To make a payment head to the Transactions tab and press Send Payment:
-
That’s it! You now have a lightning node running with a channel open ready to send payments on the lightning network!
Note
You will not be able to receive payments until you have inbound liquidity in your channel. After completing the above process you will only have outbound liquidity. Inbound liquidity can be created by making payments, having someone open a channel to you or via more sophisticated channel creation.
This guide will explain more about attaining inbound liquidity.
If you want to connect other applications or wallets to your node, please see the guides here.
Getting Inbound Liquidity
Before you read this, it’s important to understand the important concept of liquidity. This guide summarizes some of the ways you can get some inbound liquidity after opening a new or first channel.
Spending Sats
The simplest way to gain inbound liquidity is to spend some of your outbound liquidity. Whether you send this to yourself or spend it on a purchase, the end result will be inbound liquidity equal to the amount you have spent.
Let’s say you have opened a channel of 1 million sats and you’d like this “balanced” so that you have 500k outbound and 500k inbound. To do this, you’ll have to send 500k sats from your node to somewhere else.
Common options
-
Buy something you’d ordinarily buy using a service like Bitrefill or The Bitcoin Company, then buy back the sats with fiat.
-
Send 500k sats to another wallet you control, or pay your friend the 500k sats you owe!
-
Donate to Start9
“Loop Out”, or perform a swap
Oftentimes when people open a channel, again, let’s use 1 million sats as an example, they’d like to be both better connected to the Lightning Network with more than one channel and have inbound and outbound liquidity on both channels. But if you’ve just opened a channel with the majority of your on-chain funds, you now have just one channel with all your funds as outbound liquidity.
To get some of these sats back as on-chain funds, and so free up the channel so that it has some inbound liquidity, we need to send sats via lightning and have them come back to us at an on-chain Bitcoin address (optionally back to your CLN or LND node to open another channel).
This is typically done using third-party services such as Loop, Boltz, Deezy, and probably a few others. They’ll provide you with a lightning invoice to pay and ask you in turn for a Bitcoin address to send to. In return for this service, you’ll pay a percentage fee.
Note
In using a swap service, you’ll not only pay the third-party a fee for their service, but you’ll also be charged for the resulting on-chain fee. This means when swapping or “looping” out 500k, you’ll receive the majority but not all of it back. This means any second channel you open will be smaller than the first unless you add more on-chain funds.
Warning
Start9 doesn’t recommend, vouch for or have any relationship with the third-parties listed as examples.
You can acheive the same effect as using an official swap tool with many lightning wallets that have their own swapping functionality built in. Though this is generally intended for you to be able to pay an on-chain invoice/address through the app rather than for channel management, it can be useful in a pinch. Send to the wallet over lightning, send back to yourself onchain, paying the wallet’s own swap fees in the process.
Get peers to open channels to you
When you open a channel to someone else, by default, you’d have all the liquidity on your side of that channel. You’d have only outbound liquidity. On your channel partner’s side of the channel, they would see that all the liquidity is on your side and that they only have inbound liquidity.
In the same way that you’re giving someone else inbound liquidity by opening your channel to them, you can get inbound liquidity by having someone open a channel to you.
You can convince someone to do this, pay someone to do this, or make friends with others and open reciprocal channels as a group.
Buying Lquidity
There are those who make a business out of selling liquidity. These businesses will charge a fee to open a channel to you from their well-connected nodes, giving you inbound liquidity to use immediately. They will typically agree to keep the channel open for a specific period of time. Examples of these businesses include LNBig and Deezy.
There are also marketplaces where ordinary users sell their liquidity. These could probably be considered a better option. Most sellers are well connected but not heavily centralized, and you have a channel partner you can reach out to and talk with. They’d often be willing to keep the channel open longer if you ask them or if you use it. One popular market for this is Magma.
Swapping Liquity
The easiest, cheapest, and best way to get and offer liquidity is to make agreements with fellow Lightning Network users and open reciprocal channels as a group. You’ll often have a chance to learn from more experienced peers (i.e., how to do a circular rebalance) and get two channels by just opening one yourself. For example, in a triangular swap, you open with A, A opens with B, B opens with you. Each user gets 2 channels and 50% inbound. The best example of this is lightning network+
Jellyfin
Jellyfin is a self-hosted media server capable of serving a variety of content such as movies, shows, music, books, and photos.
Follow the guide below to get the most out of your Jellyfin server.
Contents
Nextcloud
Nextcloud is an open-source, self-hosted cloud platform that allows you to store, share, and manage files securely from your own server or device. It’s a private alternative to popular commercial “cloud” services (the “cloud” is just someone else’s server), where you control your data instead of relying on third-parties.
With Nextcloud, you can sync files across devices, collaborate on documents in real-time, and even integrate apps for tasks like video conferencing, calendar management, or note-taking. It’s highly customizable, privacy-focused, and ideal for individuals, businesses, or organizations looking to maintain full ownership of their digital assets while enjoying the convenience of cloud storage.
Contents
- Nexcloud Device Setup - Set up your client device to connect to Nextcloud
- Nextcloud Apps & Integrations - Setup and use Nextcloud and 3rd party apps
Nostr
Nostr, short for “Notes and Other Stuff Transmitted by Relays,” is a decentralized protocol designed for creating a censorship-resistant social media platform. It allows users to publish and share messages, known as “notes,” to relays without relying on a central authority. This architecture promotes self-sovereignty and freedom of expression, as puplished content and user profiles are not easily subject to censorship or control by any single entity.
Contents
- Nostr RS Relay – Run your own relay
- noStrudel – Host your own client
Vaultwarden
Vaultwarden is a self-hosted password manager, which means your passwords physically live on your Start9 Server. Be sure to create backups and keep them safe! If you lose your Server or uninstall Vaultwarden, and you have not made a backup, all your passwords will be lost forever.
If you currently have a hosted account with Bitwarden, you can export your data from that account and import it to your Vaultwarden service on your Start9 Server using the built-in import/export features in any Bitwarden application!
Follow the guides below to get the most out of your Vaultwarden server:
Contents
Miscellaneous Guides
- Setting up Dynamic DNS
- Using StartTunnel
- Getting SMTP Credentials
- Resetting Your Password
- Upgrading from a Raspberry Pi
- Migrating LND to StartOS
- Firefox Guides
- Thunderbird Guides
Setting up Dynamic DNS
Your ISP may unexpectedly change the IP address of your home.
-
If you are using your router as a VPN server for private, remote access, this will cause every authorized client to be disconnected until you re-download configuration files for each client.
-
If you are using your router as a gateway for clearnet, domains using it will be unreachable until you update their DNS settings.
To prevent service interruption, you can enable dynamic DNS. Many routers offer this as a free or paid service. If not, there are third party services available.
Using StartTunnel
Installation
Follow the official StartTunnel installation instructions to install StartTunnel on a VPS.
The instructions below assume you chose to initialize the StartTunnel web interface during installation. If not, you can do everything using the start-tunnel CLI.
Adding your StartOS Server
In this section, you will add your server to a specific subnet of your StartTunnel instance. This is similar to plugging your server into your router. The server is joining a private network.
-
In StartTunnel, navigate to
Devicesand click “Add”. -
Fill out the form:
- Give your server a name (e.g. “Start9 Server”).
- Select a subnet for the server to join (the default is fine).
- Accept/choose what IP address your server will have on the a subnet. (the default is fine).
- Click “Save”.
-
Download the resulting
start-tunnel.conf, (or copy to your clipboard). -
In StartOS, navigate to
System -> Gatewaysand click “Add”. -
Give the gateway a name (e.g. “StartTunnel”).
-
Upload
start-tunnel.conf(or paste from your clipboard). -
Click “Save”.
-
StartOS will now see your StartTunnel VPS as a private gateway, no different from your home router. Each service interface will automatically acquire new LAN and public IP addresses that correspond your StartTunnel gateway.
Adding a Client Device for Private Access
These instructions must be completed for each client device (cell phone, laptop, etc) you want to have private, remote access to your server.
-
Install the WireGuard app on your client device.
-
In StartTunnel, navigate to
Devicesand click “Add”. -
Give the device a name (e.g. “Phone”), select the same subnet as your server, accept/choose a LAN IP address, and click “Save”.
-
The resulting
start-tunnel.confmust be imported into the WireGuard app on your client device. If it is a phone or tablet, you can scan the QR code. If it is a laptop, download/upload the file, or copy/paste the contents. Refer to your device’s instructions for importing and enabling a wireguard VPN. -
Service interfaces are now accessible to the client device at their LAN addresses corresponding to the StartTunnel gateway.
Forwarding Ports for Clearnet Hosting
In order to expose a service interface to the public Internet, it is necessary to create a port forwarding rule in StartTunnel.
-
In StartOS, navigate to the service interface you want to expose.
-
Under
Gateways, make sure your StartTunnel gateway is enabled. -
If you intend to use a domain, add it under
Public Domains. -
Under
Addresses, find thePublicaddress you want to expose. A domain is usually best, but it is also possible to exposeIP:port. -
Click the blue “ⓘ” icon.
-
Find the line that says “Requires port forwarding in gateway…” and take note of the
externalPort -> internalPort(e.g.443 -> 5443). -
In StartTunnel, navigate to
Port Forwardsand click “Add”. -
Select the external IP address you want to use (there is usually only one), then provide the port forward information noted above.
-
If you are forwarding port
443 -> 5443, you will see a checkbox to also forward port80 -> 5443. This is highly recommended, as it will automatically handle redirecting HTTP -> HTTPS. For example, if someone visitshttp://your-domain.comor justyour-domain.com, they will be automatically redirected tohttps://your-domain.com. -
Click “Save”.
Getting SMTP Credentials
There are several StartOS services that are capable of sending emails, such as BTCPay Server, Ghost, Gitea, Nextcloud, Synapse, and Vaultwarden, using third party email (SMTP) servers. The guides below are for using Gmail or Amazon SES for SMTP, but you may also use another third party provider of your choice.
Contents
Gmail
-
Access your Google 2-step verification settings: https://myaccount.google.com/signinoptions/two-step-verification.
-
Enable 2-Step verification if not already.
-
Under “App Passwords” (bottom), add a new App Password.
-
Choose a name for the new App Password. You may call it anything, such as “SMTP”, then click “Create”.
-
A random 16-character password will be created and shown to you. This is your app password. Save it somewhere secure, such as your Vaultwarden password manager, then click “Done”.
-
Now you can use this SMTP account for any service that has the capability to send an email. The table below shows all the details you may need:
Parameter Value Host smtp.gmail.com Port 587 Encryption TLS Username your-username@gmail.com Password your App Password (form above)
Amazon SES
To use Amazon SES you will need:
- An Amazon Web Services (AWS) account. If you don’t have one, you can register here for free.
- To set up Amazon Simple Email Service (SES) on AWS, from inside your AWS console, also free for a time within certain limits.
- Optional: To purchase your own domain name to send emails from, then add the domain records Amazon provides you. This will allow you to request ‘Production Access’ to send emails to unverified addresses (i.e. to more than just your own email address).
You can then refer to the Amazon SES docs to create a SMTP user.
Proton Mail
Access to Proton Mail’s SMTP settings is currently only made available by Proton to their customers with Proton for Business, as well as certain higher tier individual and family plans (Proton Duo, Proton Family – both with “SMTP Submission” as a listed feature), and then only when you point a custom domain to your account.
To set up Proton Mail for SMTP you will need:
- To purchase and point a domain name from a domain registrar to Proton’s servers by following this guide here: Custom Domain
- To follow the steps in the secion How to set up SMTP in the guide here: SMTP Submission
Resetting Your Password
This guide should only be used if you have lost or forgotten your StartOS master password. If you are just wanting to change your password, that can be done through the main UI System > Change Password.
Contents
Raspberry Pi
-
Simply re-flash the microSD card.
[!DANGER] When performing initial setup, be certain to select
Recover > Use Existing Drive. -
Create a new password and complete setup. All your previous addresses and data will be preserved.
All Other Devices
-
Download and flash the latest version of StartOS, using the appropriate flashing guide for your hardware.
[!DANGER]
- When installing StartOS, be sure to select “Re-install OS, preserving data”.
- When performing initial setup (after installing StartOS), be certain to select
Recover > Use Existing Drive.
-
Create a new password and complete setup. All your previous addresses and data will be preserved.
Upgrading Your Raspberry Pi
Follow this guide to upgrade from a Raspberry Pi StartOS server to a Server One, Server Pure, or similar device.
Contents
From a Pi with External Drive
Use this section if your current StartOS Raspberry Pi uses an external drive over USB.
-
Stop every service on your Raspberry Pi server.
-
Shutdown your Raspberry Pi server and disconnect from power.
-
Connect your new server to power and ethernet.
-
Visit http://start.local on any computer on the same LAN.
-
Connect your previous storage drive to any USB-3 or USB-C port on your new server.
-
Select “Recover”.
-
Select “Transfer”.
-
On the “Transfer” screen, select the previous external storage drive.
-
On the “Select Storage Drive” screen, select your new storage drive. This is the internal drive of the new server.
-
Create a password for the new server. It can be the same as before.
-
Your data will now transfer. This can take minutes to hours, depending on how much data you have.
-
If you intend to re-purpose the Raspberry Pi as another StartOS server, be sure to first re-flash the microSD, then perform a fresh setup, which will wipe the SSD in the process. It is a good idea to wipe the SSD separately beforehand, just in case.
Warning
Do not power on the Raspberry Pi until you have successfully re-flashed the microSD. If you power it on as-is, it can cause serious problems, including loss of funds if you are running a lightning node.
From 2022 Embassy One (NASPi case)

-
Get a high quality USB-A to USB-A cable.
-
Power down the old server, then pull out the micro SD card.

-
Disconnect the USB adapter.
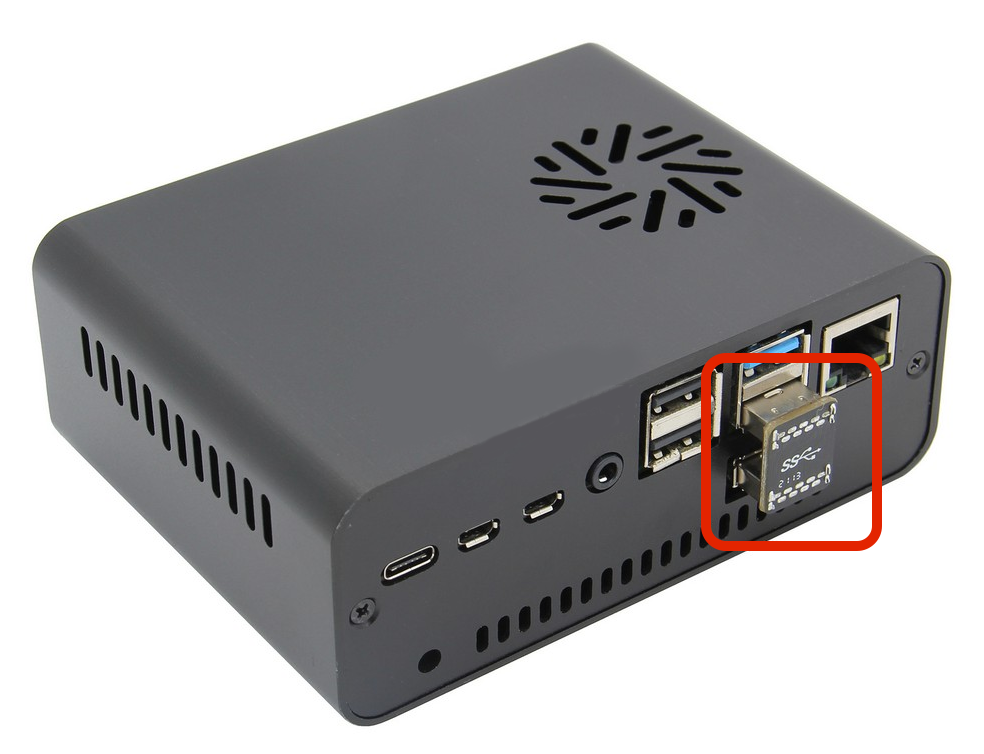
-
Connect one side of the USB-A cable to the lowest blue USB port on the old server, then the other side to a blue USB port on your new server.
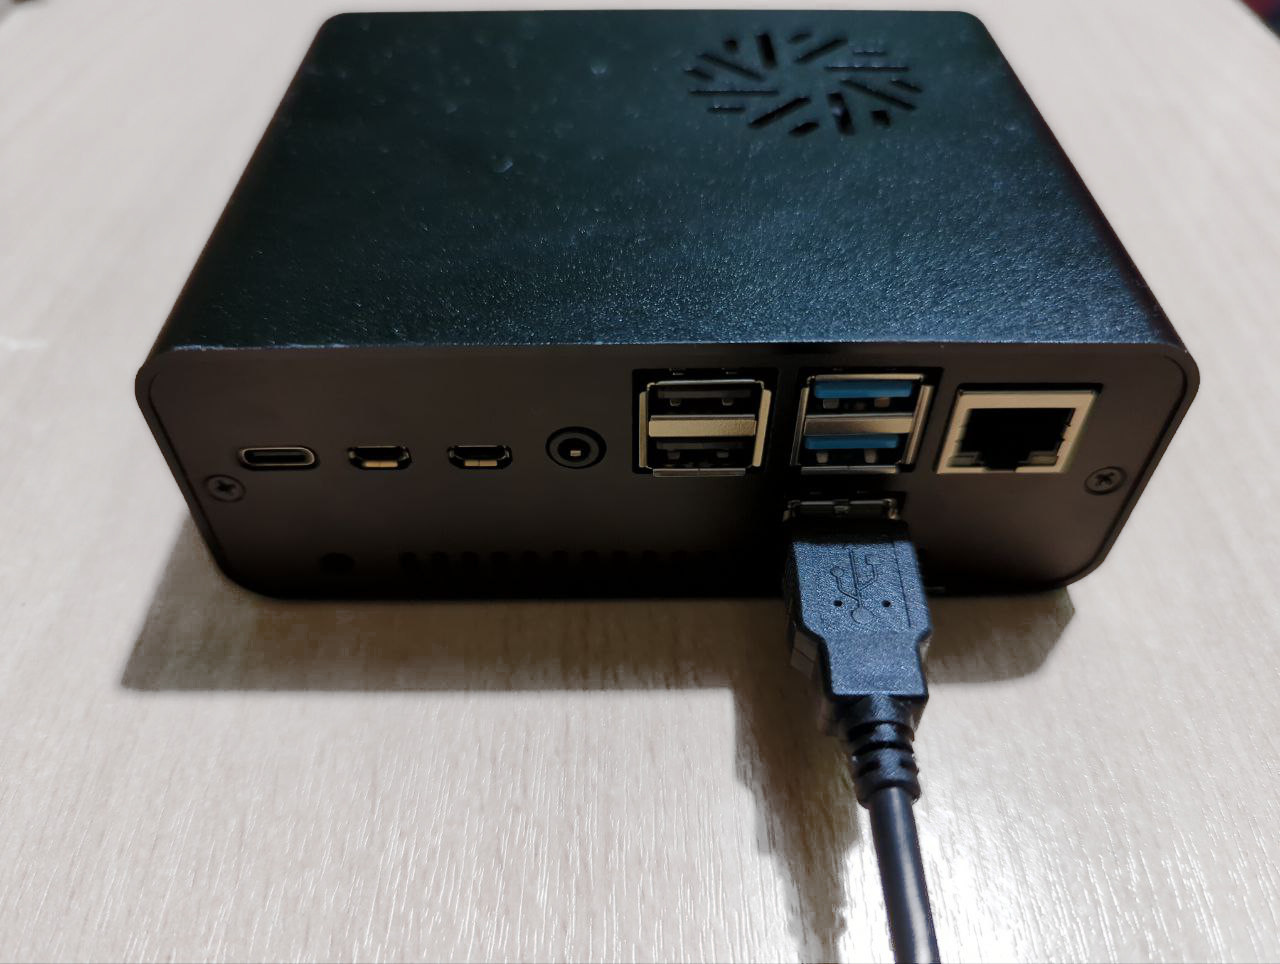
-
Power on the old server
-
The two servers are now tethered together, and the NASPi is now powered on.
-
Connect your new server to power and ethernet if not already and also power on.
-
Visit
http://start.localon any computer on the same LAN. -
Select “Recover”.
-
Select “Transfer”.
-
On the “Transfer” screen, Select the NASPi storage drive.
-
On the “Select Storage Drive” screen, select your new storage drive. This is the internal drive of the new server.
-
Create a password for the new server. It can be the same as before.
-
Your data will now transfer. This can take minutes to hours, depending on how much data you have.
-
If you intend to re-purpose the NASPi as another StartOS server, be sure to first reflash the microSD, then perform a fresh setup, which will wipe the SSD in the process.
Warning
Do not re-insert and power on the Raspberry Pi until you have successfully re-flashed the microSD. If you power it on with an unflashed microSD inserted, it can cause serious problems, including loss of funds if you are running a lightning node.
Migrating LND to StartOS
Warning
After migrating an LND wallet to StartOS, NEVER restart your old node. Turning on your old node can result in the broadcast of old channel states and potentially loss of funds!
This guide is for users seeking to migrate LND on-chain and lightning funds from a different node to StartOS easily and without closing channels. This migration will require two sets of hardware, your existing hardware you wish to migrate from, and the hardware running StartOS you are migrating to. Both devices must be running on the same LAN. The LND service on StartOS provides easy to use actions for users migrating from the below Node implementations:
- Umbrel (Both 1.x and 0.5)
- RaspiBlitz
- myNode
Instructions
-
First, you will need a fresh installation of LND on StartOS which has never been started. Starting the LND service will create a wallet; if there is an existing LND wallet on StartOS, LND will not allow any of the import actions to be run.
-
Select the action corresponding to the node you are migrating from and fill out the corresponding IP and password(s). If you are unsure of the IP address of your node, you may need to check your router.
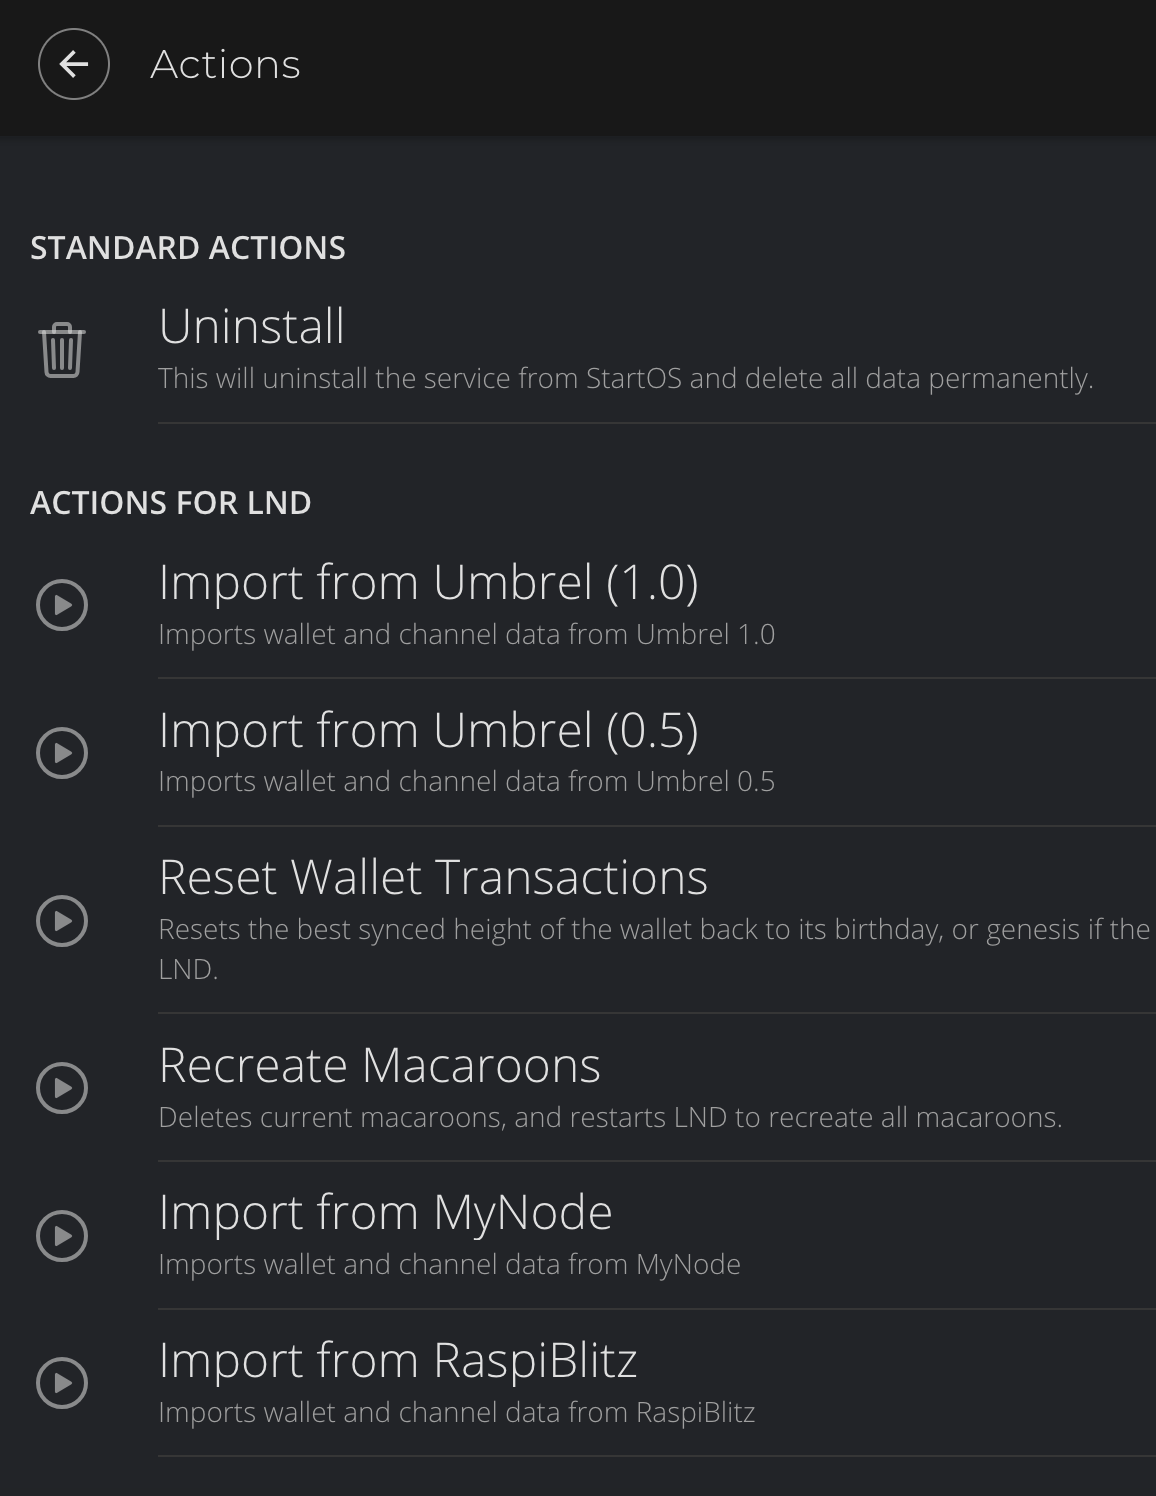
-
The migration action may take several minutes to complete. Once the action has completed and your old node has been unplugged, you may safely start LND on StartOS. Remember - NEVER restart your old node after the migration has completed!
Firefox Guides
Trusting your Root CA (Firefox)
These guides apply to Firefox, Firefox ESR, Librewolf, and Thunderbird. Mozilla apps need to be configured to use the certificate store of your device. Please refer to their blog post for an explanation (TLDR: for security purposes).
Contents
Mac / Windows
-
Open Firefox and enter
about:configin the URL bar. Accept any warnings that appear. -
Search for
security.enterprise_roots.enabledand set the value to “true”. -
Restart Firefox
Debian / Ubuntu
-
In the hamburger menu, click “Settings”. Search for
security devicesand select “Security Devices…” -
When the Device Manager dialog window opens, click “Load”.
-
Give the Module Name a title, such as “System CA Trust Module”. For the Module filename, paste in
/usr/lib/x86_64-linux-gnu/pkcs11/p11-kit-trust.soand hit “OK”.Tip
The path to p11-kit-trust.so will be slightly different if your processor’s architecture is not x86_64.
-
Verify that the new module shows up on the left hand side and click “OK” in the bottom right:
-
Restart Firefox
Android / Graphene
Warning
The regular Firefox app will not work. You must use `Firefox Beta Firefox Beta.
-
Go to
Menu > Settings > About Firefoxand tap the Firefox icon 5 times to enable “developer mode”. -
Go back to
Menu > Settings > Secret Settings(at the bottom), and tap “Use third party CA certificates”.
Arch / Garuda / CentOS / Fedora
No special steps required.
Enabling Tor (Firefox)
Contents
All Platforms
-
Ensure you have already followed instruction for running Tor on your platform.
-
Open Firefox and enter
about:configin the URL bar. Accept any warnings that appear. -
Search for
dom.securecontext.allowlist_onionsand set the value to “true”.
Mac
-
Ensure you have completed the steps under All Platforms.
-
In the main hamburger menu, click “Settings”.
-
Using the search bar, enter
proxy, then selectSettings.... -
Select both boxes:
Use System Proxy SettingsandProxy DNS when using SOCKS v5. -
Click “OK”.
-
Restart Firefox.
-
Test that Firefox can resolve
.onionURLs by visiting Start9’s Tor website: http://privacy34kn4ez3y3nijweec6w4g54i3g54sdv7r5mr6soma3w4begyd.onion.
Linux
Warning
If you cannot connect after following this guide, your Firefox may be installed in a jailed environment, such as an AppImage, Flatpak, or SNAP. Ubuntu uses a SNAP for Firefox, so you may experience issues on Ubuntu-based systems. Please install Firefox via an alternate method that does not isolate Firefox from the wider filesystem.
-
Ensure you have completed the steps under All Platforms.
-
You need a
Proxy Auto Configfile to inform Firefox how to resolve.onionURLs. You can get Start9’s standard file from a terminal, by using the following command:wget -P ~/ https://start9.com/assets/proxy.pac -
Determine the full path of
proxy.pac, which we will use later, by executing the following command in the terminal, and copying its output to your clipboard:echo file://$HOME/proxy.pac -
In the main hamburger menu, click “Settings”.
-
Using the search bar, enter
proxy, then selectSettings.... -
Select
Automatic proxy configuration URL, then paste the path copied from above. Be aware, the triple///is intentional, and your path will be different from the one below - namely, YOUR_LINUX_USERNAME will be your actual linux username:file:///home/YOUR_LINUX_USERNAME/proxy.pac -
Select the box
Proxy DNS when using SOCKS v5. -
Click
OK. -
Restart Firefox.
-
Test that Firefox can resolve
.onionURLs by visiting Start9’s Tor website: http://privacy34kn4ez3y3nijweec6w4g54i3g54sdv7r5mr6soma3w4begyd.onion.
Windows
-
Ensure you have completed the steps under All Platforms.
-
You need a
Proxy Auto Configfile to inform Firefox how to resolve.onionURLs. Click here to get the one offered by Start9. Save it somewhere you will not delete it, and remember where you save it. For example:C:\Program Files\Tor Browser\proxy.pac -
In the main hamburger menu, click “Settings”.
-
Using the search bar, enter
proxy, then selectSettings.... -
Select the box
Automatic proxy configuration URL, then paste in the path to your PAC file from earlier, prefixed withfile://and with all backslashes (\) replaced by forward slashes (/). For example:file://C:/Program Files/Tor Browser/proxy.pac -
Select the box
Proxy DNS when using SOCKS v5. -
Click
OK. -
Restart Firefox.
-
Test that Firefox can resolve
.onionURLs by visiting Start9’s Tor website: http://privacy34kn4ez3y3nijweec6w4g54i3g54sdv7r5mr6soma3w4begyd.onion.
Android/Graphene
-
Ensure you have completed the steps under All Platforms.
-
You need a
Proxy Auto Configfile to inform Firefox how to resolve.onionURLs. Click here to get the one offered by Start9. -
Search for
network.proxy.autoconfig_url, and set the value tofile:///storage/emulated/0/Download/proxy.pac. This is the default location of a the proxy.pac file downloaded above, although your path may vary. -
Search for
network.proxy.typeinto the search bar, and set the value to2: -
Search for
network.proxy.socks_remote_dns, and set the value totrue. -
Search for
network.http.referer.hideOnionSourceand set the value totrue -
(GrapheneOS users only): Head to
Settings -> Apps -> Firefox Beta -> Permissions -> Photos and videos -> Configure Storage Scopes -> ADD FILE, then navigate to where you placed the proxy.pac file. -
Test that Firefox can resolve
.onionURLs by visiting Start9’s Tor website: http://privacy34kn4ez3y3nijweec6w4g54i3g54sdv7r5mr6soma3w4begyd.onion.
Thunderbird Guides
Contents
Trusting Your Root CA
-
Ensure you have already trusted your Root CA.
-
In the Thunderbird hamburger menu, click
Settings. -
Using the search bar, enter
config, then selectConfig Editor.... -
Using the new search bar, search for
security.enterprise_roots.enabled, and set the value totrue.
Enabling Tor
Mac
- Once you have configured Mac for Tor, no additional steps are required.
Linux
-
Ensure you have already configured Linux for Tor.
-
You need a
Proxy Auto Configfile to inform Firefox how to resolve.onionURLs. You can get Start9’s standard file from a terminal, by using the following command:wget -P ~/ https://start9.com/assets/proxy.pac -
Determine the full path of
proxy.pac, which we will use later, by executing the following command in the terminal, and copying its output to your clipboard:echo file://$HOME/proxy.pac -
In the Thunderbird hamburger menu, click
Settings. -
Using the search bar, enter
proxy, then selectSettings.... -
Select
Automatic proxy configuration URL, then paste the path copied from above. Be aware, the triple///is intentional, and your path will be different from the one below - namely, YOUR_LINUX_USERNAME will be your actual linux username:file:///home/YOUR_LINUX_USERNAME/proxy.pac
Windows
-
Ensure you have already configured Windows for Tor.
-
You need a
Proxy Auto Configfile to inform Firefox how to resolve.onionURLs. Click here to get the one offered by Start9. Save it somewhere you will not delete it, and remember where you save it. For example:C:\Program Files\Tor Browser\proxy.pac -
In the Thunderbird hamburger menu, click
Settings. -
Using the search bar, enter
proxy, then selectSettings.... -
Select the box
Automatic proxy configuration URL, then paste in the path to your PAC file from earlier, prefixed withfile://and with all backslashes (\) replaced by forward slashes (/). For example:file://C:/Program Files/Tor Browser/proxy.pac
📦 Packaging Guide
Introduction
StartOS is a Server OS. It is a Linux distro that is optimized for administering servers. Mac, Windows, iOS, Android, and other Linux distros, such as Debian and Ubuntu, are optimized for administering clients, such as phones or laptops. Using these operating systems to administer a server requires “popping the hood” and using the command line. Server administration involves compiling software, permissioning file systems, editing configuration files, managing dependencies, configuring network interfaces, generating certificates, monitoring health, creating backups, etc etc. It is a serious undertaking that requires significant time and expertise. For developers and system administrators, StartOS provides huge time savings over traditional Linux workflows. For everyone else, it makes administering a server possible.
The StartOS graphical interface is a private website, accessible from a local monitor or remote web browser. Through it, users can discover, download, install, configure, monitor, back up, and generally manage any variety of self-hosted, open-source software.
What makes this experience possible is a unique package format that permits services/apps/nodes to take advantage of StartOS APIs. In its most basic form, a package is just a thin metadata wrapper around a service that allows it to be discovered, installed, and run on StartOS. Beyond that, StartOS APIs grant developers an incredible degree of creative capacity to define the end-user experience for their service. Developers can:
- display instructions and tool tips
- present alerts and warnings under certain conditions
- run arbitrary code on install, update, and uninstall
- represent configuration files as validated forms with all varieties of form inputs
- define command line scripts and commands that present as buttons with optional inputs
- write health checks that run on an interval and are optionally displayed
- automatically install and configure dependencies
- maintain state and optionally expose particular values to users or dependent services
- grant users flexible networking options such as LAN (.local + IP/port), Tor (.onion), and clearnet
- offer one-click, encrypted backups of targeted data
- and more…
In the next section, we will explore the StartOS APIs and how to access them using type safe Start-SDK.
Environment Setup
StartOS machine
You will need a computer running StartOS to test your package. Follow the flashing guide to install StartOS on a physical device or VM.
Docker
Docker is essential for building and managing container images that will be used for final .s9pk build. It handles:
- Pulling base images for your service containers
- Building custom container images from Dockerfiles
Make
Make is a build automation tool that streamlines the package creation process and it is used to:
- Execute build scripts defined in Makefiles
- Coordinate the packaging workflow
- Build and install s9pk binaries to StartOS
- Automate repetitive development tasks
Node.js v22 (Latest LTS)
Node.js is required for compiling TypeScript code used in StartOS package configurations.
SquashFS
SquashFS is used to create compressed filesystem images that package your compiled service code.
Installation:
Linux (Debian-based)
sudo apt install squashfs-tools squashfs-tools-ng
macOS
Make sure you have Homebrew installed, then:
brew install squashfs
Start CLI
start-cli is the core development toolkit for building StartOS packages and provides:
- Package validation and verification
- s9pk file creation and assembly
- Development workflow management
- Integration with StartOS systems
Installation:
The easiest way to install start-cli is using our automated installer script:
curl -fsSL https://start9labs.github.io/start-cli/install.sh | sh
Quick Start
Environment Setup
Ensure you have completed every step of environment setup.
Generate your Package Repository
-
Access the Hello World Template
-
Click
Use this template > Create new repository. You must be signed into Github to see this button.
-
Name your repository. The name should be
[service-name]-startos. For example, NextCloud isnextcloud-startosand Lightning Terminal islightning-terminal-startos. -
For the repository description, enter “StartOS package for [Service Name]”.
-
Make sure the repository is Public.
-
Click “Create Repository”.
Clone your Package Repository
From the command line of your local work machine, run the following commands:
git clone [your-repository-url]
cd [repository-name]
npm i
Build and Install your Package
make
This produces a [service-id].s9pk at the root of your project that can be sideloaded through the StartOS UI.
See Building and Installing for more options and to streamline your development workflow.
Project Structure
/
├── assets/
├── docs/ (optional)
├── startos/
├── .dockerignore
├── .gitignore
├── Dockerfile (optional)
├── icon.svg
├── LICENSE
├── Makefile
├── package-lock.json
├── package.json
├── README.md
└── tsconfig.json
.dockerignore, .gitignore, Makefile, package-lock.json, package.json, and tsconfig.json
These are boilerplate files that generally do not require editing.
Dockerfile (optional)
It is recommended to pull an existing Docker image as shown in Hello World. If necessary, you can define a custom image using this Dockerfile.
icon.svg
This is the icon for your package. In most cases, it will be the upstream service icon. Maximum file size is 40 KiB. Supported extensions are .svg, .png, .jpg, and .webp.
LICENSE
This is the software license for your package. In most cases, it will be the upstream license. If your package contains multiple upstream services with different licenses, you should select the more restrictive license.
README.md
This is largely boilerplate. Update as needed for your service, including replacing references to Hello World.
assets/
Use the /assets directory to include additional files or scripts needed by your service. For example, a Python script that generates a default config file for the service. It should rarely be necessary to use this directory.
docs/
Optionally use the /docs directory to store an instructions.md file or an entire set of documentation, structured however you want. When creating your service manifest, set docsUrl to the URL where this directory will eventually be published. For example, if using GitHub, the URL would likely be https://github.com/<GITHUB_USERNAME>/<REPO>/blob/master/docs, assuming you publish to branch master.
startos/
startos/
├── actions/
├── fileModels/
├── init/
├── install/
├── backups.ts
├── dependencies.ts
├── index.ts
├── interfaces.ts
├── main.ts
├── manifest.ts
├── sdk.ts
└── utils.ts
The startos/ directory is where you take advantage of the StartOS SDK and APIs.
backups.ts
setupBackups() is where you define what volumes to back up as well as what directories or files to exclude from backups.
dependencies.ts
setupDependencies() is where you define any dependencies of this package, including their versions, whether or not they need to be running or simply installed, and which health checks, if any, need to be passing for this package to be satisfied.
index.ts
This file is just plumbing, used for exporting package functions to StartOS.
interfaces.ts
setupInterfaces() is where you define the service interfaces and determine how they are exposed. This function will execute on service install, update, and config save. It takes the user’s config input as an argument, which will be null for install and update.
main.ts
setupMain() is where you define the daemons that define your service’s runtime, it runs each time the service is started. Daemon comes with built-in health checks that can optionally be displayed to the user. You can also use setupMain() to define additional health checks, such as tracking and displaying a sync percentage.
manifest.ts
setupManifest() is where you define static metadata about the service, such as ID, name, description, release notes, helpful links, volumes, (software) images, hardware requirements, alerts, and dependencies.
sdk.ts
This file is plumbing, used to imbue the generic Start SDK with package-specific type information defined in manifest.ts and store.ts. The exported SDK is what should be used through the startos/ directory. It is a custom SDK just for this package.
utils.ts
This file is for defining constants and functions specific to your package that are used throughout the code base. Many packages will not make use of this file.
actions/
actions/
├── index.ts
├── action1.ts
└── action2.ts
In the actions/ directory, you define custom actions for your package.
Actions are predefined scripts that display as buttons to the user. They accept arbitrary input and return structured data that can be optionally displayed masked or as QR codes. For example, a config.ts action might present a validated form that represents an underlying config file of the service, allowing them to configure the service without needing SSH or the command line. A resetPassword action could use the upstream service’s CLI to generate a new password for the primary admin, then display it to the user.
Each action receives its own file and is also passed into Actions.of() in actions/index.ts
fileModels/ (optional)
fileModels/
├── store.json.ts
└── config.json.ts
In the fileModels/ directory, you can create separate .ts files from which you export a file model for each file from the file system you want to represent. Supported file formats are .yaml, .toml, .json, .env, .ini, .txt. For alternative file formats, you can use the raw method and provide custom serialization and parser functions.
These .ts files afford a convenient and type safe way for your package to read, write and monitor, and react to file on the file system.
It is common for packages to have a store.json.ts file model as a convenient place to persist arbitrary data that are needed by the package but not persisted by the upstream service. For example, you might use store.json to persist startup flags or login credentials.
init/
init/
├── index.ts
├── customInitFn1.ts
└── customInitFn2.ts
In the init/ directory, you define the container initialization sequence for your package as well as optional custom init functions.
Containers initialization takes place under the following circumstances:
- Package install (including fresh install, update, downgrade, and restore)
- Server (not service) restart
- “Container Rebuild” (an built-in Action that must be manually triggered by the user)
Note: starting or restarting a service does not trigger container initialization. Even if a service is stopped, the container still exists with event listeners still active.
index.ts
setupInit() is where you define the specific order in which functions will be executed when your container initializes.
-
restoreInitandversionGraphmust remain first and second. Do not move them. -
setInterfaces,setDependencies,actionsare recommended to remain in this order, but could be rearranged if necessary. For example, if setInterfaces depends on your package dependencies, you should run setDependencies before setInterfaces, though this would be a highly unusual circumstance. -
Any custom init functions can be appended to the list of built-in functions above, or even inserted between them. For example, if you wanted to run a custom init function prior to creating your actions that might affect which actions get created, you would insert that function between
setDependenciesandactions. Most custom init functions are simply appended to the list.
Finally, it is possible to limit the execution of custom init functions to specific kinds of initialization. For example, if you only wanted to run a particular init function on fresh install and ignore it for updates and restores, setupOnInit() provides a kind variable (one of install, update, restore) that you can use for conditional logic. kind can also be null, which means the container is being initialized due to a server restart or manual container rebuild, rather than installation.
install/
install/
├── versions/
└── versionGraph.ts
In the install/ directory, you will manage package versions and also define pre-install and migration logic.
versionGraph.ts
VersionGraph.of() is where you index the current version as well as other versions of your package. Lastly, the function accepts a preInstall argument where you can define custom logic to run once, before anything else, on initial installation only. A common use case of the preInstall function is to seed files that other init functions expect to exist.
versions
versions/
├── index.ts
├── v1_0_3_2.ts
└── v1_0_2_0.ts
In the versions/ directory, you will create a new file for each new package version. In each version file, use VersionInfo.of() to provide the version number, release notes, and any migrations that should run.
Similar to preInstall migration up and down functions run once, before anything else, upon updating or downgrading to that version only.
All versions should then be provided in index.ts, either as the current version or list of other versions.
Important note: migrations are only for migrating data that is not migrated by the upstream service itself.
Building and Installing
Default Build (Universal)
make
Builds a universal package supporting all platforms. Same as running make all.
Platform-Specific Builds
make aarch64   # Build for ARM64 (Raspberry Pi, etc.)
make x86_64    # Build for x86_64 architecture
Note: For convenience, legacy targets
make armandmake x86are also supported as aliases foraarch64andx86_64respectively. Using the full architecture name is recommended for clarity.
Installing
make install
Builds the package and installs it directly to your configured StartOS device.
Requires a valid ~/.startos/config.yaml with a host: http://<device>.local entry.
Summary of Commands
| Target | Description |
|---|---|
make or make all | Build universal package for all platforms |
make aarch64 | Build ARM64-only package |
make x86_64 | Build x86_64-only package |
make install | Build and install to StartOS device |
make clean | Remove build artifacts (.s9pk, JS build, node_modules) |
Tandem Operations
You can chain multiple commands:
make clean aarch64          # Clean, then build ARM64 package
make clean x86_64 install   # Clean, build x86_64 package, then install
make clean install          # Clean, build universal, then install
Example Outputs
Building aarch64 package:
$ make aarch64
   Re-evaluating ingredients...
   Packing 'albyhub_aarch64.s9pk'...
✅ Build Complete!

📦 Alby Hub   v1.19.3:1-alpha.0
───────────────────────────────
 Filename:   albyhub_aarch64.s9pk
 Size:       7M
 Arch:       aarch64
 SDK:        0.4.0-beta.36
 Git:        78c30ec776f6a9d55be3701e9b82093c866a382c
Note: If you have uncommitted changes, the Git hash will be shown in red.
Installing aarch64 package:
$ make aarch64 install

🚀 Installing to working-finalist.local ...
Sideloading 100% ███████████████████████████████
  Uploading...
  Validating Headers...
  Unpacking...
Cleaning build artifacts:
$ make clean
Cleaning up build artifacts...
Important Info
contents
start-sdk embedded docs
When working with start-sdk in a package codebase, hover states reveal descriptions, type definitions, and example usages of just about everything. If you are wondering what a function does or how to use, hovering over the function name. If you are wondering what attributes can be included in an object, press ctrl + space inside the object.
Container init
Service containers are initialized when:
- When the service is freshly installed
- When the service is updated or downgraded
- On StartOS boot
- If the user manually triggers a rebuild
File Models
Many services have configuration files, such as a config.toml. With start-sdk, these files can and should be represented as “File Models” in the file-models directory. Here you create a Typescript definition of the file, providing type protection throughout the codebase. File Models can also enforce types at runtime. For example, if a json file expects a “name” key to be a string and the user uses SSH to enter a number instead, you can coerce the value back to a string and protect the user from themselves. File Models provide automatic parsing/serialization for .json, .yaml, .toml, .ini, and .env. For custom file types (e.g. .conf) you can provide a custom parser/serializer.
Reading files
File Models have a read() method that take an optional mapping if you only care to read a subset of the file.
FileModel.read().once()will return the entire fileFileModel.read(f => f.users).once()will return only the contents of “users”.
Options for reading
When you access a File Model or Store value, you must choose between:
.once(): returns the parsed file or Store value and nothing else..const(effects): returns the parsed file or Store value, and registers an OS task to re-run the context function if the file or nested value of interest changes. For example, if you didFileModel.read(f => f.name).const(effects)insetupInterfaces(), thensetupInterfaces()would re-run whenever “name” changes..onChange(effects): registers an OS tak to run a callback function that accepts the new file or value. For example,FileModel.read().onChange((file) => { // do stuff })watch(effects): returns an async iterator of the new file or value.
🎥 Community Content Program
Community Content Program
Start9 builds tools for people who want to self-host and take responsibility for their data and communications.
Clear documentation and practical education are a critical part of that work.
Anyone is welcome to contribute videos that support StartOS documentation and real-world use. Contributions are reviewed for clarity, accuracy, and relevance, and contributors may work towards becoming Certified Creators.
Certified contributions may be embedded in the documentation or shared through Start9 channels, helping surface creators’ work to a broader audience, and in some cases be eligible for bounties.
Video Guidelines
Videos should be clear, accurate, and aligned with the Start9 documentation or StartOS/StartTunnel use cases.
Videos are welcomed in these two main categories:
Instructional videos
- Help a user complete a specific task successfully
- Make prerequisites and outcomes clear
- Show how to confirm the task worked as expected
Exploratory or conceptual videos
- Explain the purpose or design of a system or tool
- Provide context for when and why it is used
- Clarify tradeoffs or common points of confusion
Accuracy and clarity should always come first. Analogies, comparisons and/or examples are optional but encouraged when they improve understanding.
How to Become a Certified Creator
- Pick a topic from the video wishlist.
- Create a short, focused video that follows the documentation and video guidelines.
- Submit the video for review.
- Make any requested changes for clarity or accuracy.
- Once approved, you’ll be considered a Certified Creator for future submissions.
Video Wishlist
This wishlist is based on the current Start9 documentation and highlights areas where video walkthroughs would be helpful.
It’s not meant to be a fixed list. As videos are created, documentation changes, and new ideas come up, this page will be updated over time.
If you have an idea for a video that fits the docs or helps explain how StartOS is used in the real world, feel free to submit it.
Videos Aligned With docs.start9
User Manual
- Connecting Locally
- Connecting Remotely (VPN): Mac, Linux, Windows, Android/Graphene, iOS
- Connecting Remotely (Tor)
- Installing Services
- DNS
- Private Domains
- Creating Backups - Overview
- Creating a Backup: Mac, Windows, Linux, Synology, TrueNAS
- Restoring Backups
- Updating StartOS
- Sending Emails
- SSH
Flashing Guides
- Flashing Firmware - Server Pure
- Flashing Firmware - Server One
- Flashing StartOS -X86_64 / Arm
- Flashing StartOS - Raspberry Pi
Service Guides
Bitcoin / Electrs
- Wallet Integrations - Many wallets to demonstrate
- Blockchain Migration
Jellyfin
- What is it, how you use it
- Device Apps
Lightning
- Opening Channels
- Getting Inbound Liquidity
- Core Lightning (CLN)
- LND
- Using Alby Hub
- Using LNbits
Matrix
- What it is, how to use it
Nextcloud
- What it is, how to use it
- Device Setup
- Apps & Integrations
Nostr
- Nostr RS Relay
- noStrudel
Vaultwarden
- Initial Setup
- Client Setup
- Organizations
Misc Guides
- Setting up Dynamic DNS
- Getting SMTP Credentials
- Resetting Your Password
- Upgrading from a Raspberry Pi
- Migrating LND to StartOS
- Thunderbird Guides
Packaging Guides
- Helpful walk through on how to package services
Help
- Common issues
Submission & Bounties
If you are interested in contributing a video, please start by submitting your idea or finished work for review.
Send submissions or questions to: content@start9.com
❓ Help
Common Issues
Contents
- I do not have access to Ethernet
- StartOS boots into Diagnostic Mode
- During initial setup, I am unable to connect to “start.local”
- I am unable to connect to my server’s “custom-address.local” URL
- I am unable to connect to my server’s “xxxxxxxxxxxxxxxxxx.onion” URL
- Request Error
- Clock Sync Failure
- Issue with a particular service
- Common Speaker Noises
I do not have access to Ethernet.
Ethernet is necessary to set up a StartOS server. If you do not have access to an Ethernet connection, such as in a school or office setting, you can use a WiFi extender to connect to the local WiFi network, then connect your server to the extender using Ethernet. The WiFi extender below has been tested to work with StartOS, but other extenders should also work.
StartOS boots into “Diagnostic Mode”
If you encounter Diagnostic Mode, your best bet is stop clicking and contact support.
During initial setup, I am unable to connect to “start.local”.
-
Confirm that the server is plugged into power and Ethernet
-
Confirm your phone/computer is not connected to a “Guest” network
-
Confirm you are not using the Tor Browser.
-
Confirm your phone/computer is not using a VPN, or that if you are, that it allows LAN connections, such as the examples below:
- Mullvad - Go to
Settings -> VPN Settings -> Local Network Sharing - ProtonVPN - Go to
Preferences -> Connection -> Allow LAN Connections
- Mullvad - Go to
-
Very rarely, your firewall settings may block mDNS. In this case:
- From your browser, navigate to your router configuration settings. This is usually an IP address such as 192.168.1.1. A simple web search will usually reveal how to access the router configuration settings for a particular brand.
- Once in the router config settings, find the section that lists the devices on your network. You should see a device labeled
start. Take note of the associated IP address and enter it into your browser’s URL field to enter the setup.
-
Log into your router (the directions for which can be found with a simple web search for your router model and ‘how to log in’). Once you are in your router, find the device labeled “start”, and visit its associated IP address, which will look something like:
192.168.1.9
I am unable to connect to my server’s “custom-address.local” URL
-
First, try :ref:
these step <setup-troubleshoot>. In none resolve the issue, continue below. -
Hard refresh the browser:
- Linux/Windows:
ctrl+shift+R - macOS Firefox:
cmd+shift+R - macOS Safari:
cmd+option+E, thencmd+R
- Linux/Windows:
-
Make sure you have successfully followed the :ref:
connecting-laninstructions for your device. -
If you are using Windows, the problem is almost certainly with Bonjour. Follow the :ref:
directions to reinstall <connecting-lan-windows>, even if you have already done so. -
If using Firefox from Mac, Windows or Android, ensure you have set
security.enterprise_roots.enabletotrueinabout:configper the :ref:instructions<ca-ff> -
Try connecting using your server’s IP address or Tor address. If this works, it means your issue is specific to .local. Try clearing your browser cache and/or restarting your phone/laptop/router. If all fails, try restarting your server.
-
Try connecting using a different browser on the same device. If this works, it means you need to clear cache on your current browser.
-
Try connecting using a different device. If this works, it means you need to clear cache on your current browser and/or restart your current device.
-
Try visiting start.local. Your server may be in diagnostic mode.
-
Try restarting your router.
-
Try restarting your server. Be patient and give it plenty of time to come back online.
I am unable to connect to my server’s “xxxxxxxxxxxxxxxxxx.onion” URL
- Tor can be slow and unreliable. Often, the solution to poor connectivity is just to wait an hour and try again.
- Try connecting using the official Tor Browser. If this works, it means the issue is with (1) your current browser or native app, (2) the Tor daemon running on your phone/laptop. Try clearing cache and restarting things.
- Try connecting to your server using its “custom-address.local” URL or its IP address. If this works, it means the issue is specific to Tor on your server. Check out your Tor logs (System -> Tor Logs). If you see errors, such as Tor stuck bootstrapping, navigate to
System -> Experimental Features -> Reset Tor.
Request Error
This means your client device failed to connect to the server. This can happen for a variety of reasons. The best course of action is:
- Check your local Internet connection.
- Hard refresh the browser.
- Clear the browser cache/history.
- Try using a different address for your server. For example, if you are using your .onion address, try using your .local or IP address instead. If you are using your .local address, try using your .onion or IP address.
- Try from another client device. If the second client works, then you know the issue is with your first client. If the seconds client does not work, then you know the issue is either with your clients’ network or with your server.
- If after completing the steps above, you still cannot connect using any address from any client, then you will likely need to manually power cycle the server.
- If power cycling the server does not resolve the issue, please contact support.
Clock Sync Failure
This means your server was unable to sync its clock with the Internet using the Network Time Protocol (NTP). This is usually due to a firewall issue with your network/router. Make sure you are not blocking NTP. If the issue persists, please contact support.
Issue with a particular service
If a service is misbehaving or crashing, check the logs for that service. Look for any errors that might explain the problem. Often, the solution is to restart the service by clicking “Restart”. If the issue persist, contact support.
Common Speaker Noises
The Server Pure (2023 and older) and and Server One (2022 and older) have an internal speaker. Below are the meanings of various noises.
-
bep: Server is starting up
-
chime: Server is ready
-
double/triple bep: Server is updating
-
flatline: Server initialization failed / no network connection
-
Beethoven’s 5th: Something has gone wrong. Visit
http://start.localto view Diagnostic Mode and contact support.
Contact
Please visit https://start9.com/contact for contact information.